Debugging SendBird Chat

CHALLENGE: testing different types of messages directly from chat
SOLUTION: use sendBirdSelectors.getSendUserMessage and React Logger
Debugging Messages
You can define different customTypes for messages and append custom data. Special messages are usually composed in the backend and sent to chat via API. Backend can communicate with Chat using webhooks. In this article, we will focus only on the frontend part – Chat in React.
UIKit for React
For testing purposes, we’re going to build a simple chat with channel settings. UIKit for React uses the following dependencies:
React 16.8.0 or higher
React DOM 16.8.0 or higher
Sendbird Chat SDK for JavaScript 3.0.117 or higher
css-vars-ponyfill 2.3.2
date-fns 2.16.1
In practice, it is enough to paste this line:
npm install sendbird-uikit
React Logger
To log all events in Console we’re going to add config={{ logLevel: ‘all’ }} to SendBirdProvider. There are also other levels that will report fewer events:
| Level | Description |
| info (gray) | Logs general events of UIKit. |
| warning (orange) | Logs unexpected events which wouldn’t affect the operation of UIKit, but might cause problems. |
| error (red) | Logs the things that have caused failures in specific events, but not an UIKit-wide failure. |
| all (respective to level) | Logs all detailed information of events and activities, including info, warning, and error. The values of all and debug work the same way. |
Example (demo)
Make sure to change APP_ID, USER_ID and CHANNEL_URL. Sendbird UIKit for React is a development kit that enables fast and easy integration. Components can be fully customized to create an in-app chat experience. Currently, UIKit for React now supports both group channels and open channels. Our example is connecting to one group channel. For more advanced examples, we recommend the Official Documentation and Community Forum
// App.jsx
import React from "react";
import {
    SendBirdProvider,
    Channel,
    ChannelSettings
} from 'sendbird-uikit';
import "sendbird-uikit/dist/index.css";
import './App.css';
import {DebugHelper} from "./DebugHelper";
const APP_ID = "AAA";
const USER_ID = "BBB";
const CHANNEL_URL = "CCC";
export default function App() {
  return (
      <div className="App">
          <SendBirdProvider appId={APP_ID} userId={USER_ID} config={{ logLevel: 'all' }}>
              <div style={{ display: 'flex', height: '100%' }}>
                  <Channel channelUrl={CHANNEL_URL} />
                  <ChannelSettings channelUrl={CHANNEL_URL} />
              </div>
              <DebugHelper channelUrl={CHANNEL_URL} />
          </SendBirdProvider>
      </div>
  );
}
Some additional styles to make the chat full window height:
/**
App.css
 */
.App {
  font-family: sans-serif;
  text-align: center;
  height: calc(100vh - 100px);
}
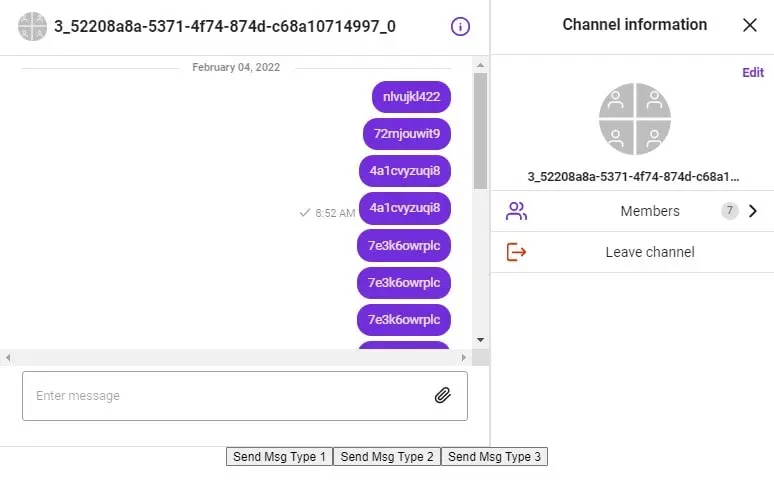
For testing different types of messages with custom data we’ve prepared a Debug Tool component that will sendMessage into the channel. It can be useful when testing the rendering of different messages. After clicking 3 buttons placed below the chat, SendMessage will be triggered.
// DebugHelper.jsx
import React, {useState, useEffect} from 'react';
import SendMessageWithSendBird from "./SendMessage";
export const DebugHelper = (props) => {
    const {channelUrl} = props;
    const [sendMsgType1, setMsgType1] = useState(false);
    const [sendMsgType2, setMsgType2] = useState(false);
    const [sendMsgType3, setMsgType3] = useState(false);
    useEffect(() => {
        return () => {
            setMsgType1(false);
            setMsgType2(false);
            setMsgType3(false);
        };
    }, [sendMsgType1, sendMsgType2, sendMsgType3]);
    const randomText = (Math.random().toString(36)).slice(2, 44);
    const msg1ExtraData = "{\"msgButtons\":[\"Button1\"]}";
    const msg2ExtraData = "{\"question_id\":14,\"type\":2 }";
    const msg3ExtraData = "{\"image\":\"https://picsum.photos/200\" }";
    return (
        <>
            <button onClick={() => setMsgType1(true)}>Send Msg Type 1</button>
            {
                sendMsgType1 &&
                <SendMessageWithSendBird msg={randomText} customType="type1" extraData={msg1ExtraData} channelUrl={channelUrl} />
            }
            <button onClick={() => setMsgType2(true)}>Send Msg Type 2</button>
            {
                sendMsgType2 &&
                <SendMessageWithSendBird msg={randomText} customType="type2" extraData={msg2ExtraData} channelUrl={channelUrl} />
            }
            <button onClick={() => setMsgType3(true)}>Send Msg Type 3</button>
            {
                sendMsgType3 &&
                <SendMessageWithSendBird msg={randomText} customType="type3" extraData={msg3ExtraData} channelUrl={channelUrl} />
            }
        </>
    );
}
And the final needed element – SendMessage – which uses withSendBird. withSendBird() is an HOC (A higher-order component) that helps you access data and internally supports the Channel, ChannelList and ChannelSettings.
// SendMessage.jsx
import React, { useEffect } from "react";
import {
    withSendBird,
    sendBirdSelectors,
} from "sendbird-uikit";
const CustomComponent = (props) => {
    const {
        msg,
        customType,
        channelUrl,
        extraData,
        sendMessage,
        updateLastMessage,
        sdk,
    } = props;
    const sendSelectTypeMessage = (msg, customType, channelUrl, extraData = null) => {
        const params = new sdk.UserMessageParams();
        if(!msg){
            return;
        }
        if(customType){
            params.customType = customType;
        }
        params.message = msg;
        if(extraData){
            params.data = extraData;
        }
        sendMessage(channelUrl, params)
            .then(message => {
            })
            .catch(e => {
                console.warn(e);
            });
    }
    useEffect(() => {
        sendSelectTypeMessage(msg, customType, channelUrl, extraData);
    });
    return(
        <></>
    );
};
const SendMessageWithSendBird = withSendBird(CustomComponent, (state) => {
    const sendMessage = sendBirdSelectors.getSendUserMessage(state);
    const updateLastMessage = sendBirdSelectors.getUpdateUserMessage(state);
    const sdk = sendBirdSelectors.getSdk(state);
    return ({
        sendMessage,
        updateLastMessage,
        sdk
    });
});
export default SendMessageWithSendBird
Debugging SendBird
Having logger enabled, we can easily check the Developer Console and see all the events logged there. Every channel’s properties are visible, using lastMessage property you will see the object responsible for a recently sent message. Example message object properties:
{
    "messageId": 1596437856,
    "messageType": "user",
    "channelUrl": "sendbird_group_channel_136307973_9b2a10c9d7b59fa029c6cb313d0fc572974a803c",
    "data": "{\"question_id\":14,\"type\":2 }",
    "customType": "type2",
    "silent": false,
    "createdAt": 1643965698240,
    "updatedAt": 0,
    "channelType": "group",
    "metaArrays": [],
    "reactions": [],
    "mentionType": "users",
    "mentionedUsers": [],
    "mentionedUserIds": [],
    "sendingStatus": "succeeded",
    "parentMessageId": 0,
    "parentMessageText": null,
    "threadInfo": {
    "replyCount": 0,
        "mostRepliedUsers": [],
        "lastRepliedAt": 0,
        "updatedAt": 0
},
    "isReplyToChannel": false,
    "parentMessage": null,
    "ogMetaData": null,
    "isOperatorMessage": false,
    "appleCriticalAlertOptions": null,
    "reqId": "1643964170021",
    "_isAutoResendRegistered": false,
    "message": "rcxg4gyfdb",
    "_sender": {
    "nickname": "Client",
        "plainProfileUrl": "",
        "userId": "3_52208a8a-5371-4f74-874d-c68a10714997",
        "connectionStatus": "nonavailable",
        "lastSeenAt": 0,
        "metaData": {},
    "isActive": true,
        "friendDiscoveryKey": null,
        "friendName": null,
        "_preferredLanguages": null,
        "requireAuth": false,
        "role": "none",
        "isBlockedByMe": false
},
    "translations": {},
    "requestState": "succeeded",
    "requestedMentionUserIds": [],
    "errorCode": 0,
    "messageSurvivalSeconds": -1,
    "plugins": [],
    "poll": null,
    "_messageParams": null
}
When creating integration with a Backend application, it can be really helpful to see what data is stored in SendBird API and what webhook is expected to return.
Now let’s see a working example on screencast: we can send custom messages and preview logs in the Console.
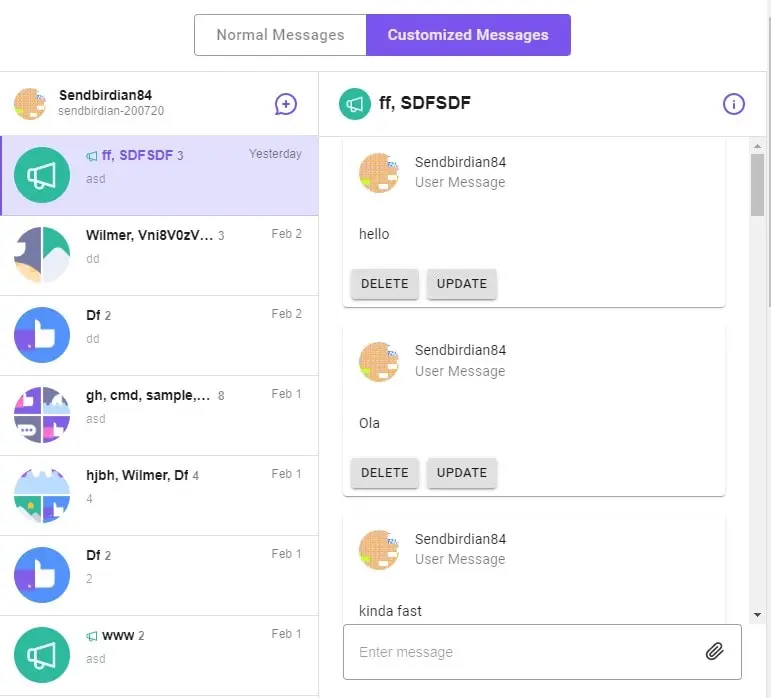
Custom messages
renderChatItem needs to be implemented to use custom message parameters and render different types of messages. I’ve found an interesting example prepared by Sravan S : https://codesandbox.io/s/lrcu9?file=/src/CustomizedApp.js . It shows how to use message data and change item layout.
That’s it for today’s tutorial. Make sure to follow us for other useful guidelines and sign up for our newsletter to stay up to date.


![How to Fight AI Hallucinations About Your Brand [ready-to-use prompt inside]](https://www.createit.com/wp-content/uploads/2026/02/How-to-Fight-AI-Hallucinations-355x200.jpg)


