Adding rating stars to chat

CHALLENGE: allow chat members to rate chat by clicking stars
SOLUTION: prepare a custom message type with custom rendering
Building your own chat using SendBird? Do you want to get user rating at the end of a chat conversation? This tutorial will show you how.
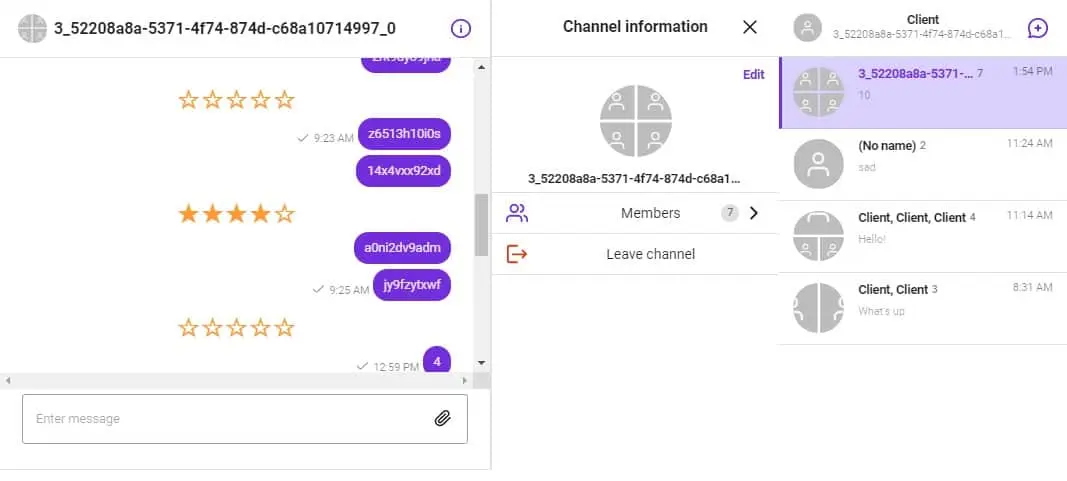
Typically, a Chat is a conversation between 2 users: the Client and the Agent or the Client and the Bot. It will be nice to allow the Client to rate the quality of the chat experience. We’re going to render clickable stars, which can be clicked only once. By clicking, the user will send a rate value as a response.
ChannelList with default channel
By default, channels are rendered from newest to oldest (based on channel creation time). We will use the sortChannelList parameter and place our DEFAULT_CHANNEL_URL as the first item on the list. It will also be autoloaded on page refresh ( setCurrentChannelUrl() ).
Keep messages styling
To keep messages styling included in React UIKit, we’re going to use renderCustomMessage prop that allows to change the render of only one customType, keeping other messages without change. Alternatively, we can overwrite renderChatItem, but the result will be the loss of all messages styling, removing reaction emoticons, typing indicator and the “message received” icon.
Message HOC (High Order Component) expects a string as a returned value, so instead of using Component, renderStars will be a javascript function.
Chat settings
Make sure to change settings to your own values. You can also control the amount of displayed star icons.
const APP_ID = "AAA";
const USER_ID = "BBB";
const DEFAULT_CHANNEL_URL = "CCC";
const TOTAL_STARS = 10;
RatingStars Message
SendBirdProvider is a wrapper component for our customizations. Final changes include: changing the order of channel list and changing the rendering of one message type. The function is expecting: message.customType to be defined as “type2”. For this condition, starts will be rendered.
// App.jsx
import React, {useState, useCallback} from 'react';
import {
  SendBirdProvider,
  Channel,
  ChannelSettings,
  ChannelList
} from 'sendbird-uikit';
import "sendbird-uikit/dist/index.css";
import './App.css';
import {renderStars} from "./renderStars";
const APP_ID = "AAA";
const USER_ID = "BBB";
const DEFAULT_CHANNEL_URL = "CCC";
const TOTAL_STARS = 10;
export default function App() {
  const channelSort = useCallback((channels) => { // useCallback to memoize the fn
    if (channels.length === 0 ) {
      return channels;
    }
    const channel = channels.find(c => c.url === DEFAULT_CHANNEL_URL);
    if (!channel) {
      return channels;
    }
    const otherChannels = channels.filter(c => c.url !== channel.url);
    otherChannels.sort(function(a, b){
      if(a.name < b.name) { return -1; }
      if(a.name > b.name) { return 1; }
      return 0;
    });
    return [channel, ...otherChannels];
  }, []);
  const [currentChannelUrl, setCurrentChannelUrl] = useState("");
  return (
      <div className="App">
        <SendBirdProvider appId={APP_ID} userId={USER_ID} >
          <div style={{ display: 'flex', height: '100%' }}>
            <Channel
                channelUrl={currentChannelUrl}
                renderCustomMessage={(message, channel) => {
                  if (message.customType === 'type2') {
                    return (
                        renderStars(currentChannelUrl, TOTAL_STARS)
                    )
                  }
                }}
            />
            <ChannelSettings channelUrl={currentChannelUrl} />
            <ChannelList
                sortChannelList={channelSort}
                onChannelSelect={(channel) => {
                  if (channel && channel.url) {
                    setCurrentChannelUrl(channel.url);
                  }
                }}
            />
          </div>
        </SendBirdProvider>
      </div>
  );
}
Basic styling and disabling ability to rate the second time.
.App {
  font-family: sans-serif;
  text-align: center;
  height: calc(100vh - 100px);
}
.sendbird-conversation {
  max-width:50%;
}
.starsRating {
  display:block;
  margin:2px 0;
}
.star {
  display:inline-block;
  font-size:2rem;
  color: #ff9933;
  cursor: pointer;
}
.starsRating.disabled {
  pointer-events:none;
  opacity: 0.5;
}
The component for sending a message (when a Star is clicked):
// SendMessage.jsx
import React, { useEffect } from "react";
import {
    withSendBird,
    sendBirdSelectors,
} from "sendbird-uikit";
const CustomComponent = (props) => {
    const {
        msg,
        customType,
        channelUrl,
        extraData,
        sendMessage,
        updateLastMessage,
        sdk,
    } = props;
    const sendSelectTypeMessage = (msg, customType, channelUrl, extraData = null) => {
        const params = new sdk.UserMessageParams();
        if(!msg){
            return;
        }
        if(customType){
            params.customType = customType;
        }
        params.message = msg;
        if(extraData){
            params.data = extraData;
        }
        sendMessage(channelUrl, params)
            .then(message => {
            })
            .catch(e => {
                console.warn(e);
            });
    }
    useEffect(() => {
        sendSelectTypeMessage(msg, customType, channelUrl, extraData);
    });
    return(
        <></>
    );
};
const SendMessageWithSendBird = withSendBird(CustomComponent, (state) => {
    const sendMessage = sendBirdSelectors.getSendUserMessage(state);
    const updateLastMessage = sendBirdSelectors.getUpdateUserMessage(state);
    const sdk = sendBirdSelectors.getSdk(state);
    return ({
        sendMessage,
        updateLastMessage,
        sdk
    });
});
export default SendMessageWithSendBird;
And the most interesting part of the code – the main function for rendering stars, handling hover event and triggering sending a message.
// renderStars.jsx
import React, {useState, useEffect} from 'react';
import SendMessageWithSendBird from "./SendMessage";
/**
 * Stars rating
 */
const Star = ({ marked, starId }) => {
    return (
        <span data-star-id={starId} className="star" role="button">
              {marked ? '\u2605' : '\u2606'}
            </span>
    );
};
const StarRating = (props) => {
    const {channelUrl, total} = props;
    const [rating, setRating] = useState( 0);
    const [selection, setSelection] = useState(0);
    const [msgToSent, setMsgToSent] = useState({msg: "",msgType: "", currentRating:""});
    useEffect(() => {
        if(msgToSent.currentRating){
            setRating(msgToSent.currentRating);
        }
        // eslint-disable-next-line
    }, [msgToSent]);
    const hoverOver = event => {
        if(rating) {
          // do nothing
        } else {
            let val = 0;
            if (event && event.target && event.target.getAttribute('data-star-id')){
                val = event.target.getAttribute('data-star-id');
            }
            setSelection(val);
        }
    };
    const component = !rating && msgToSent.msg ? (<SendMessageWithSendBird msg={msgToSent.msg} customType={msgToSent.msgType}  channelUrl={channelUrl} />) : (<></>);
    const classNameDisabled = rating ? "disabled" : "";
    return (
        <span
            onMouseOut={() => hoverOver(null)}
            onClick={e => {
                if(rating) {
                    return false;
                }
                const currentRating = e.target.getAttribute('data-star-id') || rating;
                setMsgToSent({msg: currentRating, msgType: "answer", currentRating: currentRating});
            }}
            onMouseOver={hoverOver}
            className={"starsRating " + classNameDisabled }
        >
                {Array.from({ length: total }, (v, i) => (
                    <Star
                        starId={i + 1}
                        key={`star_${i + 1}`}
                        marked={selection ? selection >= i + 1 : rating >= i + 1}
                    />
                ))}
            {component}
            </span>
    );
};
export const renderStars = (channelUrl, total) => {
    return () => (
        <StarRating channelUrl={channelUrl} total={total} />
    );
}
Conclusion
Chat now has the ability to render a custom view for message customType. The stars functionality does not use any dependencies, you can easily change the color using CSS. The inspiration for this article was a snippet found here: https://www.30secondsofcode.org/react/s/star-rating
That’s it for today’s tutorial. Make sure to follow us for other useful guidelines and don’t forget to sign up for our newsletter.


![How to Fight AI Hallucinations About Your Brand [ready-to-use prompt inside]](https://www.createit.com/wp-content/uploads/2026/02/How-to-Fight-AI-Hallucinations-355x200.jpg)


