Effective WooCommerce styling

There are multiple ways to make a WordPress theme compatible with WooCommerce. The recommended way will be to use hooks and style store elements globally. There is also the option to ‘override WooCommerce templates via theme’, but this has some downsides, such as possible conflicts with third-party plugins / difficulties when upgrading to newer versions of WooCommerce.
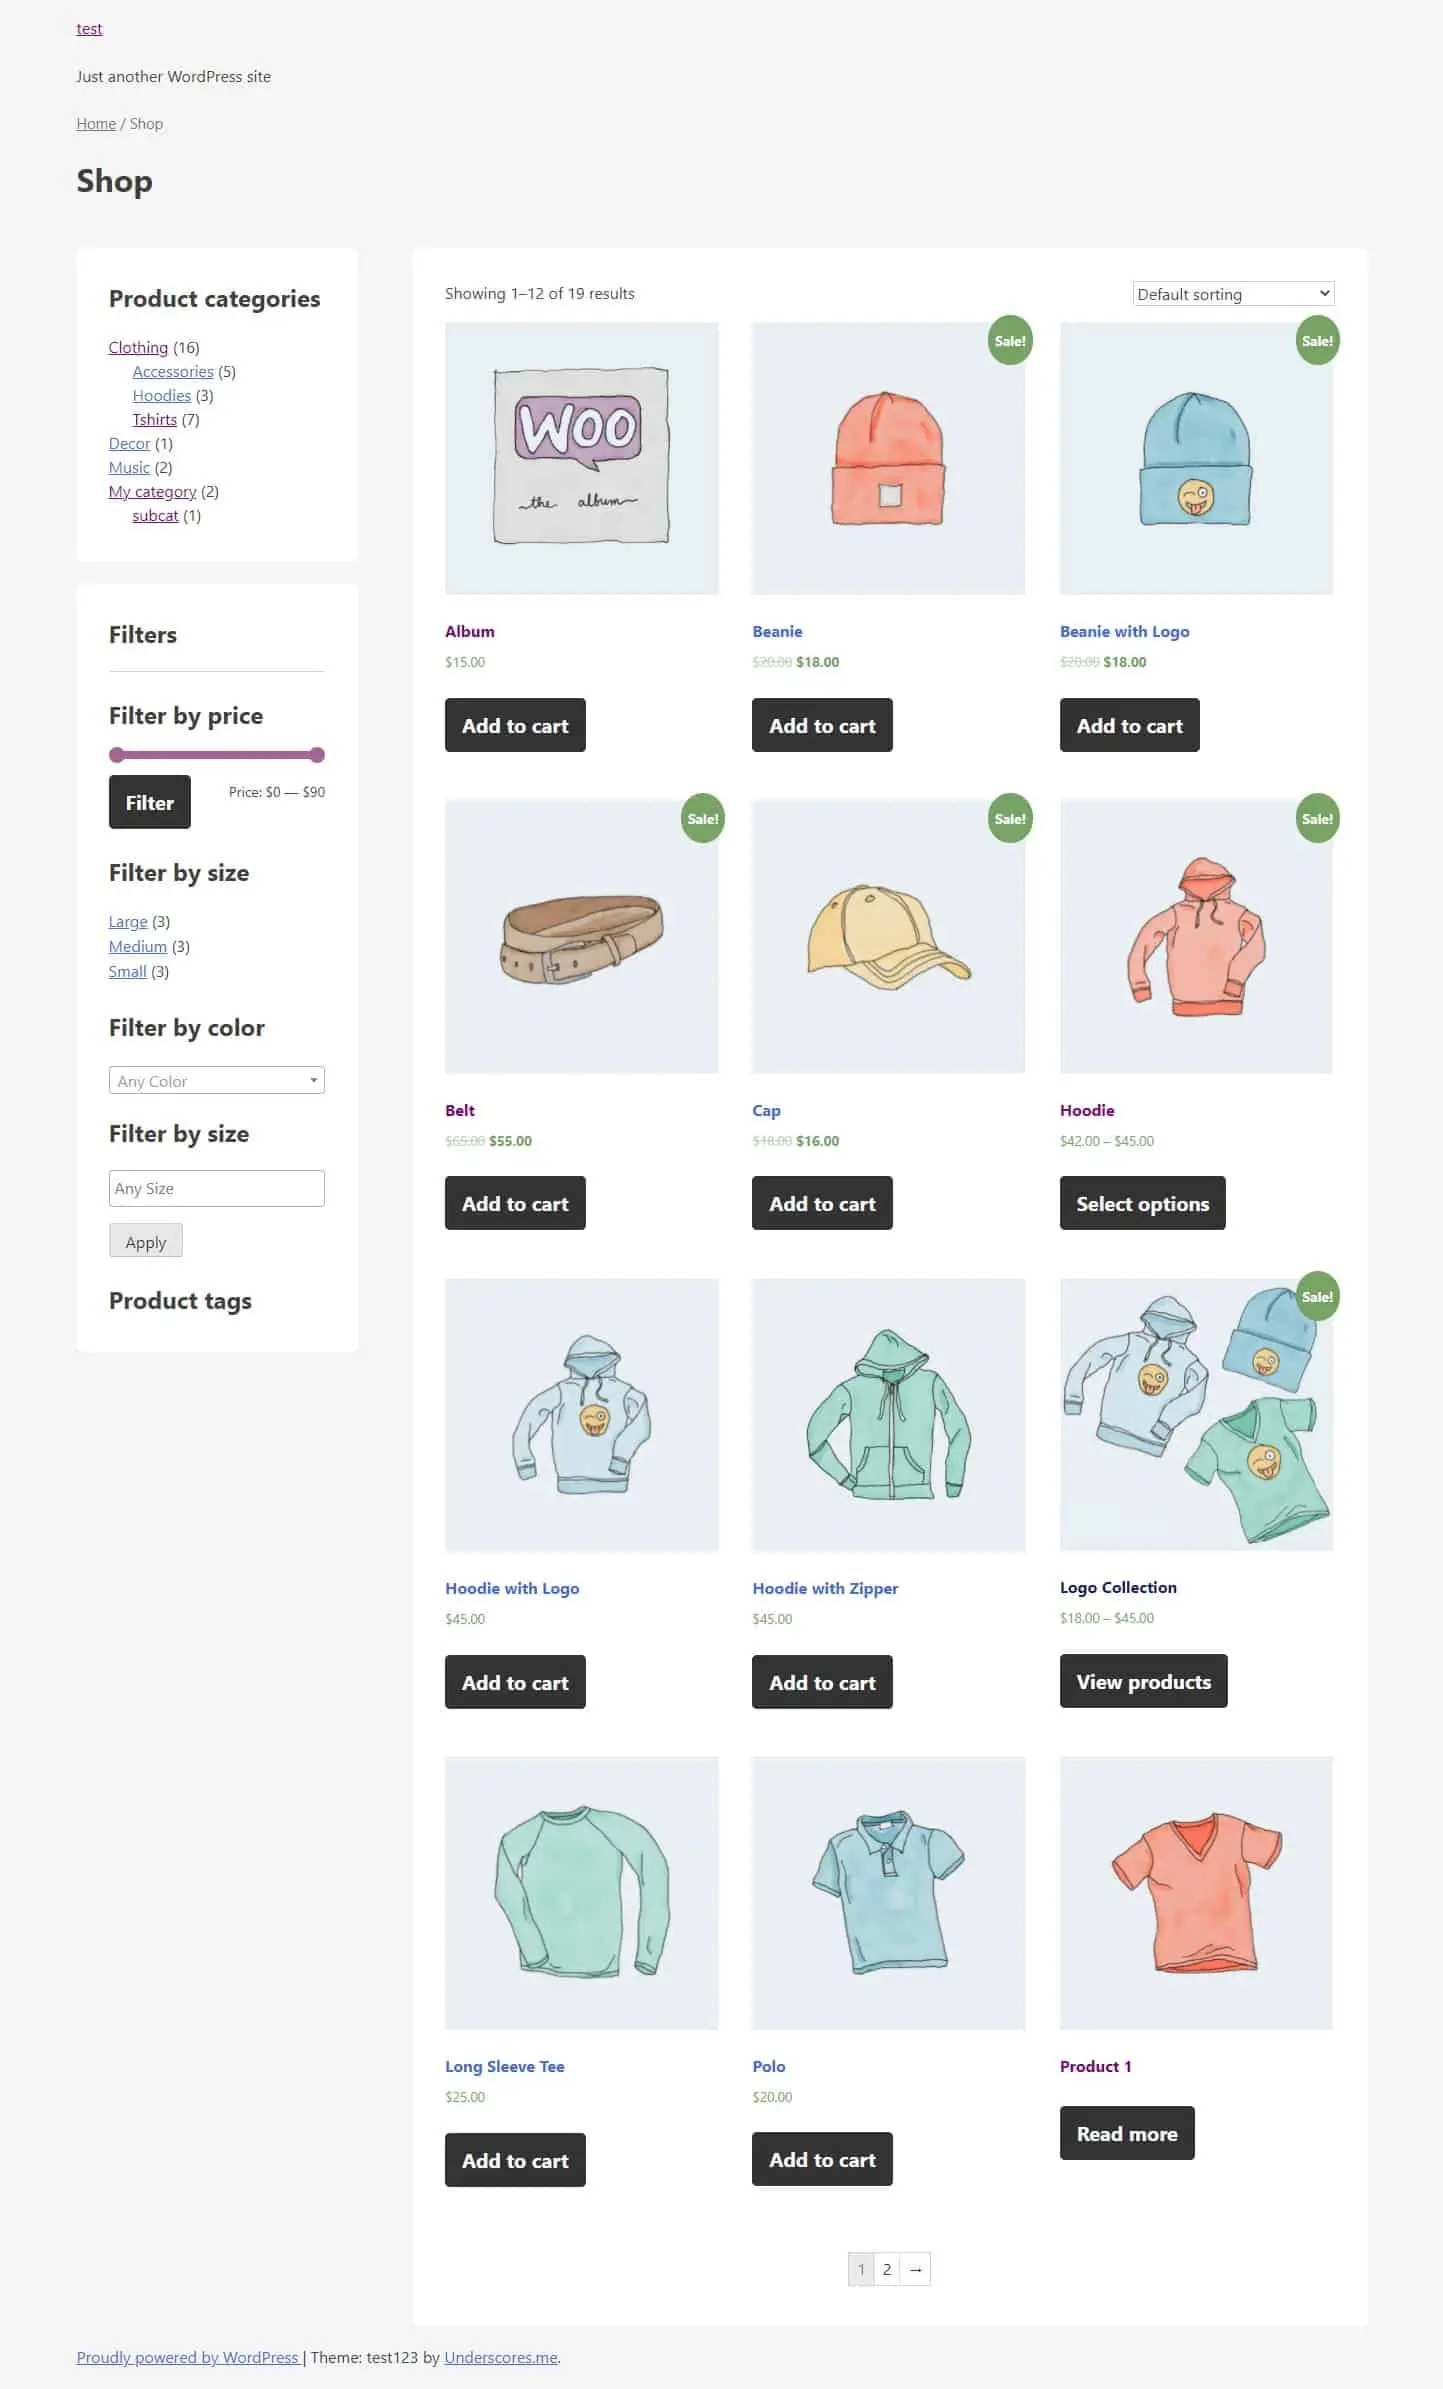
Our goal will be to add a product listing with filters, styling all of the default shop views: Cart, Checkout, MyAccount, Product Page and add minimal shop styles.
Add WC theme compatibility
We have a WP theme that is not yet compatible with Woo – underscores. What will be the most effective way to enable the shop functionality? Adding proper code to functions.php will make it happen.
<?php
// functions.php
/**
 * Define WooCommerce support
 */
add_theme_support( 'woocommerce' );
add_theme_support(
    'woocommerce',
        array(
            'single_image_width'    => 1500,
            'thumbnail_image_width' => 1500,
            'product_grid'          => array(
                'default_columns' => 3,
                'default_rows'    => 4,
                'min_columns'     => 1,
                'max_columns'     => 3,
                'min_rows'        => 1,
            ),
        )
);
/**
 * Single product view
 */
add_theme_support( 'wc-product-gallery-zoom' );
add_theme_support( 'wc-product-gallery-lightbox' );
add_theme_support( 'wc-product-gallery-slider' );
/**
 * Move title before main wrapper
 */
add_filter('woocommerce_show_page_title', 'ct_woocommerce_show_page_title');
function ct_woocommerce_show_page_title(){
    return false;
}
add_action('ct_before_main_wrapper','ct_woocommerce_before_main_content', 9);
function ct_woocommerce_before_main_content(){
    ?>
    <header class="woocommerce-products-header mb-4">
        <h1 class="woocommerce-products-header__title page-title"><?php woocommerce_page_title(); ?></h1>
    </header>
    <?php
}
function entry_content_class()
{
    if(is_front_page()){
        return '';
    }
    if (is_woocommerce() || is_cart() || is_checkout() ):
        echo 'entry-content--white';
    endif;
    if (! is_user_logged_in() && is_page('my-account') ):
        echo 'entry-content--white';
    endif;
}
Create woocommerce.php
A new file is needed – woocommerce.php , which will be used to render the shop listing. We’re also displaying built-in breadcrumbs and a sidebar shop with filters.
<?php
// woocommerce.php
/**
 * Main WooCommerce template
 */
get_header();
?>
<?php woocommerce_breadcrumb(); ?>
<?php do_action("ct_before_main_wrapper"); ?>
    <main id="primary" class="site-main">
        <div class="entry-content <?php entry_content_class(); ?>">
            <?php woocommerce_content(); ?>
        </div>
    </main><!-- #main -->
<?php
get_sidebar('shop');
get_footer();
Shop filters
The function get_sidebar(‘shop’); will include the content of the sidebar-shop.php file. We want to have different filters: by category, by price, by attribute, by tags, by ratings. WC already provides widgets that will do the job. We’re going to use the_widget() function to render the proper filter.
<?php
/**
 * sidebar-shop.php
 * Shop sidebar - filters
 */
if(! is_shop() && !is_archive()){
    return;
}
?>
<aside id="secondary" class="widget-area">
    <div class="widget-area-inside">
        <div class="entry-content <?php entry_content_class(); ?>">
            <?php the_widget( 'WC_Widget_Product_Categories', array('count' => 1, 'hide_empty' => 1) ); ?>
        </div>
    </div>
    <div class="widget-area-inside">
        <div class="entry-content <?php entry_content_class(); ?>">
        <h2 class="widgettitle"><?php echo esc_html( 'Filters') ?></h2>
        <hr>
        <?php the_widget( 'WC_Widget_Price_Filter', array() ); ?>
        <div class="widget--size widget">
            <?php the_widget( 'WC_Widget_Layered_Nav', array('title' => esc_html( 'Filter by size' ),'attribute'=>'size','display_type'=>'list', 'query_type' => 'or') ); ?>
        </div>
        <?php the_widget( 'WC_Widget_Layered_Nav', array('title' => esc_html( 'Filter by color' ), 'attribute'=>'color','display_type'=>'dropdown', 'query_type' => 'and') ); ?>
        <?php the_widget( 'WC_Widget_Layered_Nav', array('title' => esc_html( 'Filter by size' ), 'attribute'=>'size','display_type'=>'dropdown', 'query_type' => 'or') ); ?>
        <?php the_widget( 'WC_Widget_Rating_Filter', array() ); ?>
        <?php the_widget( 'WC_Widget_Product_Tag_Cloud', array() ); ?>
        </div>
    </div> <!-- / widget-area -->
</aside><!-- #secondary -->
<div class="clearfix"></div>
Adding shop styles
Adding some basic styles will make the website look better and give it a custom look. Instead of overwriting every WC style, we’re going to add global styling for main elements, such as buttons / inputs and style main wrapper.
/**
Global WooCommerce styles
 */
body {
   background:#F5F5F5;
}
.entry-content--white {
   background:#fff;
   border-radius: 5px;
   padding:2rem;
}
.button,
.woocommerce #respond input#submit,
.woocommerce input.button {
   display: inline-block;
   font-weight: 700 !important;
   line-height: 1 !important;
   text-align: center;
   text-decoration: none;
   vertical-align: middle;
   cursor: pointer;
   -webkit-user-select: none;
   -moz-user-select: none;
   user-select: none;
   border: 1px solid transparent !important;
   padding: 0.375rem 0.75rem;
   font-size: 1rem;
   border-radius: 0.25rem;
   transition: color 0.15s ease-in-out, background-color 0.15s ease-in-out, border-color 0.15s ease-in-out, box-shadow 0.15s ease-in-out;
   padding: 1rem 1rem !important;
   font-size: 1.25rem !important;
   border-radius: .3rem !important;
   color: #fff !important;
   border-color: #333 !important;
   background: #333 !important;
}
.input-text {
   font-size: 1rem;
   padding: 0.375rem 0.75rem;
   border-radius: 0.25rem;
   color:#333;
   font-weight: 400;
   line-height: 1.3 !important;
   background-clip: padding-box;
   background: #FFFFFF;
   border: 1px solid #E6E6E6;
   -webkit-appearance: none;
   -moz-appearance: none;
   appearance: none;
   min-height: calc(1.5em + (1rem + 2px));
   padding: 1rem 1rem !important;
   font-size: 1rem;
   border-radius: .3rem;
}
Styling store views
Those custom CSS will adjust shop listing columns, display one product per row on mobile, add styles for My Account view for logged in users and style product categories link in the shop sidebar.
/**
Shop listing
 */
.woocommerce-shop .site-main,
.archive .site-main {
   width:73.9130434783%;
   float:right;
   margin-right:0
}
.woocommerce-shop .widget-area,
.archive .widget-area{
   width:21.7391304348%;
   float:left;
   margin-right:4.347826087%
}
@media (max-width: 991.98px) {
   .site-main,
   .widget-area {
      width:100% !important;
      float:none !important;
      margin:0 0 2rem 0 !important;
   }
}
/**
   shop listing mobile
*/
@media (max-width: 767.98px) {
   .woocommerce ul.products.columns-3 li.product, .woocommerce-page ul.products.columns-3 li.product {
      width: 100%;
      float: none !important;
   }
   .woocommerce-message .button {
      display: block !important;
      float: none !important;
      margin-bottom: 10px !important;
      clear:both;
   }
}
/**
my account - logged in user
 */
.woocommerce-MyAccount-navigation {
   background: #FFFFFF;
   border-radius: 5px;
   padding: 40px;
   margin-bottom: 2rem
}
.woocommerce-MyAccount-navigation a {
   color: #646464;
   text-decoration: none
}
.woocommerce-MyAccount-navigation .is-active a {
   text-decoration: underline;
}
.woocommerce-MyAccount-navigation ul {
   list-style: none;
   margin: 0;
   padding: 0
}
.woocommerce-MyAccount-navigation ul li {
   margin-bottom: 10px
}
.woocommerce-MyAccount-content {
   background: #FFFFFF;
   border-radius: 5px;
   padding: 40px
}
/**
WooCommerce Filters
 */
.product-categories {
   padding:0;
   margin:0 0 10px 0;
   list-style:none;
}
.product-categories ul {
   list-style:none;
   padding:0;
}
Wrapper for Cart, My account and Checkout
We’re using global CSS class .entry-content–white as main wrapper with some padding and white background. Function <?php entry_content_class(); ?> controls when to add proper class. It will be good to apply it for other store views, like Cart, My Account and the Checkout form. Wrapper should be added in the page.php file. In underscores theme – <?php get_template_part( ‘template-parts/content’, ‘page’ ); ?> is used, so we’re going to edit: template-parts/content-page.php
<?php
/**
* // template-parts/content-page.php
 */
?>
<article id="post-<?php the_ID(); ?>" <?php post_class(); ?>>
   <header class="entry-header">
      <?php the_title( '<h1 class="entry-title">', '</h1>' ); ?>
   </header><!-- .entry-header -->
   <div class="entry-content <?php entry_content_class(); ?>">
      <?php
      the_content();
      wp_link_pages(
         array(
            'before' => '<div class="page-links">' . esc_html__( 'Pages:', 'test123' ),
            'after'  => '</div>',
         )
      );
      ?>
   </div><!-- .entry-content -->
</article><!-- #post-<?php the_ID(); ?> -->
Underscores adjustments
As described at the beginning, we’re using the Underscores starter theme, which is a clean, minimalistic WP theme. The last step will be to add basic adjustments: make the main wrapper container centered and add the helper function for clearing the floats.
/**
underscore adjustments
 */
.site {
   width: 100%;
   padding-right: 15px;
   padding-left: 15px;
   margin-right: auto;
   margin-left: auto;
}
@media (min-width: 576px) {
   .site {
      max-width: 540px;
   }
}
@media (min-width: 768px) {
   .site {
      max-width: 720px;
   }
}
@media (min-width: 992px) {
   .site {
      max-width: 960px;
   }
}
@media (min-width: 1200px) {
   .site {
      max-width: 1140px;
   }
}
@media (min-width: 1400px) {
   .site {
      max-width: 1320px;
   }
}
/**
Helpers
 */
.clearfix:after {
   content: "";
   display: table;
   clear: both;
}
WooCommerce customizations summary
We have added WC support, and customized the look of the store using a minimal amount of code. Instead of Overriding templates, we’ve used hooks and built-in WC elements. This approach will pay off in the long run – upgrading to the next WooCommerce version will be smooth. Also, every WP plugin will be compatible with our “minimal WooCommerce theme”.
Minimal WC styling preview
Let’s have a look at the results. Here is the product listing with filters.
That’s it for today, make sure you follow us for other useful tips and guidelines.


![How to Fight AI Hallucinations About Your Brand [ready-to-use prompt inside]](https://www.createit.com/wp-content/uploads/2026/02/How-to-Fight-AI-Hallucinations-355x200.jpg)


