Gatsby push notifications solution

CHALLENGE: add push notifications to a Gatsby website
SOLUTION: deploy a WordPress website on the same domain and use the self-hosted Perfecty Push Notifications WP plugin
GatsbyJS is a static website generator based on ReactJS. In a time when Headless CMS is a trending concept, Gatsby is becoming more popular. Having WordPress CMS Backend for data sourcing, you can set up a static website with Gatsby really fast! The benefits? Speed (good site performance), security, and low hosting costs.
Are you using GatsbyJS and would like to enable push notifications? You will find a solution in this article.
Self hosted push notifications
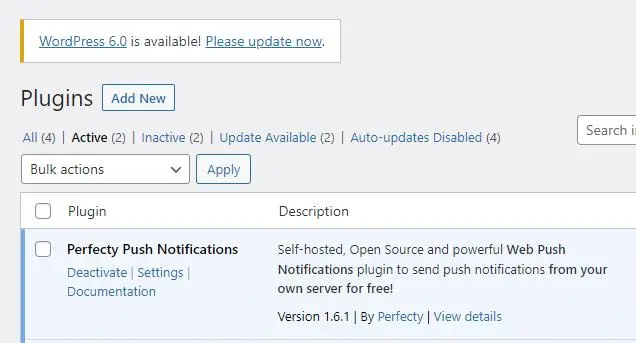
An interesting WordPress plugin for self-hosted push notifications is called Perfecty Push Notifications. Released on 26 Dec 2020 and frequently updated, the plugin is getting more popular and provides a nice set of features. More info: https://wordpress.org/plugins/perfecty-push-notifications/
Perfecty is self-hosted. All data is stored in a WordPress database locally. In contrast, third-party services like OneSignal store data in the cloud. OneSignal is free for small websites, but starting from 10.000 subscribers, it requires a paid plan. In this article, we will focus on a self-hosted solution.
Push notifications in Gatsby
The configuration of push notifications on a static Gatsby website requires a couple of steps:
- Configure a WordPress instance with the “Perfecty Push Notifications” plugin activated (needs to use the same domain like a Gatsby site to pass the CORS policy)
- integrate Gatsby with the Perfecty plugin (by adding Javascript initialization)
- minor tweaks in the Perfecty plugin (to skip nonce validation)
WordPress installation
WordPress will store all push notification data – users, content of notification and schedule sending – using Cron. It’s important to have a https connection (SSL certificate) and to use the same domain as the Gatsby website. For example:
- Gatsby website: https://www.example.com
- WordPress Backend for Push Notifications (self-hosted): https://www.example.com/mywordpress/
The Perfecty plugin uses ajax calls to register a user and add a new subscriber to notifications (WP REST custom endpoints). Due to CORS policy, a “Gatsby site” and “Wordpress Backend for Push Notifications site” needs to use a common domain name.
Perfecty Push Notifications configuration
The activated plugin is ready to use. Your WordPress installation at https://www.example.com/mywordpress/ is now able to register new subscribers and send desktop push notifications. A visitor can also unsubscribe by using the bell icon placed in the bottom left corner.
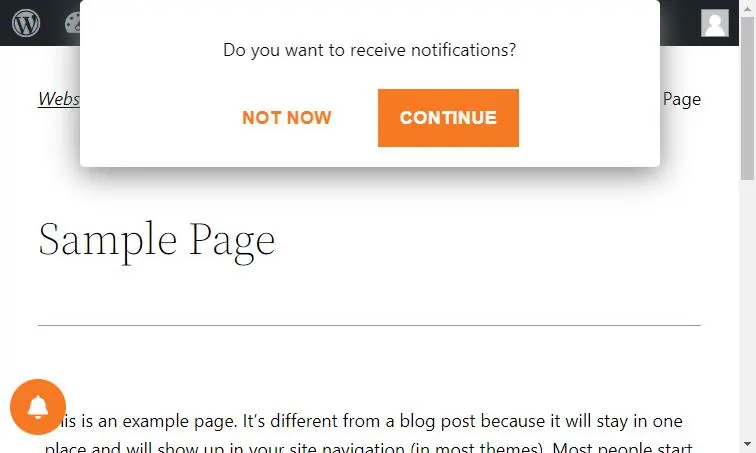
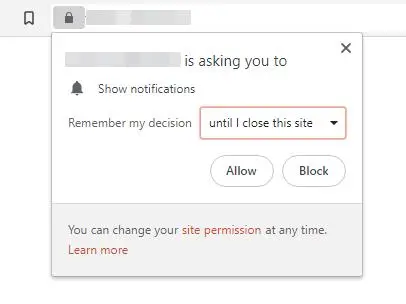
Subscribe to notifications
The standard workflow for subscribing to push notifications of a WordPress site:
- Click the ‘Continue’ button
- Confirm ‘Allow’ in the ‘Show notifications’ browser alert
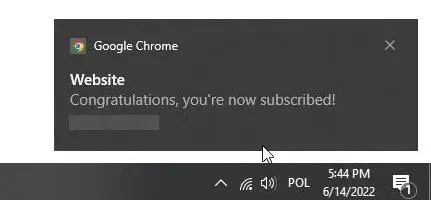
- That’s it. The user is subscribed to future browser pushes. By default, the user will receive a ‘welcome message’: Congratulations, you’re now subscribed! Texts can be changed in the WordPress plugin settings.
Unsubscribe
In case a user would like to stop receiving push notifications, there is a bell icon with a checkbox for unsubscribing. Unchecking the checkbox will trigger the unsubscribe action and remove the user from WordPress database.
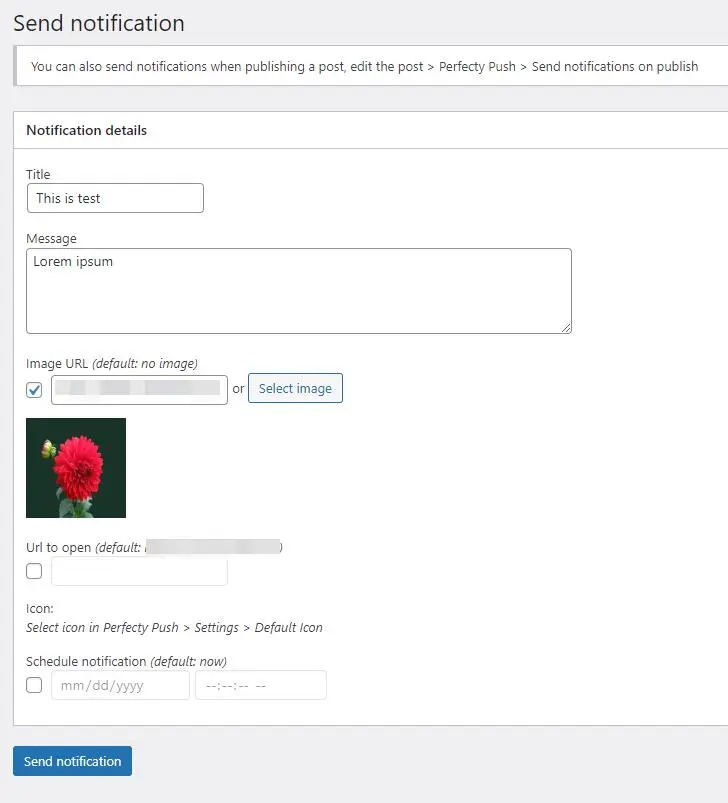
Backend for sending notifications
Perfecty has an advanced admin panel for managing push notifications: a list of subscribers, a list of scheduled messages, and the ability to send new messages. It is also built with performance in mind.
For testing purposes, we’ve added one subscriber, then sent a test message as a push notification. In the following screenshots you will see the entire process.
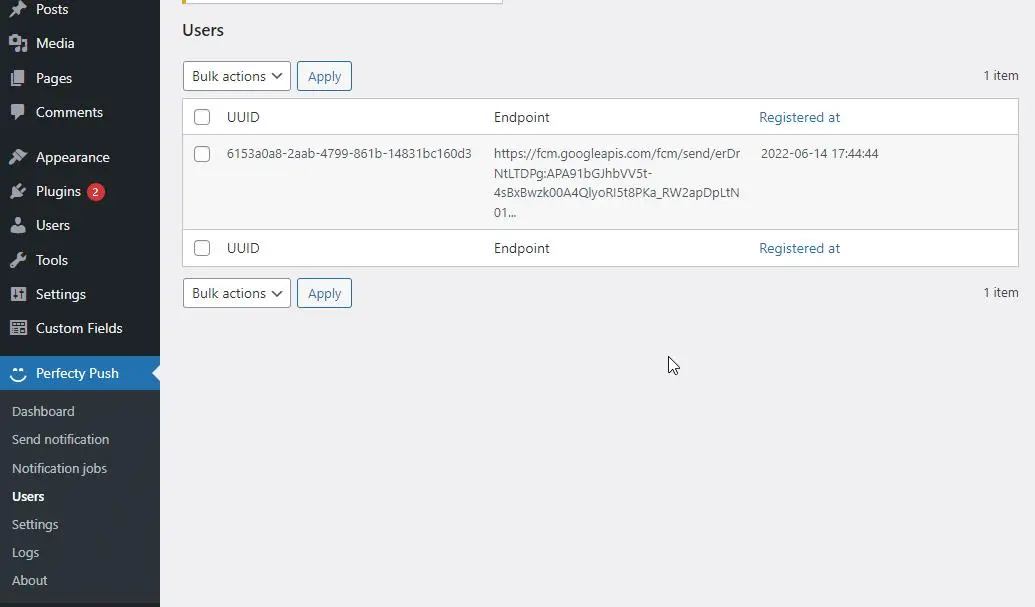
Verification of sending messages
The plugin section ‘Notification jobs’ contains a list of all messages and statistics on how many succeeded (were received by subscribers). Messages are sent in the background using WordPress Cron.
According to authors, the plugin can send around 13.000 notifications in 1 minute (DigitalOcean droplet with 2 Gb of RAM and 2vCPU). The parameters that were used:
batch_size = 15.000
parallel_flushing_size = 200
memory_limit = 256M
max_execution_time = 256
Gatsby implementation
Push notifications work in our WordPress, which is installed at: https://www.example.com/mywordpress/ . But what about Gatsby? How to enable push notifications at our Gatsby website? Here are those steps to enable Gatsby push notifications:
- hardcode plugin settings as object: window.PerfectyPushOptions (gatsby-browser.js)
- load a javascript file for initialization – perfecty-push-sdk.min.js (enqueuing file from wordpress folder)
- load the plugin stylesheet for styling (perfecty-push-public.css)
Here are examples of a working implementation:
// gatsby-browser.js
const addScript = url => {
    const script = document.createElement("script")
    script.src = url
    script.async = false
    document.body.appendChild(script)
}
exports.onClientEntry = () => {
    window.PerfectyPushOptions = {
        path: "https://www.example.com/mywordpress/wp-content/plugins/perfecty-push-notifications/public/js",
        dialogTitle: "Do you want to receive notifications?",
        dialogSubmit: "Continue",
        dialogCancel: "Not now",
        settingsTitle: "Notifications preferences",
        settingsOptIn: "I want to receive notifications",
        settingsUpdateError: "Could not change the preference, try again",
        serverUrl: "https://www.example.com/mywordpress/admin/wp-json/perfecty-push",
        vapidPublicKey: "BF2RuUdxpxX1JPNOdT5YasmDlZU21mvwFjeTUXKT50-yqvMFqx0LIuYuGi-lLlKX0AZcG6nt_zapSaxpCxO8ZYo",
        token: "da3212edsa",
        tokenHeader: "X-WP-Nonce",
        token2: "da831edDS23ds234Jaa",
        enabled: true,
        unregisterConflicts: false,
        serviceWorkerScope: "/perfecty/push",
        loggerLevel: "error",
        loggerVerbose: false,
        hideBellAfterSubscribe: false,
        askPermissionsDirectly: false,
        unregisterConflictsExpression: "(OneSignalSDKWorker|wonderpush-worker-loader|webpushr-sw|subscribers-com/firebase-messaging-sw|gravitec-net-web-push-notifications|push_notification_sw)",
        promptIconUrl: "",
        visitsToDisplayPrompt: 0
    }
    addScript("https://www.example.com/mywordpress/wp-content/plugins/perfecty-push-notifications/public/js/perfecty-push-sdk/dist/perfecty-push-sdk.min.js?ver=1.6.1")
}
You might ask: where can I find my window.PerfectyPushOptions object with settings? The plugin adds it as a global javascript variable in the WordPress DOM, just navigate to: view-source: https://www.example.com/mywordpress/ – and there will be a variable there, defined with all the current plugin settings. Just copy it to GatsbyJS.
For applying styling, we will add a css file in the Helmet tag section:
// src/components/Sections/Layout.js
const Layout = (props) => {
   return (
      <>
         <SEO title={props.pageTitle} description={t('siteMetadata.description')} article={props.article} errorPage={props.errorPage} />
         <Helmet>
            <link rel='stylesheet' id='perfecty-push-css' href='https://www.example.com/mywordpress/wp-content/plugins/perfecty-push-notifications/public/css/perfecty-push-public.css?ver=1.6.1' media='all' />
         </Helmet>
         {props.children}
      </>
   );
}
export default Layout;
Fix WP Nonce error
The plugin is doing a verification of nonce (a secret value added in the request that is refreshed every X hours). We have hardcoded the nonce value in the gatsby-browser.js file, so it will be outdated really soon. As a result, the AJAX request will be blocked on the WordPress side with the error: “Cookie nonce is invalid”.
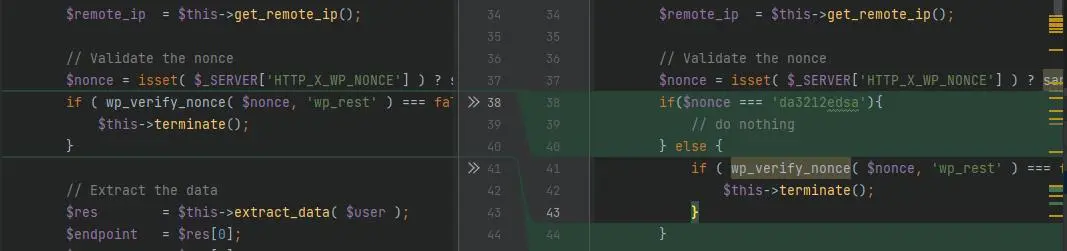
We don’t have an elegant solution for this issue. The only way is to edit the plugin source code and disable nonce validation. We need to add 3 changes in the wp-content/plugins/perfecty-push-notifications/public/class-perfecty-push-users.php file:
Find:
if ( wp_verify_nonce( $nonce, 'wp_rest' ) === false ) {
   $this->terminate();
}
and replace it with:
if($nonce === 'da3212edsa'){
    // do nothing
} else {
    if ( wp_verify_nonce( $nonce, 'wp_rest' ) === false ) {
        $this->terminate();
    }
}
This will disable nonce validation for 3 endpoints: register user, get user subscriber status and unregister user. By adding those changes Gatsby will be able to communicate with the WordPress installation (our Backend for Push Notifications).
WP REST API nonce validation
We are almost done with implementation. The last remaining problem is: currently WP REST API endpoints is still blocking requests from Gatsby. The reason is that before executing plugin endpoints, WordPress validates the X-WP-Nonce header value and returns the 403 error (forbidden).
The solution for this issue: create a new WordPress user (subscriber) and set up Application Passwords in Edit User settings. This value will be set in Gatsby as token2 and passed to WP REST API for Basic Authorization.
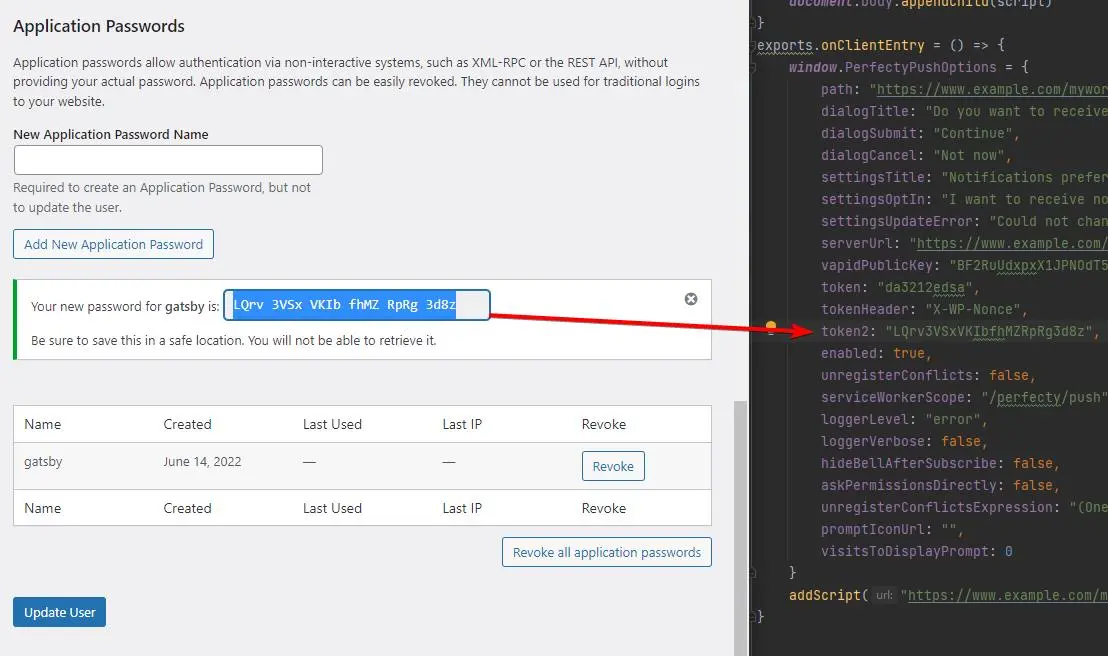
For handling the token2 value inside the plugin we need to edit: wp-content/plugins/perfecty-push-notifications/public/js/perfecty-push-sdk/dist/perfecty-push-sdk.min.js . It’s minified by default, so first, we’re going to prettify js file for better readability.
First change, add token2 to the list of passed parameters. Find:
S.token = e.token
and replace it with:
S.token = e.token, S.token2 = e.token2
Second change, add Basic Authorization. Find:
var e = {"Content-Type": "application/json"};
return e[E.tokenHeader] = E.token, e
and replace it with:
var username = 'user-for-gatsby-1';
var token2 = btoa(username + ':' + E.token2);
var e = {"Content-Type": "application/json", 'Authorization': 'Basic ' + token2};
return e[E.tokenHeader] = E.token, e
Make sure to update the username value (it’s a new user just added in WordPress users section). This user has application password set up and is used only for authentication purposes.
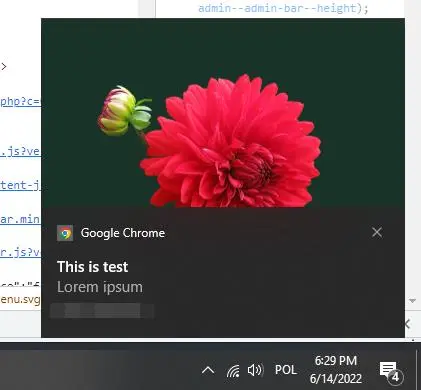
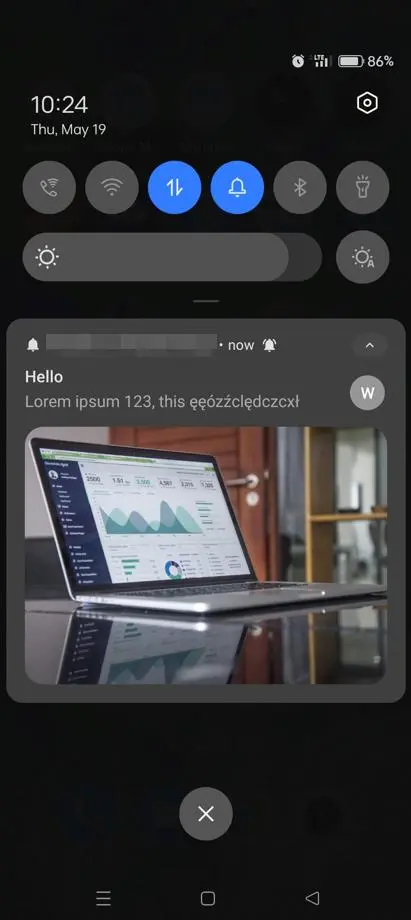
Gatsby PWA with notifications
That’s it! We have managed to enable push notifications for our Gatsby website
To make it behave like a native mobile app, including offline mode and android push notifications, we need to set up the Progressive Web App (PWA). A PWA website with Gatsby is simple, we need to install 2 plugins: gatsby-plugin-manifest and gatsby-plugin-offline. Here is the result, a notification received on the Android mobile phone:
Safari and push notification
The most anticipated feature for Safari iOS is web push notifications. Currently, it’s not possible to get web push notifications on iPads and iPhones. With iOS 16, Apple is confirming that notifications will be supported. The official release is expected in fall 2022.
Troubleshooting
- Problem: I see a critical error on Perfecty plugin activation
- Solution: The plugin required a PHP gmp extension (GNU Multiple Precision) to be installed on the server. More info: https://docs.perfecty.org/wp/troubleshooting/ .
That’s it for today’s Support Diaries. Subscribe to our newsletter to stay up to date with all the news and guidelines.


![How to Fight AI Hallucinations About Your Brand [ready-to-use prompt inside]](https://www.createit.com/wp-content/uploads/2026/02/How-to-Fight-AI-Hallucinations-355x200.jpg)


