How to create a WP plugin with admin forms

CHALLENGE: create a WordPress plugin with wp-admin forms that saves data in the wp_options table
SOLUTION: submit a custom form, handle POST data, save to database and display the success message
This article has been reviewed and updated in August 2024 to make it up to date.
In this tutorial, you will see good practices when creating a custom WordPress plugin for the Admin Dashboard. The plugin displays forms prefilled with wp_options data. The content of the forms is defined in the Controller. PHP templates (views) are responsible for rendering form elements.
WP Admin plugin with forms
Do you need a simple solution for saving configuration options in your plugin or saving theme options with custom code? Here you will find a solution. The source code of the plugin can be downloaded from GitHub – more info at the end of article.
The plugin has simple directory structure and is object oriented (PHP). It’s good boilerplate to start your own WordPress plugin that will render forms in the Admin Dashboard area. It can be used as a plugin starter in your own project.
The code demonstrates how to render wp_options displayed as: input, textarea, checkbox or select. The submitted data is saved as a serialized array in a WordPress table called “wp_options”. By following the presented approach, you can extend the plugin to add as many wp-admin forms as you like.
Create the WordPress plugin and put it in admin page
For WordPress CMS to recognize a new plugin in the wp-admin Plugins section, we need to create a PHP file with the plugin name and version added as a PHP comment. In addition, we’re going to include helpers functions and PHP Class for core functionality.
<?php
// /wp-content/plugins/ct-wp-admin-form/ct-wp-admin-form.php
/**
 * Plugin Name:       CT WP Admin Form Example
 * Description:       Create custom wp-admin forms
 * Version:           1.0.0
 * Text Domain:       ct-admin
 */
// If this file is called directly, abort.
if ( ! defined( 'WPINC' ) ) {
    die;
}
define( 'CT_WP_ADMIN_VERSION', '1.0.0' );
define( 'CT_WP_ADMIN_DIR', 'ct-wp-admin-form' );
/**
 * Helpers
 */
require plugin_dir_path( __FILE__ ) . 'includes/helpers.php';
/**
 * The core plugin class
 */
require plugin_dir_path( __FILE__ ) . 'includes/class-ct-wp-admin-form.php';
function run_ct_wp_admin_form() {
    $plugin = new Ct_Admin_Form();
    $plugin->init();
}
run_ct_wp_admin_form();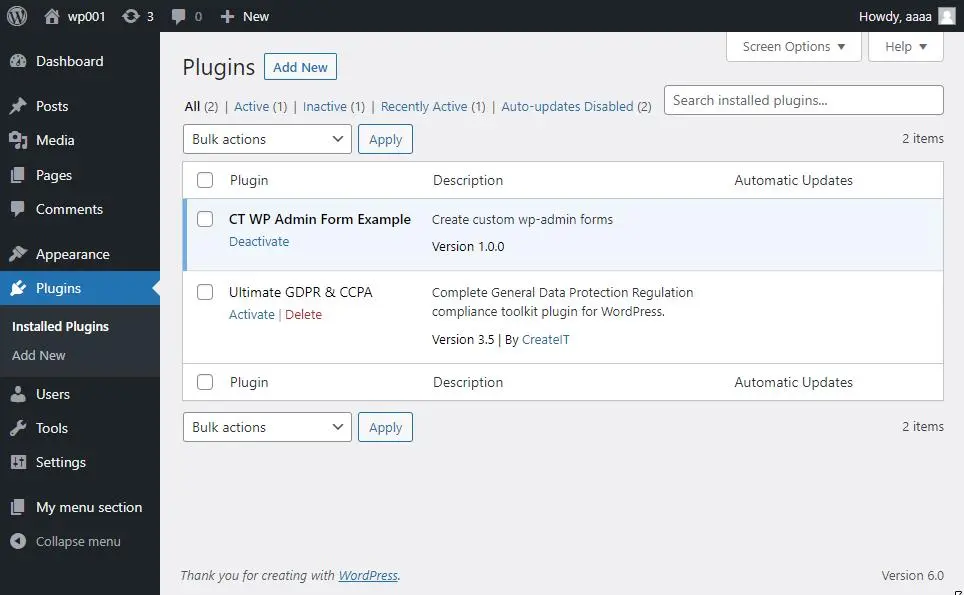
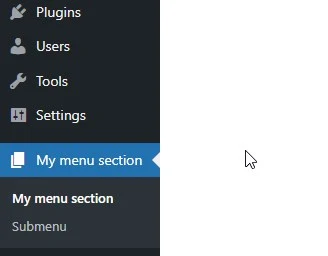
Add menu and submenu page
To add a new section in the wp-admin Dashboard area, we’re going to use wp core functions: add_menu_page and add_submenu_page. The entire plugin core logic is defined in PHP class Ct_Admin_Form. Below, you will find a part of the class responsible for adding the admin menu.
<?php
// /wp-content/plugins/ct-wp-admin-form/includes/class-ct-wp-admin-form.php
class Ct_Admin_Form
{
    const ID = 'ct-admin-forms';
    public function init()
    {
        add_action('admin_menu', array($this, 'add_menu_page'), 20);
    }
    public function get_id()
    {
        return self::ID;
    }
    public function add_menu_page()
    {
        add_menu_page(
            esc_html__('My menu section', 'ct-admin'),
            esc_html__('My menu section', 'ct-admin'),
            'manage_options',
            $this->get_id(),
            array(&$this, 'load_view'),
            'dashicons-admin-page'
        );
        add_submenu_page(
            $this->get_id(),
            esc_html__('Submenu', 'ct-admin'),
            esc_html__('Submenu', 'ct-admin'),
            'manage_options',
            $this->get_id() . '_view1',
            array(&$this, 'load_view')
        );
    }
}
Load data and render the template
For rendering forms, we’re using the load_view method. The method is doing multiple things:
- check the wp-admin path to determine what data to load
- use the protected array $views to identify the proper function name (ex: view1_data ) to fetch data to the $args variable
- include a template for displaying alerts (success messages)
- include a template for a particular view (ex: view1.php )
- define the main HTML structure
function load_view()
{
    $this->default_values = $this->get_defaults();
    $this->current_page = ct_admin_current_view();

    $current_views = isset($this->views[$this->current_page]) ? $this->views[$this->current_page] : $this->views['not-found'];
    $step_data_func_name = $this->current_page . '_data';
    $args = [];
    /**
     * prepare data for view
     */
    if (method_exists($this, $step_data_func_name)) {
        $args = $this->$step_data_func_name();
    }
    /**
     * Default Admin Form Template
     */
    echo '<div class="ct-admin-forms ' . $this->current_page . '">';
    echo '<div class="container container1">';
    echo '<div class="inner">';
    $this->includeWithVariables(ct_admin_template_server_path('views/alerts', false));
    $this->includeWithVariables(ct_admin_template_server_path($current_views, false), $args);
    echo '</div>';
    echo '</div>';
    echo '</div> <!-- / ct-admin-forms -->';
}
WordPress – pass data to the template
Our method includeWithVariables is really useful. It extracts variables (args) and provides direct access to them from the PHP template. It’s an elegant way to define all data in the controller and to use the template only for data presentation. We’re saying no to spaghetti code!
function includeWithVariables($filePath, $variables = array(), $print = true)
{
    $output = NULL;
    if (file_exists($filePath)) {
        // Extract the variables to a local namespace
        extract($variables);
        // Start output buffering
        ob_start();
        // Include the template file
        include $filePath;
        // End buffering and return its contents
        $output = ob_get_clean();
    }
    if ($print) {
        print $output;
    }
    return $output;
}
Wp-admin forms – define fields
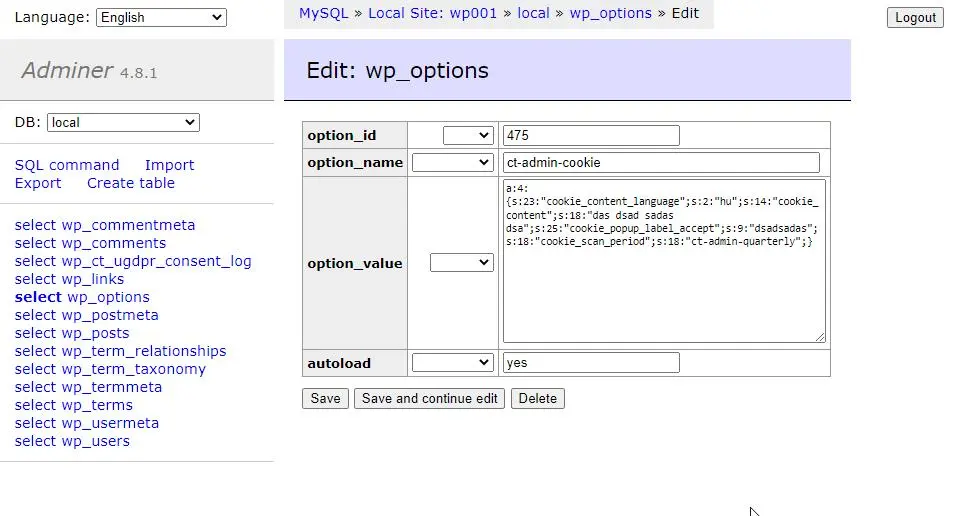
To define WordPress admin form fields, we need to specify the group and key for a particular form element. The group string will be used as wp_options option_name and a key and value will be added as a serialized array into the option_value column.
To understand exactly the concept, see the section “Submit wp-admin form”, where custom logic for saving data and screenshots from the database are presented.
Here are sample form fields defined in our plugin. Each view template has a separate method to provide the data and form fields definition:
/**
 * Prepare data for views
 */
private function view0_data()
{
    $args = [];
    $values = array(
        '' => esc_html__('Select', 'ct-admin'),
        'cs' => 'Čeština',
        'de' => 'Deutsch',
        'en' => 'English',
        'es' => 'Español',
        'fr' => 'Français',
        'hr' => 'Hrvatski',
        'hu' => 'Magyar',
        'no' => 'Norwegian',
        'it' => 'Italiano',
        'nl' => 'Nederlands',
        'pl' => 'Polski',
        'pt' => 'Português',
        'ro' => 'Română',
        'ru' => 'Русский',
        'sk' => 'Slovenčina',
        'dk' => 'Danish',
        'bg' => 'Bulgarian',
        'sv' => 'Swedish'
    );
    $args['cookie_content_language'] = $this->render_select('ct-admin-cookie', 'cookie_content_language', $values);
    $args['cookie_content'] = $this->render_textarea('ct-admin-cookie', 'cookie_content');
    $args['cookie_popup_label_accept'] = $this->render_input('ct-admin-cookie', 'cookie_popup_label_accept');
    $args['forgotten_automated_forget'] = $this->render_checkbox('ct-admin-forgotten', 'forgotten_automated_forget');
    return $args;
}
private function view1_data()
{
    $services_args = array(
        'post_type'        => 'any',
        'numberposts'      => - 1,
        'suppress_filters' => false,
    );
    $blog_posts = get_posts($services_args);
    $args = [];
    $args['posts'] = $blog_posts;
    // add options
    $values = array(
        'manual'                     => __( 'Never', 'ct-admin' ),
        'ct-admin-weekly'    => __( 'Weekly', 'ct-admin' ),
        'ct-admin-monthly'   => __( 'Monthly', 'ct-admin' ),
        'ct-admin-quarterly' => __( 'Quarterly', 'ct-admin' )
    );
    $args['cookie_scan_period'] = $this->render_select('ct-admin-cookie', 'cookie_scan_period', $values);
    return $args;
}
WordPress form – field types
We have 4 different types of fields:
- text input
- textarea
- choice select
- checkbox options
Fields show the current value that is read from the database (wp_options). On submission, wp_options values will be updated with the submitted data.
You might notice that render_checkbox() function uses hidden input. That is required to save an empty checkbox value to the database (unchecked checkbox is not usually visible in POST data).
/**
 * Form elements outputs
 */
private function render_input($group, $key, $required = false)
{
    $inputValue = isset($this->default_values[$group][$key]) ? stripslashes($this->default_values[$group][$key]) : '';
    $requiredAttr = ($required) ? "required" : '';
    return '<input type="text" id="' . $key . '" name="' . $group . '[' . $key . ']" class="form-control" value="' . $inputValue . '" ' . $requiredAttr . '>';
}
private function render_textarea($group, $key)
{
    $defaultValue = isset($this->default_values[$group][$key]) ? stripslashes($this->default_values[$group][$key]) : '';
    return '<textarea class="form-control" rows="6" autocomplete="off" id="' . $key . '" name="' . $group . '[' . $key . ']">' . $defaultValue . '</textarea>';
}
private function render_select($group, $key, $options)
{
    $selectedVal = isset($this->default_values[$group][$key]) ? $this->default_values[$group][$key] : '';
    $html = '';
    $html .= '<select class="form-control" id="' . $key . '" name="' . $group . '[' . $key . ']">';
    $html .= ($selectedVal == '') ? '<option value=""></option>' : '';
    foreach ($options as $key => $opt) {
        $selectedOpt = '';
        if ($selectedVal == $key) {
            $selectedOpt = 'selected="selected"';
        }
        $html .= '<option value="' . $key . '" ' . $selectedOpt . '>' . $opt . '</option>';
    }
    $html .= '</select>';
    return $html;
}
private function render_checkbox($group, $key)
{
    $checkedVal = isset($this->default_values[$group][$key]) ? $this->default_values[$group][$key] : '';
    $checkedAttr = "";
    if ($checkedVal != '') {
        $checkedAttr = "checked";
    }
    $html = '';
    $html .= '
    <input type="hidden" name="' . $group . '[' . $key . ']" value="">
    <input class="form-check-input" type="checkbox" value="on" id="' . $key . '" name="' . $group . '[' . $key . ']" ' . $checkedAttr . '>';
    return $html;
}
Submit the wp-admin form
The action “admin_post_ct_admin_save” is used to define the PHP function for saving form data. As a result, proper data will be saved as wp options.
Form Nonce validation is good practice regarding security. For additional security measure we’re also checking if current user has permissions as Administrator.
Whitelisted keys are option_name keys that are used in forms (groups). By defining it as constants, we’re making sure that we’re not updating some records in wp_options by mistake.
// /wp-content/plugins/ct-wp-admin-form/ct-wp-admin-form.php
const NONCE_KEY = 'ct_admin';
const WHITELISTED_KEYS = array(
    'ct-admin-cookie',
    'ct-admin-forgotten'
);
private $default_values = array();
private $current_page = '';
public function init()
{
    add_action('admin_post_ct_admin_save', array($this, 'submit_save'));
}
public function get_nonce_key()
{
    return self::NONCE_KEY;
}
public function get_whitelisted_keys()
{
    return self::WHITELISTED_KEYS;
}
public function submit_save()
{
    $nonce = sanitize_text_field($_POST[$this->get_nonce_key()]);
    $action = sanitize_text_field($_POST['action']);
    if (!isset($nonce) || !wp_verify_nonce($nonce, $action)) {
        print 'Sorry, your nonce did not verify.';
        exit;
    }
    if (!current_user_can('manage_options')) {
        print 'You can\'t manage options';
        exit;
    }
    /**
     * whitelist keys that can be updated
     */
    $whitelisted_keys = $this->get_whitelisted_keys();
    $fields_to_update = [];
    foreach ($whitelisted_keys as $key) {
        if (array_key_exists($key, $_POST)) {
            $fields_to_update[$key] = $_POST[$key];
        }
    }
    /**
     * Loop through form fields keys and update data in DB (wp_options)
     */
    $this->db_update_options($fields_to_update);
    $redirect_to = $_POST['redirectToUrl'];
    if ($redirect_to) {
        add_settings_error('ct_msg', 'ct_msg_option', __("Changes saved."), 'success');
        set_transient('settings_errors', get_settings_errors(), 30);
        wp_safe_redirect($redirect_to);
        exit;
    }
}
private function db_update_options($group)
{
    foreach ($group as $key => $fields) {
        $db_opts = get_option($key);
        $db_opts = ($db_opts === '') ? array() : $db_opts;
        if(!$db_opts){
            $db_opts = array();
        }
        $updated = array_merge($db_opts, $fields);
        update_option($key, $updated);
    }
}
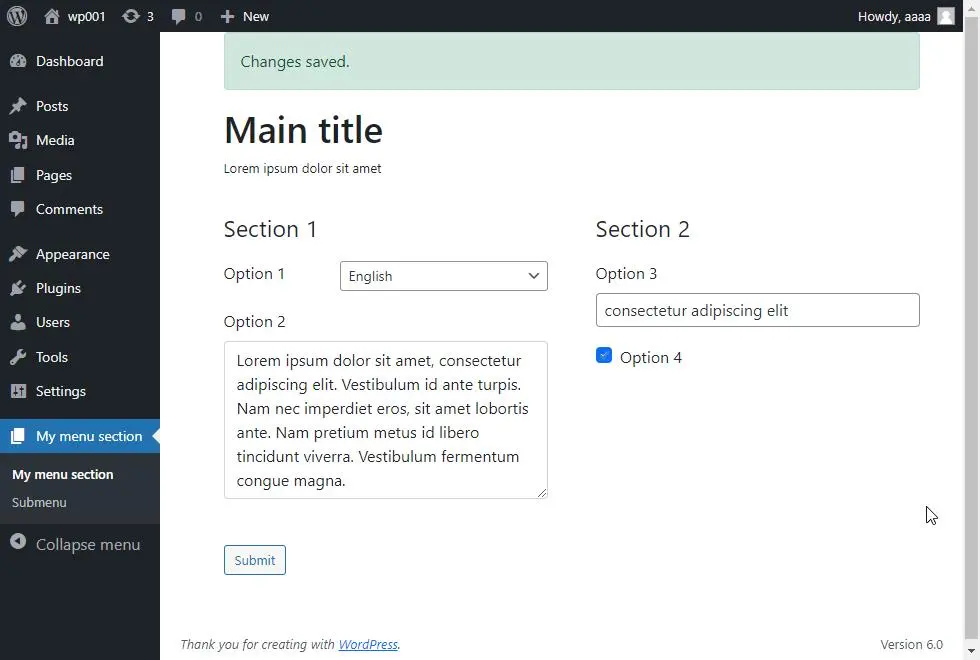
View for the template form
Here is the view template that includes HTML code for the form. WordPress dashboard forms are submitted using the admin-post.php url. The hidden input “action” in the form allows to define a custom function for saving data. Another hidden input “redirectToUrl” allows to redirect the page after a successful submission. Here, we’re redirecting to the same URL.
<?php
// /wp-content/plugins/ct-wp-admin-form/views/view0.php
/** @var string $cookie_content_language */
/** @var string $cookie_content */
/** @var string $cookie_popup_label_accept */
/** @var string $forgotten_automated_forget */
?>
<h1><?php echo esc_html__('Main title', 'ct-admin'); ?></h1>
<p><?php echo esc_html__('Lorem ipsum dolor sit amet', 'ct-admin'); ?></p>
<form method="POST" action="<?php echo esc_html(admin_url('admin-post.php')); ?>">
    <input type="hidden" name="action" value="ct_admin_save">
    <?php wp_nonce_field('ct_admin_save', 'ct_admin'); ?>
    <input type="hidden" name="redirectToUrl" value="<?php echo ct_admin_view_pagename(''); ?>">
    <div class="row g-5">
        <div class="col-md-6">
            <fieldset class="mt-3">
                <legend class="mb-3"><?php echo esc_html__('Section 1', 'ct-admin') ?></legend>
                <div class="mb-3 row">
                    <div class="col-md-4">
                        <label for="cookie_content_language"
                               class="form-label"><?php echo esc_html__('Option 1', 'ct-admin') ?></label>
                    </div>
                    <div class="col-md-8">
                        <?php echo $cookie_content_language; ?>
                    </div>
                </div>
                <div class="mb-3">
                    <label for="cookie_content"
                           class="form-label"><?php echo esc_html__('Option 2', 'ct-admin') ?></label>
                    <?php echo $cookie_content; ?>
                </div>
            </fieldset>
        </div>
        <div class="col-md-6">
            <fieldset class="mt-3">
                <legend class="mb-3"><?php echo esc_html__('Section 2', 'ct-admin') ?></legend>
                <div class="mb-3">
                    <label for="cookie_popup_label_accept"
                           class="form-label"><?php echo esc_html__("Option 3", 'ct-admin') ?></label>
                    <?php echo $cookie_popup_label_accept; ?>
                </div>
                <div class="mb-3 form-checkbox">
                    <?php echo $forgotten_automated_forget; ?>
                    <label for="forgotten_automated_forget"
                           class="form-check-label"><?php echo esc_html__("Option 4", 'ct-admin') ?></label>
                </div>
            </fieldset>
        </div>
    </div>
    <!-- / row -->
    <?php ct_admin_submit(esc_html__('Submit')); ?>
</form>
WordPress admin form – displaying an error
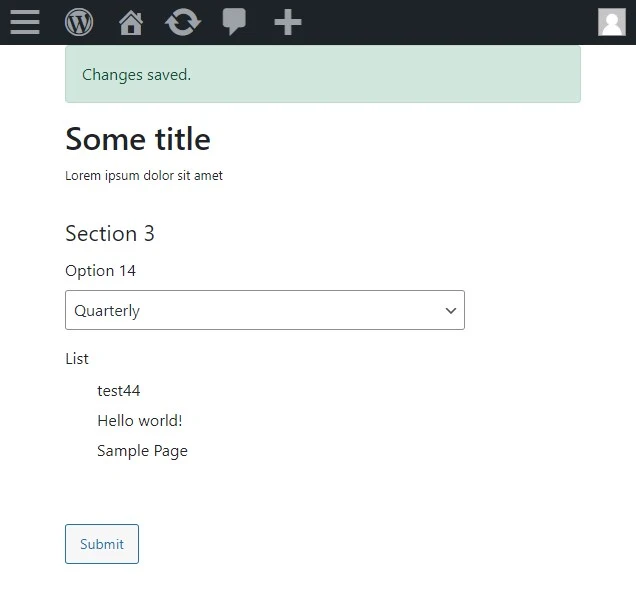
The plugin saves submitted data, redirecting to the page defined in “redirectToUrl”. Now, we want to display an error or success message. The challenge here is that WordPress admin area disallows for appending custom query strings to url.
For example, if we’re going to redirect to url: /wp-admin/admin.php?page=ct-admin-forms?success=1 – we will see the message: “Sorry, you are not allowed to access this page.”
What will be the solution for displaying an error message in the custom admin forms? Two WordPress functions will be helpful here: add_settings_error and set_transient. Working solution below:
public function submit_save()
{
    /**
     * 1. Handle submit here
     */

    /**
     * 2. Save data
     */
    /**
     * 3. Add success message and redirect
     */

    $redirect_to = $_POST['redirectToUrl'];
    if ($redirect_to) {
        add_settings_error('ct_msg', 'ct_msg_option', __("Changes saved."), 'success');
        set_transient('settings_errors', get_settings_errors(), 30);
        wp_safe_redirect($redirect_to);
        exit;
    }
}
And view for displaying WordPress alert / alerts in the admin dashboard panel. Our plugin will display a success message: Changes saved.
<?php
// /wp-content/plugins/ct-wp-admin-form/views/alerts.php
$form_errors = get_transient("settings_errors");
delete_transient("settings_errors");
if(!empty($form_errors)){
    foreach($form_errors as $error){
        echo ct_admin_message($error['message'], $error['type']);
    }
}
Helpers functions
We use multiple helpers functions that are defined as global WordPress functions. Those are available globally and can be used in any place in the plugin or theme. Here are the functionalities we’ve implemented:
- get name of current view (based on page query param)
- include PHP template using server path
- get full file path using plugins_url
- get path for subpage view
- render the submit button
- render the success message
There were some issues when embedding helpers code here. You can find it directly on github:
https://github.com/createit-dev/116-wp-plugin-with-admin-forms/blob/master/ct-wp-admin-form/includes/helpers.php
Load assets on custom admin pages
In case we need to load assets files (CSS/JS) in the admin dashboard, here is the snippet to do it properly. We will load the bootstrap library, custom styles and javascript files. Those assets will be loaded only on our custom admin pages.
// /wp-content/plugins/ct-wp-admin-form/ct-wp-admin-form.php
public function init()
{
    add_action('admin_enqueue_scripts', array($this, 'admin_enqueue_scripts'));
}
public function admin_enqueue_scripts($hook_suffix)
{
    if (strpos($hook_suffix, $this->get_id()) === false) {
        return;
    }
    wp_enqueue_style('ct-admin-form-bs', 'https://cdn.jsdelivr.net/npm/bootstrap@5.1.3/dist/css/bootstrap.min.css', CT_WP_ADMIN_VERSION);
    wp_enqueue_script('ct-admin-form-bs', 'https://cdn.jsdelivr.net/npm/bootstrap@5.1.3/dist/js/bootstrap.bundle.min.js',
        array('jquery'),
        CT_WP_ADMIN_VERSION,
        true
    );

    wp_enqueue_style('ct-admin-form', ct_admin_url('assets/style.css'), CT_WP_ADMIN_VERSION);
    wp_enqueue_script('ct-admin-form-js', ct_admin_url('assets/custom.js'),
        array('jquery'),
        CT_WP_ADMIN_VERSION,
        true
    );
}
Wp-admin custom forms source code
We’ve created a simple WordPress plugin that allows to create custom admin pages, enqueue assets and render customized forms. The submitted data is saved as wp_options and can be later reused. The entire source code can be found in the GitHub repository: https://github.com/createit-dev/116-wp-plugin-with-admin-forms
Just activate the plugin and check out how it works!
That’s it for today’s tutorial. Make sure to follow us for more tips and guidelines and don’t forget to subscribe to our newsletter.
That’s it for today’s tutorial. Don’t forget to subscribe to our newsletter to stay up to date with useful tutorials and interesting news!
Do you need someone to implement this solution for you? Check out our specialists for hire in the outsourcing section. Are you considering a global project and are uncertain how to proceed? See our custom web application development page!


![How to Fight AI Hallucinations About Your Brand [ready-to-use prompt inside]](https://www.createit.com/wp-content/uploads/2026/02/How-to-Fight-AI-Hallucinations-355x200.jpg)


