Live Visitor Count in WooCommerce with SSE

Challenge: Real-time tracking and display of visitor counts on WooCommerce product
Solution: Integration of Server-Sent Events (SSE) in WooCommerce
Welcome to our latest edition of “WooCode Tips”, a series dedicated to unraveling the complexities of WooCommerce. Here, we provide a wealth of insights, hacks, and tricks tailored for programmers seeking to master this platform.
In the evolving landscape of web technologies, Server-Sent Events (SSE) emerge as a powerful tool for enhancing real-time communication between servers and web clients. Originating from the HTML5 specification, SSE is specifically designed to handle unidirectional communication – from the server to the client – making it an ideal choice for certain types of real-time data feeds.
The mechanics of SSE
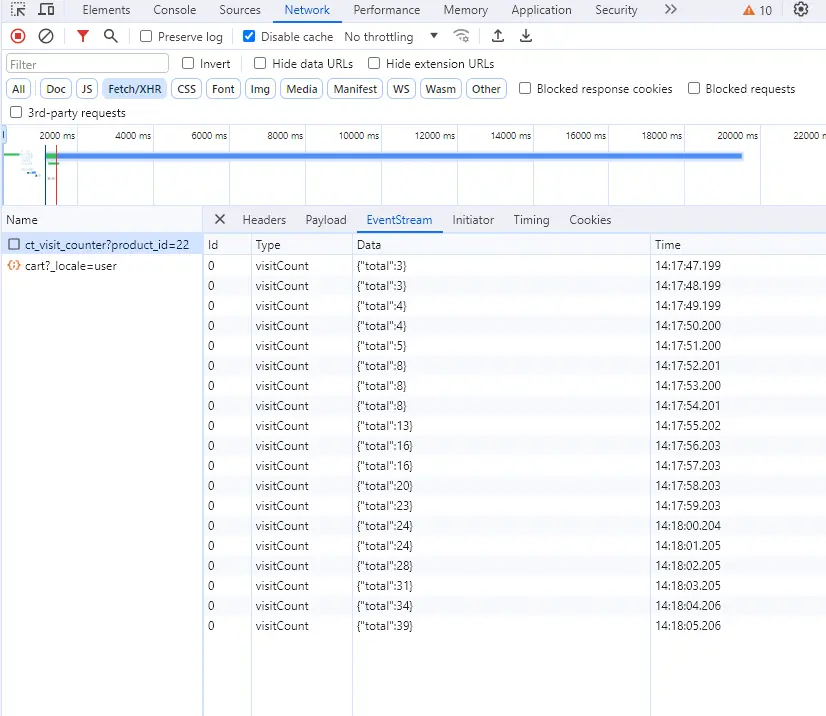
At its core, SSE works by establishing a persistent connection between the client and server. Once this connection is set up, the server can send data to the client at any time, without the client needing to request it. This is achieved using a simple HTTP connection, where the server sends a stream of updates. On the client side, a JavaScript EventSource object is used to listen for these updates and react accordingly.
Key advantages of SSE in web applications
Efficiency in real-time data transmission: SSE is highly efficient for scenarios where real-time updates are essential but occur sporadically. It reduces the overhead compared to traditional polling or long-polling techniques, where continuous requests are made to the server.
Simplicity and ease of use: Implementing SSE is straightforward, primarily because it uses standard HTTP protocols. This simplicity makes it accessible to a wide range of developers, regardless of their background in real-time technologies.
Lower server load: SSE’s one-way communication model from server to client reduces the load on the server, as it doesn’t need to handle a high volume of incoming requests for updates.
Built-in reconnection mechanism: SSE includes a built-in automatic reconnection feature. If the client gets disconnected, the EventSource object automatically attempts to reconnect to the server, ensuring continuous data flow.
SSE in eCommerce: enhancing WooCommerce
In the context of WooCommerce, SSE opens up exciting possibilities for enhancing the user experience and functionality of online stores. From updating users about changing product prices and stock availability in real-time to providing live notifications about order status, SSE can significantly improve the dynamism and interactivity of a WooCommerce site. This can lead to increased engagement, better customer satisfaction, and potentially higher sales conversions.
Exploring SSE use-cases in WooCommerce
Let’s explore various potential use-cases where SSE can be particularly impactful in a WooCommerce setting.
1. Dynamic stock updates
In the fast-paced world of eCommerce, inventory levels can fluctuate rapidly. SSE can be utilized to update stock information on product pages in real-time. This immediate feedback is crucial, especially for high-demand items, ensuring customers have accurate stock data before making a purchase decision.
2. Real-time price adjustments
Sales and promotions are dynamic events where product prices can change frequently. With SSE, changes in pricing can be pushed to customer browsers instantly. This functionality is particularly useful during flash sales or special event days like Black Friday, keeping customers informed and engaged.
3. Live order status notifications
Post-purchase communication is key to customer satisfaction. SSE can be used to provide customers with live updates on their order status, from processing to shipment. This level of transparency improves the customer’s post-purchase experience, leading to higher trust and loyalty.
4. Instant customer alerts
For stores offering time-sensitive deals or restocking popular items, SSE can notify customers immediately. These alerts can be about limited-time offers, new product arrivals, or available slots for booking services, encouraging prompt action.
5. Enhanced customer support
Customer support can be streamlined using SSE by displaying real-time availability of support agents. Customers can see when an agent is available for live chat, reducing wait times and improving service efficiency.
6. Social proof and engagement
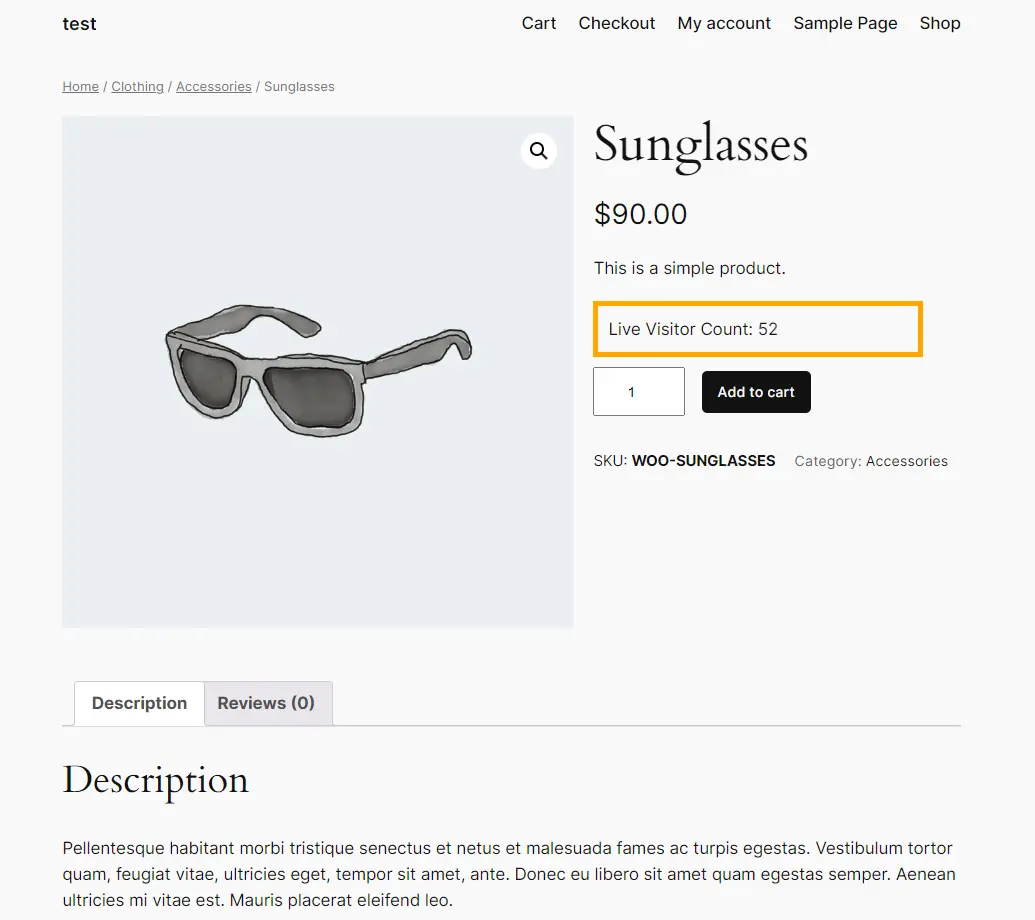
A practical example, such as displaying a live visitor count on product pages, not only creates social proof but also adds an element of interactivity and engagement to the shopping experience. Seeing how many other customers are viewing a product can influence buying decisions and create a sense of urgency.
Implementing live visitor counter using SSE
It’s essential to understand the technical foundations required for integrating SSE into a WooCommerce environment. We will walk through the process of setting up a live visitor counter using SSE, covering each step in detail.

Creating the endpoint: This step involves defining a custom API endpoint within WordPress. The endpoint is created using the register_rest_route function and is crucial for initiating the SSE connection. It specifies a callback function that will handle the SSE data stream and push updates to the client.
add_action('rest_api_init', 'register_api_routes');

function register_api_routes()
{
    register_rest_route('eshop/v1', '/ct_visit_counter', array(
        'methods' => 'GET',
        'callback' => 'send_visitor_count',
        'args' => array(
            'product_id' => array(
                'required' => true
            )
        ),
        'permission_callback' => '__return_true',
    ));
}
Continuous data push: A PHP script is implemented to run in a continuous loop. This script periodically checks for updates, in this case, the current visitor count, and sends this data to the client using the echo statement. Proper SSE headers are set, and the connection state is managed to handle reconnections and errors.
Suspending Cache Additions: The function wp_suspend_cache_addition(true) is called before fetching the visitor count. This temporarily suspends the addition of new data to the WordPress object cache. This is important in scenarios where the data being fetched (like the visitor count) is expected to change frequently or is highly dynamic. By suspending cache additions, it ensures that the most current data is fetched directly from the source (like the database or a transient) rather than a potentially stale cached version.
function send_visitor_count(WP_REST_Request $request)
{
    header('Content-Type: text/event-stream');
    header('Cache-Control: no-cache');
    header('Connection: keep-alive');
    header('X-Accel-Buffering: no');

    $lastEventId = 0;

    $product_id = $request->get_param('product_id');
    if (!$product_id) {
        // Handle the case where product_id is not provided
        echo "data: No product ID provided.\n\n";
        flush();
        return;
    }

    while (true) {
        $visitor_count_key = 'visitor_count_product_' . $product_id;
        wp_suspend_cache_addition(true); // Suspend caching additions
        $visitor_count = get_transient($visitor_count_key) ?: 0;
        wp_suspend_cache_addition(false); // Resume caching additions

        echo "id: " . $lastEventId . "\n";
        echo "event: visitCount\n";
        echo 'data: ' . json_encode(['total' => $visitor_count]) . "\n\n";

        flush();
        sleep(5);
    }
}

Establishing the client-side connection: On the client side, an EventSource object is used to establish and manage the SSE connection. JavaScript code is written to create an EventSource instance, pointing to the custom SSE endpoint. This object listens to messages from the server and processes them as they arrive.
var sseConnectionActive = false;

function setupLiveVisitorCount() {
    if (sseConnectionActive) {
        console.log("SSE already running.");
        return;
    }
    if (typeof (EventSource) == "undefined") {
        console.log("Error: Server-Sent Events are not supported in your browser");
        return;
    }

    if (!!window.EventSource && jQuery('.product').length) {
        var productId = null;

        var bodyClass = jQuery('body').attr('class').split(/\s+/);
        jQuery.each(bodyClass, function (index, item) {
            if (item.indexOf('product-id-') !== -1) {
                productId = item.split('-')[2];
            }
        });

        if (productId) {
            var source = new EventSource('/wp-json/eshop/v1/ct_visit_counter?product_id=' + productId);

            source.addEventListener('visitCount', function (event) {
                var data = JSON.parse(event.data);
                document.getElementById('visitorCount').innerText = data.total;
            }, false);

            source.addEventListener('error', function (event) {
                console.log('SSE error:', event);

                if (event.target.readyState === EventSource.CLOSED) {
                    console.log('SSE closed (' + event.target.readyState + ')');
                    sseConnectionActive = false;
                } else if (event.target.readyState === EventSource.CONNECTING) {
                    console.log('SSE reconnecting (' + event.target.readyState + ')');
                }
            }, false);

            // Ensure that if the browser tab is closed, the SSE connection is also closed.
            window.onbeforeunload = function () {
                source.close();
                sseConnectionActive = false;
            };
        }


    } else {
        console.log("Your browser does not support Server-Sent Events");
    }
}

// Call the function when the DOM is ready
jQuery(document).ready(function () {
    setupLiveVisitorCount();
});
Tracking visitor count: This involves a method for tracking and storing the visitor count using WordPress transients. These transients temporarily store cached data and are designed to record active visitor numbers.
add_action('template_redirect', 'update_product_visitor_count');
function update_product_visitor_count()
{
    if (is_product()) {
        global $post;

        // Ensure $post is not null and is a WP_Post object
        if ($post && $post instanceof WP_Post) {
            $product_id = $post->ID; // Directly get the ID from the global $post object

            $visitor_count_key = 'visitor_count_product_' . $product_id;
            $current_count = get_transient($visitor_count_key) ?: "0";
            set_transient($visitor_count_key, $current_count + 1, 10 * MINUTE_IN_SECONDS); // 10 minutes active threshold
        }
    }
}
Displaying the count on product pages: The WooCommerce product page templates are modified using hooks. View will include live visitor counter. This is achieved through additional PHP functions and JavaScript to ensure that the visitor count is displayed and updated in real time on the product pages.
function add_visitor_count_to_product_page()
{ ?>
   <script type="text/javascript">
       // Call the function when the DOM is ready
       jQuery(document).ready(function () {
           setupLiveVisitorCount();
       });
   </script>
   <style>
       #visitorCountWrapper {
           margin: 10px 0;
           padding: 10px;
           border: 5px solid orange;
           max-width: 300px;
       }
   </style>
   <?php
   echo '<div id="visitorCountWrapper">Live Visitor Count: <span id="visitorCount">Loading...</span></div>';
}


add_action('woocommerce_before_add_to_cart_form', 'add_visitor_count_to_product_page', 15);
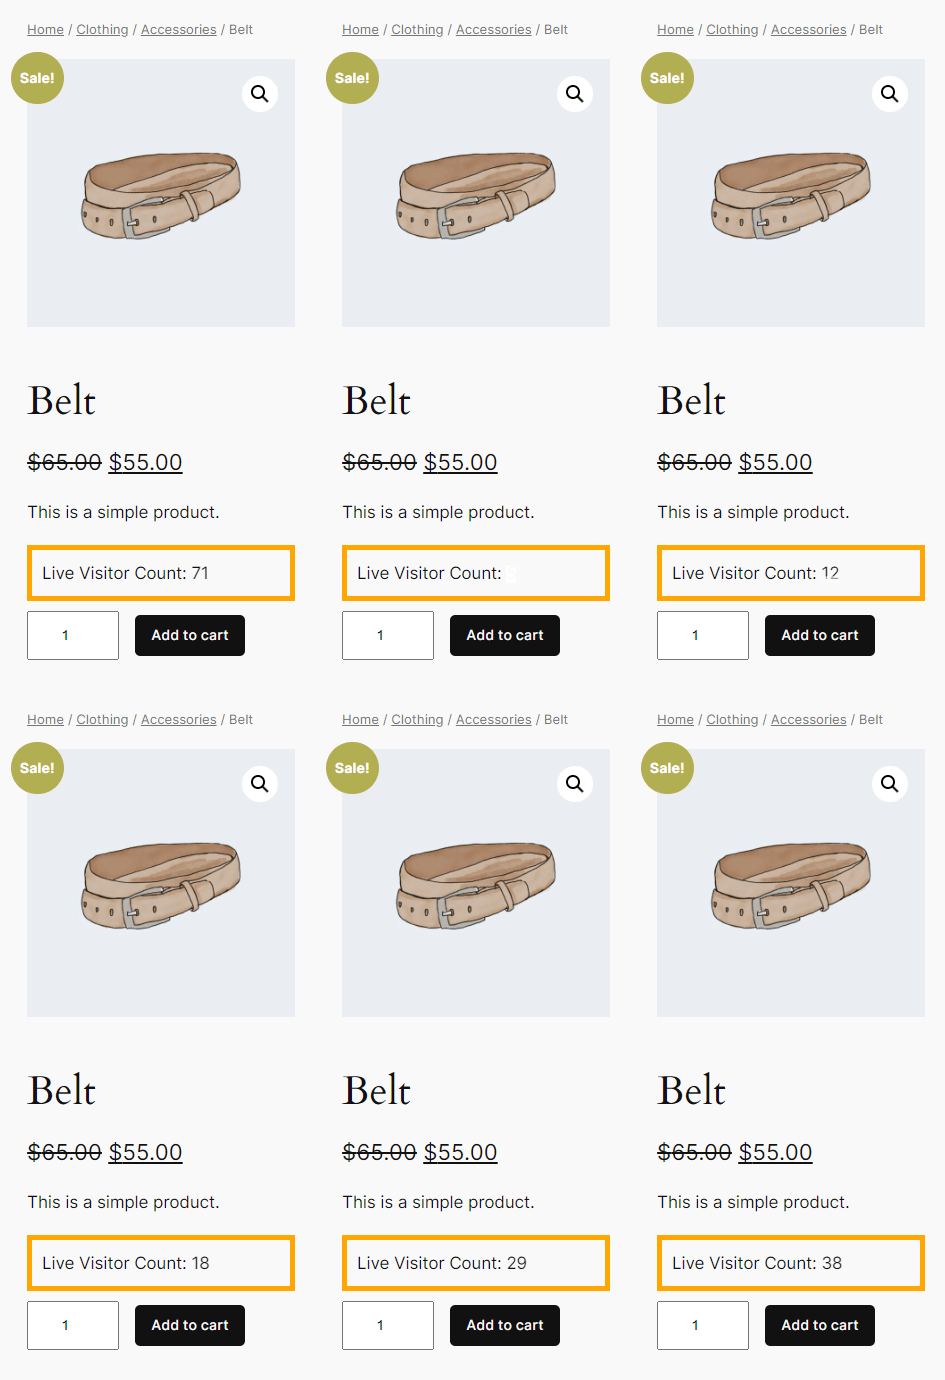
Animation: adding a calendar page turn effect for the live visitor count, specifically when the value increases, is a creative way to visually engage users. Implementing this requires a combination of CSS for the visual effect and JavaScript to control the logic. Visitor count will “flip” like a calendar page when it increases. Here’s how you can do it:
#visitorCount {
    position: relative;
    transition: transform 0.6s;
    transform-style: preserve-3d;
}
#visitorCount::before {
    content: "";
    position: absolute;
    top: 0;
    left: 0;
    right: 0;
    bottom: 0;
    background-color: #fff;
    transform-origin: bottom;
    transform: rotateX(90deg);
    transition: transform 0.6s, opacity 0.3s;
    opacity: 0;
}
#visitorCount.page-turn {
    transform: rotateX(-90deg);
}
#visitorCount.page-turn::before {
    transform: rotateX(0deg);
    opacity: 1;
}
And the Javascript part:
let previousCount = 0;

source.addEventListener('visitCount', function (event) {
    var data = JSON.parse(event.data);
    var currentCount = data.total;
    var visitorCountElement = document.getElementById('visitorCount');

    if (currentCount > previousCount) {
        // Apply the page turn effect
        visitorCountElement.classList.add('page-turn');
        setTimeout(() => {
            visitorCountElement.innerText = currentCount;
            visitorCountElement.classList.remove('page-turn');
        }, 300); // Halfway through the animation
    } else {
        // Update the count normally if it has not increased
        visitorCountElement.innerText = currentCount;
    }

    previousCount = currentCount;
}, false);

Challenges and solutions
Implementing Server-Sent Events (SSE) in WooCommerce can transform the customer experience, but this advanced functionality does come with its own set of challenges.
Browser compatibility
One significant challenge with SSE is the variability in browser support. While most modern browsers handle SSE effortlessly, older versions and some browsers may lack this capability. This discrepancy can lead to inconsistent experiences for users across different platforms. The key here is to implement a robust fallback mechanism. By using feature detection scripts in JavaScript, we can ascertain whether the user’s browser supports SSE. If it doesn’t, the script can automatically switch to an alternative method, such as AJAX long polling.
if (!!window.EventSource) {
    // Initialize SSE connection
} else {
    // Fallback to AJAX polling
}
Managing performance and server load
Another crucial aspect to consider is the impact of SSE on server performance, especially under high traffic conditions. Each SSE connection is a continuously open HTTP connection, which, when multiplied by thousands of users, can put a significant load on the server. To address this, optimizing server configurations becomes essential. This might involve tuning server parameters to handle more simultaneous connections or considering the use of dedicated servers for handling SSE connections.
SSE alternatives
SSE vs. WebSocket
WebSocket provides a full-duplex communication channel that allows for simultaneous two-way communication between the client and server. It’s ideal for cases where constant and rapid interaction is required, such as in chat applications or multiplayer online games.
While WebSocket excels in scenarios requiring bi-directional communication, SSE is specifically designed for unidirectional data flow – from server to client. It’s more suitable for scenarios where the client doesn’t need to send data to the server, such as real-time notifications, live feeds, or updates.
WebSocket can be more complex to implement and maintain due to its protocol requirements. SSE, being simpler and built on top of standard HTTP, has less overhead and can be easier to integrate with existing web infrastructures.
Traditional AJAX polling
In AJAX polling, the client repeatedly requests (polls) the server for data. This can lead to inefficient use of resources, as each request involves HTTP overhead, and the server must process requests even when no new data is available.
Source code
The choice between SSE, WebSocket, and AJAX long polling depends on the specific requirements of your application. For WooCommerce developers, SSE offers a simple and efficient way to implement real-time data updates in scenarios where unidirectional communication suffices. Its ease of use, lower server load, and integration with standard web technologies make it a compelling choice for enhancing the user experience in eCommerce settings.
For those interested in implementing the live visitor count feature discussed in this series, the complete code is available in a GitHub Gist. This resource provides a hands-on example of how to integrate SSE into your WooCommerce store, offering a practical starting point for your real-time data endeavors.


