Get User Fingerprint using UAParser.js

How to identify a website visitor? How to do it even in incognito (private) mode? The old solution was to save the cookie in the browser, which would store the visitor’s unique user identifier. However, once saved, the cookie belongs to one domain and can’t be transferred between different browsers. A better solution is to use a function called fingerprint js for this.
Every browser provides general information about the browser name, browser version, platform and user language. We can use it to create a user fingerprint, which will be used as UID (Unique Identifier). It stays the same, even if browser cache or settings are purged. Identification will also be working in the Incognito Mode of the browser. Fingerprint solutions are popular, especially in mobile app development.
Fingerprint usage with UAParser.js
Have you ever wondered how the same adverts are displayed when you’re navigating the Internet? Companies that are running ad networks use a similar technique: a user fingerprint is assigned to a user profile. Targeted ads are displayed basing on this data.
User privacy
It’s important to ask users for permission to use their data. Sensitive information, such as user IP address or user fingerprint, can be used to identify a single visitor. With the introduction of privacy laws, including GDPR (Europe) and CCPA (CA, USA), it’s crucial to get a user permission before requesting sensitive information.
IpAddress should be enough?
We can ask the following question: we already have userIP, so why should we use additional User-Agent data? One IP address can be assigned to multiple computers in the network. We need more information to target a single user. We can distinguish a single visitor using browser data.
JS fingerprint demo
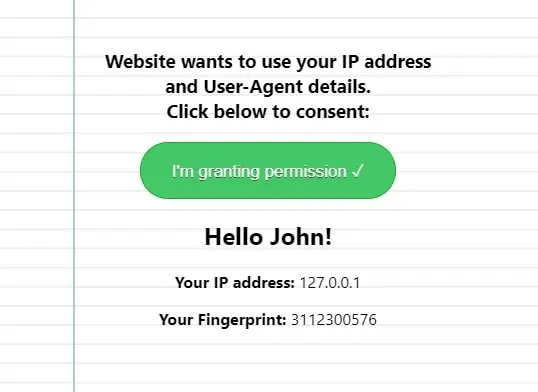
As a demonstration, let’s say we have a database of visitor names. Every unique user fingerprint using js is assigned to his first name. Our goal will be to display a greeting: Hello [user_name]! To simplify the example, we’re going to hardcode data in javascript, but the recommended way of storing such data will be a database or an API.
We’re going to use UAParser.js to get information about the Browser, Engine, OS, CPU, and Device type/model. It’s a javascript library, also available as an NPM package. Fingerprint value is hash generated from 5 values: the IP address and browser details.
Hello John!
Here is the entire application code written using React. On user visit, we’re asking for permission and then displaying greetings. The IP address is fetched using https://ip.nf/me.json. Execute the following command to install the required dependency:
npm install ua-parser-jsThe main application:
// App.jsx
import React, { useState } from "react";
import './App.css';
import {Greetings} from "./Greetings";
function App() {
const [permissionGranted, setPermissionGranted] = useState(false);
return (
<div className="App">
<div>
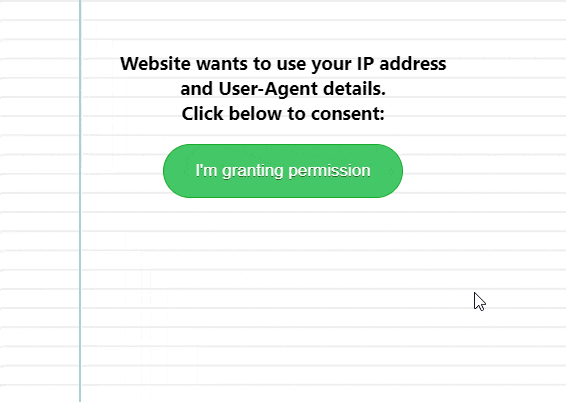
<h3>Website wants to use your IP address and User-Agent details.<br />Click below to consent:</h3>
<button className={'myButton'} onClick={() => {setPermissionGranted(true)}}>I'm granting permission {permissionGranted ? '✓' : ''}</button>
</div>
{permissionGranted ? <Greetings /> : ''}
</div>
);
}
export default App;
The component for calculating the fingerprint and displaying greetings:
// Greetings.jsx
import React, {useState, useEffect} from 'react';
import { UAParser } from 'ua-parser-js';
export const Greetings = () => {
    const [ipAddress, setIpAddress] = useState(false);
    const [userFingerprint, setUserFingerPrint] = useState(false);
    const [firstName, setFirstName] = useState('Anonymous');
    const setIP = () => {
        fetch('https://ip.nf/me.json'
            , {
                headers: {
                    'Content-Type': 'application/json',
                    'Accept': 'application/json'
                }
            }
        )
            .then(function (response) {
                return response.json();
            })
            .then(function (myJson) {
                if(myJson.ip.ip){
                    setIpAddress(myJson.ip.ip);
                    // setIpAddress("127.0.0.1");
                }
            });
    }
   const generateFingerprint = (ip, browserName, browserVersion, operatingSystem, language) =>{
        return generateHash(ip) + generateHash(browserName) + generateHash(browserVersion)
            + generateHash(operatingSystem) + generateHash(language);
    }
    const generateHash = (input) => {
        if(input){
            return input.split("").reduce(function(a,b){a=((a<<5)-a)+b.charCodeAt(0);return a&a},0);
        }
        return 0;
    }
    const setFingerprint = () => {
        const userAgentInfo = new UAParser();
        const browserName = userAgentInfo.getBrowser().name;
        const browserVersion = userAgentInfo.getBrowser().version;
        const platform = userAgentInfo.getOS().name;
        const userLang = (navigator.language) ? navigator.language : '';
        const temp1 = generateFingerprint(ipAddress, browserName, browserVersion, platform, userLang);
        if(temp1){
            setUserFingerPrint(temp1);
        }
    }
    const setNameFromDatabase = (fingerprint) => {
        // for demo purpose – data is hardcoded
        // for production application: use database storage or API
        // user fingerprint assigned to name
        const myDatabase = {
            3112300576: 'John',
            3112300577: 'Michael',
            3112300578: 'Anna'
        };
        if(myDatabase[fingerprint]) {
            setFirstName(myDatabase[fingerprint]);
        }
    }
    useEffect(() => {
        setIP();
    }, [])
    useEffect(() => {
        if(ipAddress){
            setFingerprint();
        }
        // eslint-disable-next-line
    }, [ipAddress])
    useEffect(() => {
        if(userFingerprint){
            setNameFromDatabase(userFingerprint);
        }
        // eslint-disable-next-line
    }, [userFingerprint])
    return (
        <>
            <h2>Hello {firstName}!</h2>
            { ipAddress && <p><strong>Your IP address: </strong> {ipAddress}</p> }
            <p><strong>Your Fingerprint: </strong> {userFingerprint}</p>
        </>
    );
}
The content of the CSS style:
body {
  background-color: #fff;
  background-image:
          linear-gradient(90deg, transparent 79px, #abced4 79px, #abced4 81px, transparent 81px),
          linear-gradient(#eee .1em, transparent .1em);
  background-size: 100% 1.2em;
}
.App {
  text-align: center;
  max-width: 350px;
  margin: 50px auto;
}
.myButton {
  background-color:#44c767;
  border-radius:28px;
  border:1px solid #18ab29;
  display:inline-block;
  cursor:pointer;
  color:#ffffff;
  font-size:17px;
  padding:16px 31px;
  text-decoration:none;
  text-shadow:0px 1px 0px #2f6627;
}
.myButton:hover {
  background-color:#5cbf2a;
}
.myButton:active {
  position:relative;
  top:1px;
}
More accurate targeting
We can add additional parameters for calculating fingerprint js value to have more accurate results, e.g.: Geo Location, screen resolution, time of visit patterns, URL changes, a picture rendered with the HTML Canvas or WebGL, adBlock addon installed, a list of fonts in the system or some other advanced fingerprint signals. Instead of doing it manually, we can also use a ready-to-use NPM library: https://www.npmjs.com/package/@fingerprintjs/fingerprintjs.
That’s it for today’s tutorial. Make sure to follow us for other useful tips and guidelines and don’t forget to sign up for our newsletter.


![How to Fight AI Hallucinations About Your Brand [ready-to-use prompt inside]](https://www.createit.com/wp-content/uploads/2026/02/How-to-Fight-AI-Hallucinations-355x200.jpg)


