WooCommerce – net / gross price display

CHALLENGE: improve page loading speed by eliminating blocking resources
SOLUTION: use the Async JavaScript plugin and the style_loader_tag filter
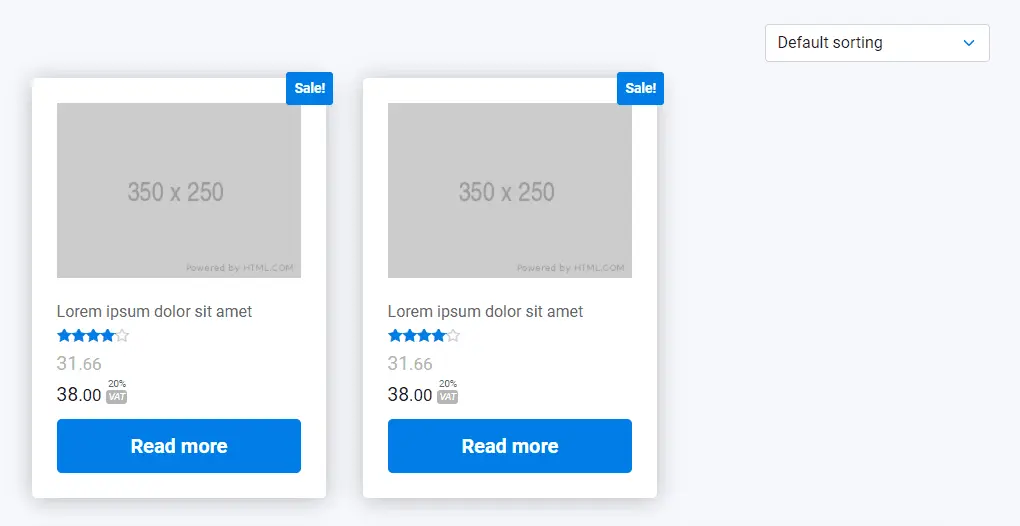
For wholesale shops, it’s important to display prices in net and gross values. By default, it’s quite difficult to achieve this using WooCommerce settings. We’re going to create a custom function to do that.
Overwrite price.php
Two WooCommerce templates price.php are safely overwritten in our theme. Doing this in the theme, we’re ensuring feature compatibility in case of a WooCommerce plugin update.
<?php
/**
 * wp-content/themes/mytheme/woocommerce/loop/price.php
 */
if ( ! defined( 'ABSPATH' ) ) {
    exit; // Exit if accessed directly
}
global $product;
ct_display_2_prices($product);
And a similar change for the single product view:
<?php
/**
 * wp-content/themes/mytheme/woocommerce/single-product/price.php
 */
if ( ! defined( 'ABSPATH' ) ) {
    exit; // Exit if accessed directly
}
global $product;
ct_display_2_prices($product);
?>
<div class="clearfix"></div>
<br>
Product price information
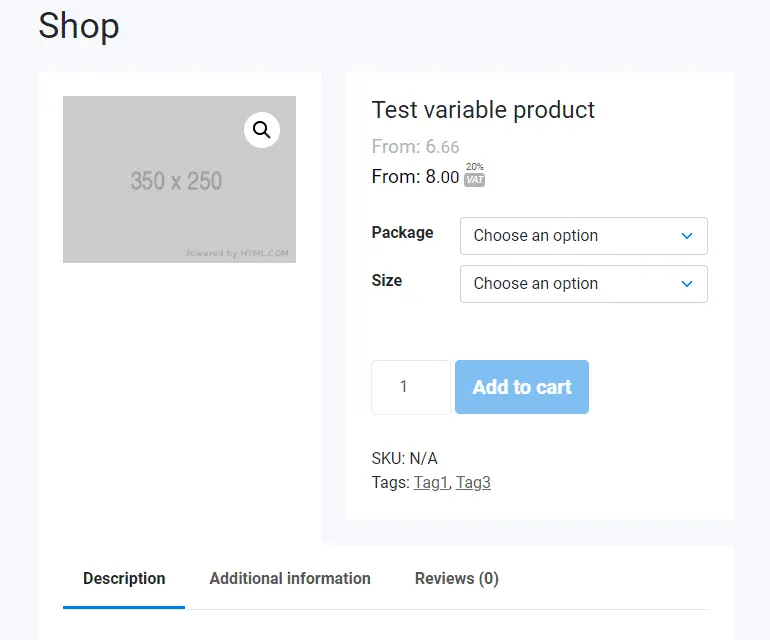
For a standard product, we can display the final price (before and after the tax). However, variable product price is typically displayed only after proper variants are chosen from selects. For variable products we will just display the minimal price available for the cheapest variant configuration (prefix: From: ). The price is properly formatted using the PHP function: number_format (2 decimal places).
/**
 * Net / Gross woocommerce price
 */
function ct_display_2_prices($product){
    $netto_price = wc_get_price_excluding_tax( $product );
    $brutto_price = wc_get_price_including_tax( $product );
    $with_tax_html = '';
    if(!empty($netto_price)){
        $tax_rate =  round(($brutto_price / $netto_price - 1) * 100);
        $with_tax_html = '<span class="withTaxBadge">'. $tax_rate .'%<br><em>VAT</em></span>';
    }
    $prefix = '';
    if ( $product->is_type( 'variable' ) ) {
        $prefix = _x( 'From:', 'min_price', 'woocommerce' );
    }
    ?>
    <?php if ( $price_html = $product->get_price_html() ) : ?>
        <span class="price">
            <span class="price--netto"><?php echo $prefix; ?> <?php echo ct_format_price($netto_price); ?></span>
        <?php echo $prefix; ?> <?php echo ct_format_price($brutto_price); ?><?php echo $with_tax_html; ?></span>
    <?php endif;
}
function ct_format_price($price, $decimal_separator = '.'){
    if(empty($price)){
        return '';
    }
    $unit = number_format( intval( $price ), 0, $decimal_separator, ',' );
    $decimal = sprintf( '%02d', ( $price - intval( $price ) ) * 100 );
    return $unit . '<small>' . $decimal_separator. $decimal . '</small>';
}
Styling the WooCommerce price
SCSS styles have been added to add some basic look. Now we have net and gross prices displayed on product listing and a single product view.
// wp-content/themes/mytheme/assets/scss/woocommerce/_shop.scss
.price {
  font-size:1.2rem !important;
  color:#000 !important;
  .price--netto {
    color:$lightdark;
    display:block;
  }
  .withTaxBadge {
    text-align:center;
    color:$dark;
    font-size: 0.5em;
    display: inline-block;
    margin-left:5px;
    line-height:1;
    em {
      background:$lightdark;
      color:#fff;
      padding: 2px;
      display: inline-block;
      line-height: 1;
      border-radius: 3px;
      margin-top:2px;
    }
  }
}
That’s it for today’s tutorial. Be sure to follow us for other useful tips and guidelines.


![How to Fight AI Hallucinations About Your Brand [ready-to-use prompt inside]](https://www.createit.com/wp-content/uploads/2026/02/How-to-Fight-AI-Hallucinations-355x200.jpg)


