WooCommerce – VAT/Tax fields on checkout

WooCommerce based shops often sell products to retail customers. However, sometimes there is a situation when a customer needs to have an invoice generated. TAX ID # is used as a company identification number on the invoice. VAT identification number (VATIN) has different abbreviation names depending on country, for example: in Poland it’s NIP, in France TVA or VAT UE (companies registered as European Union vat payers).
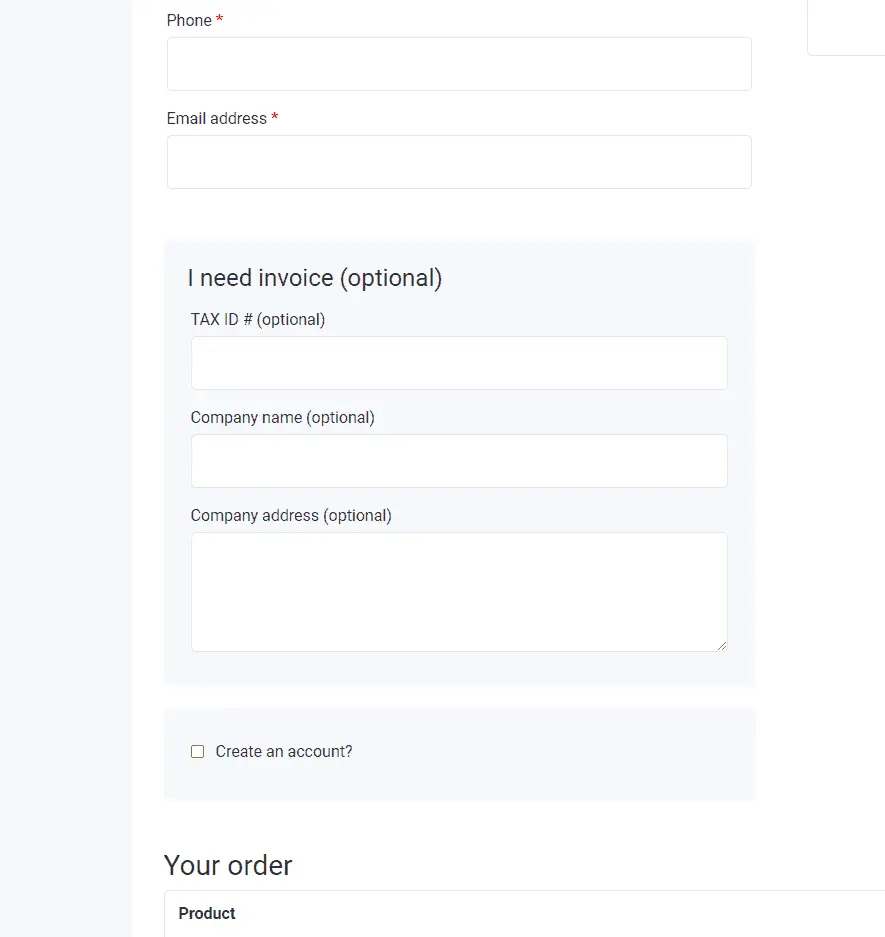
Unfortunately, there is no built-in feature for this in WooCommerce. We can use third-party plugins that will add proper fields, validate the TAX ID number, even generate an invoice and send it to the client. Instead of using a third-party plugin, we will implement a simple solution – add custom invoice fields to the checkout form. All fields will be displayed as optional to fill-in.
// functions.php
/**
 * Add the field to the checkout
 */
add_action( 'woocommerce_after_checkout_billing_form', 'ct_invoice_checkout_fields' );
function ct_invoice_checkout_fields( $checkout ) {
echo '<div id="ct_checkout_invoice" class="mt-5"><h2>' . esc_html__('I need invoice', 'storefront') . ' <span class="optional">(' . esc_html__( 'optional', 'woocommerce' ) . ')</span></h2>';
     woocommerce_form_field( 'ct_invoice_taxid', array(
         'type'          => 'text',
         'class'         => array('my-field-class form-row-wide'),
         'label'         => esc_html__('TAX ID #', 'storefront'),
         'placeholder'   => '',
     ), $checkout->get_value( 'ct_invoice_taxid' ));
     woocommerce_form_field( 'ct_invoice_company', array(
        'type'           => 'text',
        'class'          => array('my-field-class form-row-wide'),
        'label'          => esc_html__('Company name','woocommerce'),
        'placeholder'    => '',
     ), $checkout->get_value( 'ct_invoice_company' ));
     woocommerce_form_field( 'ct_invoice_address', array(
        'type'           => 'textarea',
        'class'          => array('my-field-class form-row-wide'),
        'label'          => esc_html__('Company address', 'woocommerce'),
        'placeholder'    => '',
     ), $checkout->get_value( 'ct_invoice_address' ));
     echo '</div>';
  }
The ‘woocommerce_checkout_update_order_meta’ action will be used for saving field values as order postmeta. If we’re using the WooCommerce API, this meta data will be automatically available in the response (key meta_data).
// functions.php
/**
 * Update the order meta with field value
 */
add_action( 'woocommerce_checkout_update_order_meta', 'ct_invoice_save_fields' );
function ct_invoice_save_fields( $order_id ) {
    if ( ! empty( $_POST['ct_invoice_taxid'] ) ) {
       update_post_meta( $order_id, 'ct_invoice_taxid', sanitize_text_field( $_POST['ct_invoice_taxid'] ) );
    }
    if ( ! empty( $_POST['ct_invoice_company'] ) ) {
       update_post_meta( $order_id, 'ct_invoice_company', sanitize_text_field( $_POST['ct_invoice_company'] ) );
    }
    if ( ! empty( $_POST['ct_invoice_address'] ) ) {
       update_post_meta( $order_id, 'ct_invoice_address', sanitize_textarea_field( $_POST['ct_invoice_address'] ) );
    }
  }
Display invoice information
The last thing to implement is displaying invoice details on ‘Order edit page’ in wp-admin and adding info to the confirmation e-mail (the order received a template). The PHP function nl2br is used to render line breaks in company address. We will be using actions provided by the WooCommerce plugin.
// functions.php
/**
 * Display field value on the order edit page
 */
add_action( 'woocommerce_admin_order_data_after_billing_address', 'ct_custom_checkout_field_display_admin_order_meta', 10, 1 );
function ct_custom_checkout_field_display_admin_order_meta($order){
    $taxid = get_post_meta( $order->get_id(), 'ct_invoice_taxid', true );
    if(!empty($taxid)){
        echo '<div class="clear"></div>';
        echo '<h2>' . esc_html__('I need invoice', 'storefront') .'</h2>';
        echo '<p>'; echo '<span>'. $taxid . '</span><br>';
        echo '<span>'. get_post_meta( $order->get_id(), 'ct_invoice_company', true ) . '</span><br>';
        echo '<span>'. nl2br(get_post_meta( $order->get_id(), 'ct_invoice_address', true )) . '</span><br>';
        echo '</p>';
    }
  }
  /**
  * Add meta fields to email
  */
add_action('woocommerce_email_after_order_table', 'ct_woocommerce_email_after_order_table', 10, 4);
function ct_woocommerce_email_after_order_table( $order, $sent_to_admin, $plain_text, $email ){
    ct_custom_checkout_field_display_admin_order_meta($order);
  }
Checkout styles
If our eshop has the ‘Allow customers to create an account during checkout’ option enabled, non-logged in users will see the ‘Create an account’ checkout checkbox. It is currently placed below the ‘I need invoice’ section, and its visibility is not good. Let’s add some CSS styles to highlight box contents.
.woocommerce-account-fields,
#ct_checkout_invoice {
  background: #f7f8fc;
  padding: 1.5rem;
  margin-bottom: 1.5rem;
}
#order_comments,
#ct_invoice_address {
  min-height: 120px;
}
That’s it for today’s tutorial. Make sure to follow us for other useful tips and guidelines.


![How to Fight AI Hallucinations About Your Brand [ready-to-use prompt inside]](https://www.createit.com/wp-content/uploads/2026/02/How-to-Fight-AI-Hallucinations-355x200.jpg)


