Create a channel in the chat

CHALLENGE: to have the ability to create a chat channel with members
SOLUTION: use SDK and sendBirdSelectors.getCreateChannel()
We’re using SendBird UIKit for React. In this tutorial, we’re going to: fetch user IP address and set it as channel data parameters, create a new channel, and create a distinct channel. Possible usage cases: creating chat conversations with ecommerce Clients, managing support requests, chat implementation for a dating application, or creating a ChatBot that will use AI to answer frequently asked questions.
App settings
The main settings are defined in App.jsx. Make sure to change them according to your settings. We’ve set “dark one” as the main template,. This chat will have 6 members in total (The user that created the channel and 5 chat members that were invited to the channel). Keep in mind that those users should previously exists.
const CHAT_MEMBERS = ['user1', 'user2', 'user3', 'user3', 'user4'];
const APP_ID = "AAA";
const USER_ID = "CCC";
const NICKNAME = "Client";
const THEME = "dark";
Distinct channel
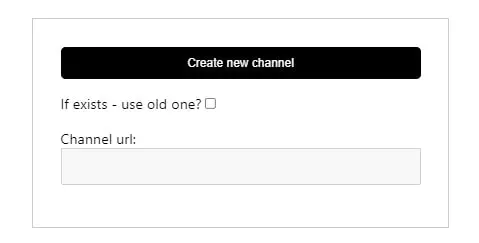
The distinct option determines whether to resume an old channel or to create an entirely new one. It’s checking pre-existing member combination. If you would like to have a new channel every time, distinct should be set to false. In our demo, it is used as a checkbox.
Fetch IP address
Before creating a channel, we would like to fetch user IP address and wait for the SDK to load. The channel has some default options set up: it is not public and not ephemeral. The group channel is created. OpenChannel is an alternative option.
Create Channel in React
Now let’s check the implementation of creating a new channel using SendBird UIKit in React. Let’s install the dependencies:
npm install sendbird-uikit
Main App.jsx content:
// App.jsx
import React, {useState} from 'react';
import './App.css';
import {
Channel,
SendBirdProvider,
} from 'sendbird-uikit';
import 'sendbird-uikit/dist/index.css';
import CustomCreateChannel from './CreateChannel';
const CHAT_MEMBERS = ['user1', 'user2', 'user3', 'user3', 'user4'];
const APP_ID = "AAA";
const USER_ID = "CCC";
const NICKNAME = "Client";
const THEME = "dark";
function App() {
const [channelUrl, setChannelUrl] = useState("");
const [chatMembers] = useState(CHAT_MEMBERS);
const [initChannel, setInitChannel] = useState(false);
const [distinctChannel, setDistinctChannel] = useState(false);
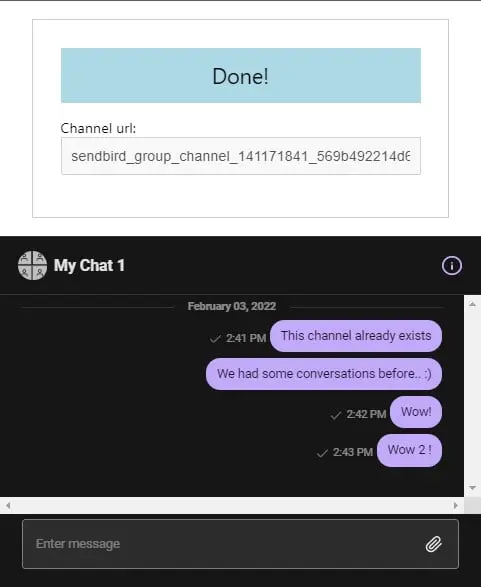
let initChannelHTML = (<span className="u-block mb1 text--info">Done!</span>);
if(! initChannel){
initChannelHTML = (
<>
<button className="button mb1" onClick={() => setInitChannel(true)}>Create new channel</button>
<label className="u-block mb1">
If exists - use old one?
<input type="checkbox" checked={distinctChannel} onChange={() => setDistinctChannel(!distinctChannel)} />
</label>
</>
)
}
return (
<div className="App">
<div className="mainControls">
{initChannelHTML}
<label className="u-block mb1">
Channel url:
<input
className="input--text"
type="text"
disabled="disabled"
value={channelUrl}
/>
</label>
</div>
<SendBirdProvider
appId={APP_ID}
theme={THEME}
userId={USER_ID}
nickname={NICKNAME}
>
<div className="sendbird-app__wrap">
<div className="sendbird-app__conversation-wrap">
<Channel
channelUrl={channelUrl}
/>
</div>
</div>
{initChannel ? <CustomCreateChannel newChatMembers={chatMembers} setChannelUrl={setChannelUrl} distinctChannel={distinctChannel}/> : ''}
</SendBirdProvider>
</div>
);
}
export default App;
Some CSS styling:
/**
App.css
 */
.mainControls {
  border:2px solid #ccc;
  padding:30px;
  margin:20px auto;
  max-width:400px;
}
.text--info {
  background: lightblue;
  padding: 15px;
  font-size: 1.5rem;
  text-align: center;
}
.button {
  padding: 10px;
  background: #000;
  color: #fff;
  border: 0;
  display: block;
  width: 100%;
  border-radius: 5px;
  margin: 0 0 10px 0;
  cursor:pointer;
}
.mainControls .input--text {
  box-sizing: border-box;
  padding:10px;
  font-size:1rem;
  width:100%;
}
.u-block {
  display:block;
}
.mb1 {
  margin-bottom:1rem !important;
}
.sendbird-app__wrap {
  min-height:400px;
}
The most interesting component, which is creating a new channel using SendBird SDK:
// CreateChannel.jsx
import React, { useEffect, useState, useRef } from "react";
import {
    withSendBird,
    sendBirdSelectors,
} from "sendbird-uikit";
import publicIp from './publicIp';
const CustomComponent2 = (props) => {
    const { createChannel, sdk, newChatMembers, setChannelUrl, distinctChannel } = props;
    const channelName = 'My Chat 1';
    const [userIpAddress, setUserIpAddress] = useState('');
    const sdkLoaded = useRef(false);
    useEffect(() => {
        const getUserIp = () => {
            publicIp.v4()
                .then(
                    (result) => {
                        if(result){
                            setUserIpAddress(result);
                        }
                    },
                    (error) => {
                        console.log(error);
                        setUserIpAddress('0.0.0.0');
                    }
                );
        }
        if(!userIpAddress){
            getUserIp();
        }
        // execute only once!
        // eslint-disable-next-line
    },[]);
    useEffect(() => {
        if (!sdkLoaded.current){
            if (sdk && sdk.ChannelHandler){
                sdkLoaded.current = true;
            }
        }
        // try multiple times
        // eslint-disable-next-line
    });
    useEffect(() => {
        if (sdkLoaded.current){
            if(newChatMembers && userIpAddress){
                let params = new sdk.GroupChannelParams();
                params.isPublic = false;
                params.isEphemeral = false;
                params.isDistinct = distinctChannel;
                params.isSuper = false;
                if(newChatMembers){
                    params.addUserIds(newChatMembers);
                }
                params.name = channelName;
                params.data = JSON.stringify({
                    'ipAddress': userIpAddress,
                });
                createChannel(params)
                    .then(c => {
                        setChannelUrl(c.url);
                    })
                    .catch(c => console.warn(c));
            }
        }
        // eslint-disable-next-line
    },[sdkLoaded.current, newChatMembers, userIpAddress]);
    return ( <></> );
};
const CustomCreateChannel = withSendBird(CustomComponent2, (state) => {
    const sdk = sendBirdSelectors.getSdk(state);
    const createChannel = sendBirdSelectors.getCreateChannel(state);
    return ({ createChannel, sdk });
});
export default CustomCreateChannel;
and finally, the helper library for fetching user IP:
// based on nodejs package: https://github.com/sindresorhus/public-ip/blob/main/browser.js
export class CancelError extends Error {
    constructor() {
        super('Request was cancelled');
        this.name = 'CancelError';
    }
    get isCanceled() {
        return true;
    }
}
export class IpNotFoundError extends Error {
    constructor(options) {
        super('Could not get the public IP address', options);
        this.name = 'IpNotFoundError';
    }
}
const defaults = {
    timeout: 5000,
};
const urls = {
    v4: [
        'https://ipv4.icanhazip.com/',
        'https://api.ipify.org/',
    ],
    v6: [
        'https://ipv6.icanhazip.com/',
        'https://api6.ipify.org/',
    ],
};
const sendXhr = (url, options, version) => {
    const xhr = new XMLHttpRequest();
    let _reject;
    const promise = new Promise((resolve, reject) => {
        _reject = reject;
        xhr.addEventListener('error', reject, {once: true});
        xhr.addEventListener('timeout', reject, {once: true});
        xhr.addEventListener('load', () => {
            const ip = xhr.responseText.trim();
            if (!ip) {
                reject();
                return;
            }
            resolve(ip);
        }, {once: true});
        xhr.open('GET', url);
        xhr.timeout = options.timeout;
        xhr.send();
    });
    promise.cancel = () => {
        xhr.abort();
        _reject(new CancelError());
    };
    return promise;
};
const queryHttps = (version, options) => {
    let request;
    const promise = (async function () {
        const urls_ = [
            ...urls[version],
            ...(options.fallbackUrls ?? []),
        ];
        let lastError;
        for (const url of urls_) {
            try {
                request = sendXhr(url, options, version);
                // eslint-disable-next-line no-await-in-loop
                const ip = await request;
                return ip;
            } catch (error) {
                lastError = error;
                if (error instanceof CancelError) {
                    throw error;
                }
            }
        }
        throw new IpNotFoundError({cause: lastError});
    })();
    promise.cancel = () => {
        request.cancel();
    };
    return promise;
};
const publicIp = {};
publicIp.v4 = options => queryHttps('v4', {...defaults, ...options});
publicIp.v6 = options => queryHttps('v6', {...defaults, ...options});
export default publicIp;
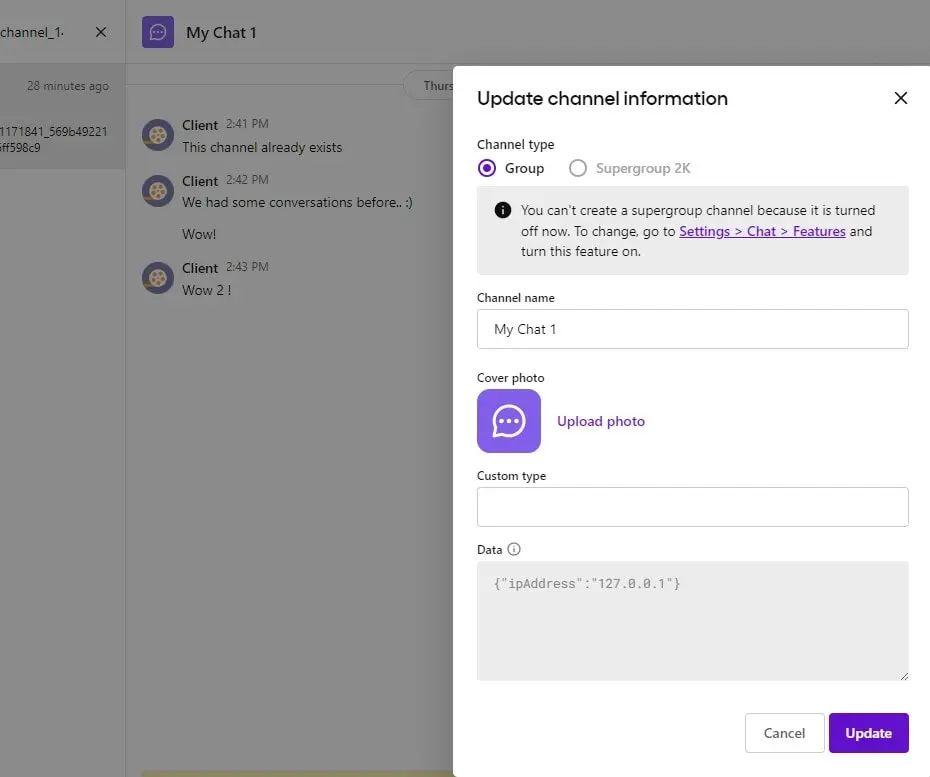
SendBird Panel
We can verify if a channel is properly created and if ipAddress is saved in the metadata of the channel. The details can be found in the Group Channels section.
Slow network
We would like to test if our code also works when having a slow network connection. Before creating a chat channel, we’re waiting for a couple of tasks to be resolved: fetching user IP address and loading the SDK library. When using a fast internet connection, everything works great every time, but asynchronous tasks might be crashing when the order of execution is changed or the waiting time is longer than usual. Let’s perform Network Throttling in Chrome: we’re going to open the Developer Console and simulate the internet connection for Slow 3G. When inspecting Network tab results, let’s make sure that every request is triggered only once and that there are no red errors in the console Tab.
Demo preview
For demo purposes, we’ve recorded an animated GIF screencast to show how the functionality is working.
That’s it for today’s tutorial. Make sure to follow us for other useful guidelines and don’t forget to sign up for our newsletter.


![How to Fight AI Hallucinations About Your Brand [ready-to-use prompt inside]](https://www.createit.com/wp-content/uploads/2026/02/How-to-Fight-AI-Hallucinations-355x200.jpg)


