Slow Docker on Windows WSL2? Here’s a solution

CHALLENGE: Incorrectly configured Docker leads to slow Docker on Windows performance
SOLUTION: Run Docker Windows from Ubuntu 20.04 LTS with WSL2 enabled
Docker Windows performance problems
If you want to use Docker on Windows, the Docker Desktop application needs to be installed. However, installation with default settings usually causes Docker performance poor and not very fast.
One of the more common problems for Developers that use Windows is that the projects with Docker configuration work really slowly, to a point when sometimes a single browser request needs to wait 30-60 seconds to be completed. This is obviously a problem, one that negatively affects project progression and generally makes the life of developers more difficult.
Why is Docker slow on Windows?
The root of the issue is that Windows 10 is (was) using WSL (Windows Subsystem for Linux), which is a layer between Windows and Linux. Communication between these two (Hard Drive operations) can be quite slow
Solution for slow Docker on Windows performance improvement
The suggested solution is:
- use WSL 2 in Windows 10
- and start Docker directly from Ubuntu in Windows
Check out the step-by-step tutorial below. The “WSL 2” feature, released as Windows Update in mid 2020, was designed to increase file system performance and support full system call compatibility. Properly configured Docker and Windows WSL2 will give you really good performance in terms of speed.
Explanation: Windows Subsystem for Linux (WSL) 2 introduces a significant architectural change as it is a full Linux kernel, allowing Linux containers to run natively without emulation. To get the best out of the file system performance when bind-mounting files, we recommend storing the source code in the Linux file system, rather than the Windows file system.
Step 1: ENABLE WSL2 on Windows
A. Enable WSL 2 on your Windows
B. Install Linux on Windows 10 (Ubuntu 20.04 LTS from Microsoft store)
C. Enable WSL 2 on Ubuntu 20.04
D. Install Docker Desktop
E. Enable WSL 2 for Docker
More info: https://www.padok.fr/en/blog/docker-windows-10
Step 2: Install SSH on Ubuntu
We want to enable SSH connection to Ubuntu and we will be using it for local files’ “deployment”. Our goal here is:
– We have a GIT project cloned on the main Windows hard drive (SSD)
– We’re developing using PHPStorm
– PHPStorm Files’ deployment is configured in a way to automatically send files to Ubuntu.
– With this setup, we will instantly see the changes to our code in the browser.
How to configure SSH on Ubuntu:
https://linuxize.com/post/how-to-enable-ssh-on-ubuntu-18-04/
Step 3: Configure PHPStorm Deployment
A. File / Settings / Build, Execution, Deployment – Deployment
B. Click + (to add a new deployment config) – choose SFTP
C. Fill in ‘SSH configuration’
– Host: your Ubuntu public IP
(to find the proper IP address, type the following command in your Ubuntu: ip a)
– User name: your ubuntu username
– Authentication type: Password
– Password: your ubuntu pass
D. Set proper directories mapping in: Deployment / Mappings
E. Deployment / Options:
– find the option ‘Upload change files automatically to the default server’ and set to ‘Always’

Step 4: ssh to Ubuntu, run Docker
A. Open your SSH Client (ex: Cmder ) and connect to Ubuntu using SSH connection:
$ ssh myusername@111.222.33.44
(use your Ubuntu credentials here, we were using the ones in PHPStorm Deployment configuration)
B. Log in to the root account:
$ sudo su
C. Run Docker:
$ docker-compose up -d
Step 5: Connect to the database
- Log into your Docker container:
$ docker exec -it myproject_php bash
$ cd /var/www/html/public/
B. Download MYSQL Client:
$ wget https://github.com/vrana/adminer/releases/download/v4.7.7/adminer-4.7.7-mysql.php
C. Find database credentials (in Docker configuration files), ex:
DATABASE_URL=mysql://root:mypass@mysql:3306/mydatabasename
C. Open the following link in the browser: http://localhost/adminer-4.7.7-mysql.php
Server: mysql
Username: root
Password: mypass
Database name: mydatabasename
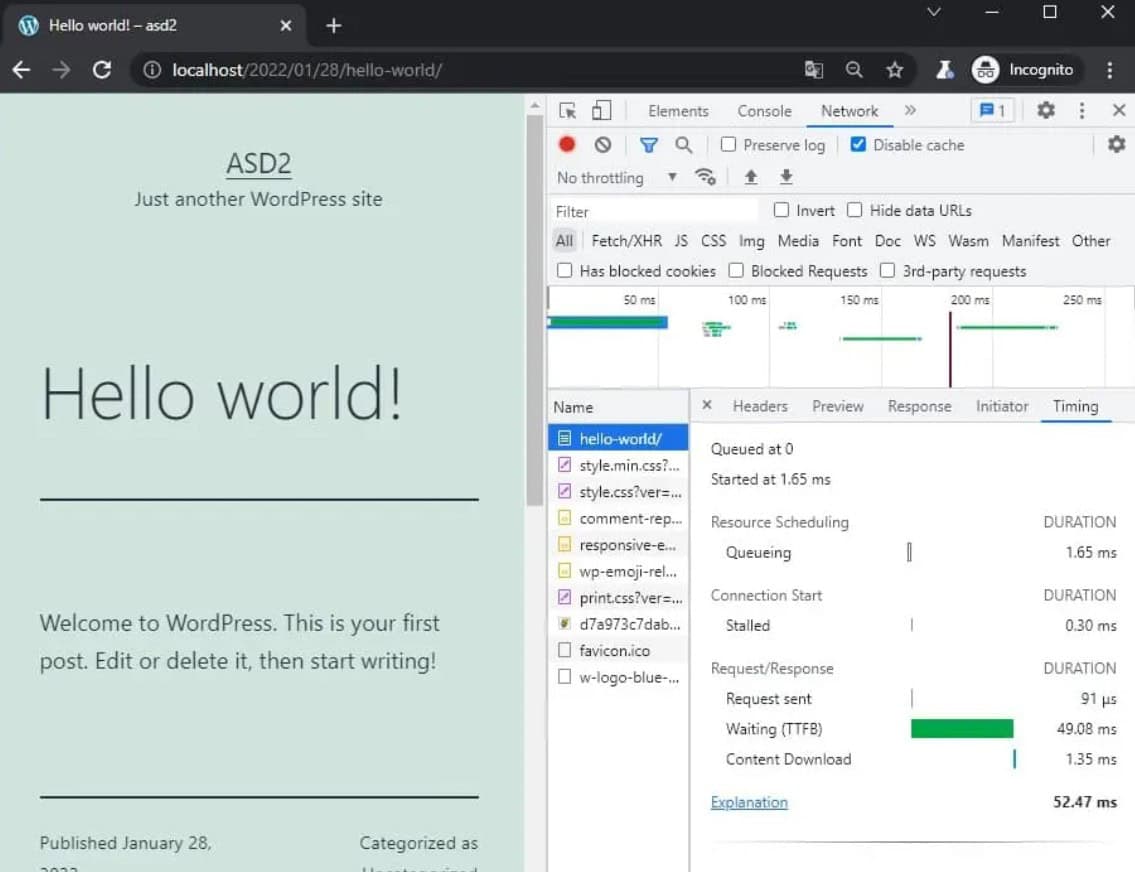
Docker WordPress with 50ms response
Docker on Windows where commands are run from the Ubuntu App has a really good response time. Instead of using emulation, the container runs natively on Linux. A single blog post page in WordPress response (TTFB) is 50ms, which is quite a good result!
This Docker solution is not only for WordPress
This solution for fast Docker in Windows is not only restricted to WordPress CMS. There is no difference if you’re using PHP Symfony, React Node server or Ruby on Rails – you will see the difference in performance speed.
Summary
That’s it. We’ve configured:
– WSL2 on Windows
– Ubuntu Linux on Windows
– PHPStorm Deployment
– Running Docker from Ubuntu
– Have ability to access Docker database
This configuration allows Docker to run really fast. Instead of waiting 60 seconds, now the browser request will run faster than 1 second!
Troubleshooting
* Error after trying to start Docker, ex: ERROR: Encountered errors while bringing up the project.
– always use Ubuntu being logged in as a root:
$ sudo su
* I see an error related to “not sufficient permissions”
– Run Powershell or the SSH Client using the ‘Run as administrator’ option
* I can’t install SSH on Win Ubuntu:
sudo su
apt install openssh-server
service ssh start
service ssh status
If you get the following error: sshd: no hostkeys available – exiting :
https://www.garron.me/en/linux/sshd-no-hostkeys-available-exiting.html
If you get the following error: Permission denied (publickey):
nano /etc/ssh/sshd_config
Find: PasswordAuthentication
Set it to: yes
#and then restart the ssh service:
service ssh restart
https://askubuntu.com/questions/311558/ssh-permission-denied-publickey/881518#881518
* hyper-v is not enabled
To Enable Hyper-V
Enable-WindowsOptionalFeature -Online -FeatureName Microsoft-Hyper-V –All
To Disable Hyper-V
Disable-WindowsOptionalFeature -Online -FeatureName Microsoft-Hyper-V-All
https://www.poweronplatforms.com/enable-disable-hyper-v-windows-10-8/ 1
* Check if hyper-v is enabled:
Run WIN Powershell (with Admin rights) and execute:
$hyperv = Get-WindowsOptionalFeature -FeatureName Microsoft-Hyper-V-All -Online
if($hyperv.State -eq “Enabled”) {
Write-Host “Hyper-V is enabled.”
} else {
Write-Host “Hyper-V is disabled.”
}
Do you need someone to implement this solution for you? Check out our specialists for hire in the outsourcing section.
Are you considering a global project and need custom web application development? Check out our offer!


![How to Fight AI Hallucinations About Your Brand [ready-to-use prompt inside]](https://www.createit.com/wp-content/uploads/2026/02/How-to-Fight-AI-Hallucinations-355x200.jpg)


