Audio in React – display current time
CHALLENGE: get current audio duration time and display
SOLUTION: use the onTimeUpdate event
Having an audio file played, we would like to have the ability to know the current play time. In React, this can be achieved by using the onTimeUpdate event. Knowing currentTime, we need to parse the value and format it using the str_pad_left function. This technique can also be used for streaming audio/video.
The Ontimeupdate event is triggered when the playing position of the file changes. It’s executed every 200-250ms. The event is invoked by playing or moving playback position.
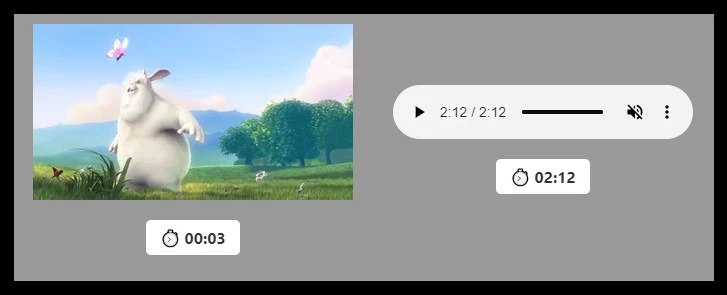
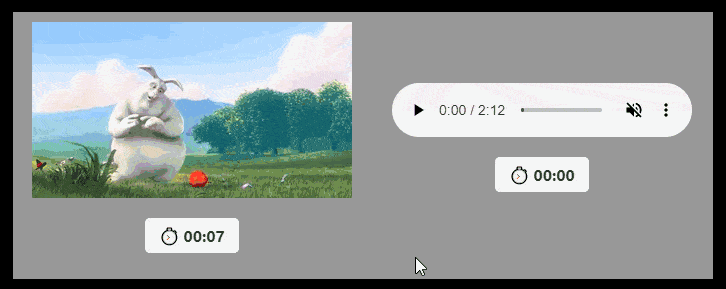
OnTimeUpdate Demo
In our Demo, we’re going to have 2 files embedded and displaying current play time, with live updating. The CurrentStreamTime component uses prop to set current time (updating the parent’s state from the child). We support both audio and video files. We use event.target.currentTime and concatenate minutes and seconds to properly format time.
The main application file:
// src/App.jsx
import React, {useState, useEffect} from 'react';
import './App.css';
import {CurrentStreamTime} from "./CurrentStreamTime";
function App() {
  const[currentTime1, setCurrentTime1] = useState('00:00');
  const[currentTime2, setCurrentTime2] = useState('00:00');
  return (
    <div className="App">
      <div className={'currentTime'}>
        <CurrentStreamTime src={'https://www.w3schools.com/html/mov_bbb.mp4'} type={'video'} setCurrentTime={setCurrentTime1} />
        <p>⏱ {currentTime1}</p>
      </div>
      <div className={'currentTime'}>
        <CurrentStreamTime src={'https://file-examples-com.github.io/uploads/2017/11/file_example_MP3_5MG.mp3'} type={'audio'} setCurrentTime={setCurrentTime2} />
        <p>⏱ {currentTime2}</p>
      </div>
    </div>
  );
}
export default App;
The file with the main component and the onTimeUpdate event handler:
// src/CurrentStreamTime.jsx
import React from 'react';
export const CurrentStreamTime = (props) => {
    const {src, type='audio', setCurrentTime} = props;
    const timeUpdate = (event) => {
        const minutes = Math.floor(event.target.currentTime / 60);
        const seconds = Math.floor(event.target.currentTime - minutes * 60);
        const currentTime = str_pad_left(minutes,'0',2) + ':' + str_pad_left(seconds,'0',2);
        setCurrentTime(currentTime);
    }
    const str_pad_left = (string,pad,length) => {
        return (new Array(length+1).join(pad)+string).slice(-length);
    }
    let htmlTag = '';
    if(type === 'audio') {
        htmlTag = <audio src={src} autoPlay muted controls onTimeUpdate={timeUpdate} />;
    }
    if(type === 'video') {
        htmlTag = <video src={src} autoPlay muted controls loop onTimeUpdate={(event) => {timeUpdate(event)} } />;
    }
    return (
        <>
            {htmlTag}
        </>
    );
}
Additional CSS styles:
body {
  background:#000;
}
.App {
  text-align: center;
  max-width:700px;
  margin:15px auto;
  background:#999;
  display:flex;
  justify-content: center;
  align-items: center;
}
.currentTime {
  border:10px solid transparent;
}
.currentTime p {
  display:inline-block;
  background:#fff;
  padding:7px 14px;
  border-radius:5px;
  font-weight:bold;
  color:#333;
}
Source code
Here is the published source code: https://github.com/createit-dev/107-audio-in-react-display-current-time
To run it:
1) Clone the repo
2) npm install
3) npm start
That’s all for today. Follow us for more useful tips and guidelines.
Do you need someone to implement this React time solution for you? Check out our custom web application development page or our specialists for hire in the outsourcing section.


![How to Fight AI Hallucinations About Your Brand [ready-to-use prompt inside]](https://www.createit.com/wp-content/uploads/2026/02/How-to-Fight-AI-Hallucinations-355x200.jpg)


