Iframe – how to access camera (cross-domain)

CHALLENGE: request access to the camera and microphone within iframe
SOLUTION: use the iframe “allow” parameter
It’s not a rare situation when we want to conduct a video chat in iframe. In a situation when iframe uses a different domain, access to the camera is blocked. To allow access to devices we can use the allow parameter that should be added to iframe.
Solution:
<iframe src=”https://www.example.com” id=”iframe1″ allow=”autoplay; camera; microphone”></iframe>Refresh iframe permissions
Without adding the allow attribute to iframe, the MediaRecorder API will return: Error: permission_denied.
To fix the error, we can add the allow attribute inline, or we can do it dynamically using Javascript. The trick is to reload iframe (change src with query string addition), otherwise, permissions will not be updated.
<script>
    const handleClick = (e) => {
        const d = document.getElementById("iframe1");
        d.setAttribute("allow", "autoplay; camera; microphone");
        // reset MediaRecorder permissions by changing src url
        const iframeUrl = d.getAttribute('src');
        d.setAttribute("src", iframeUrl + '?v=2');
        e.target.appendChild(document.createTextNode(' ✔'));
    }
</script>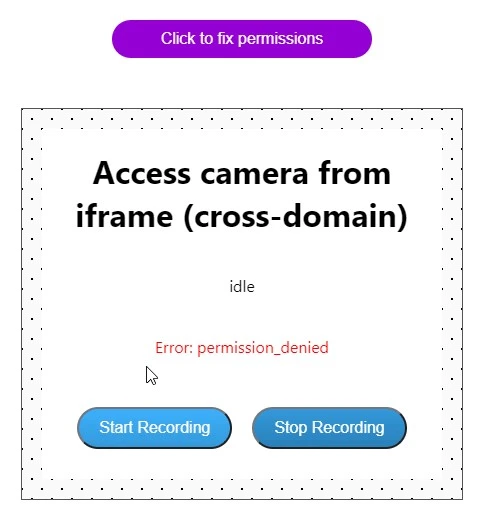
<button onclick="handleClick(event); this.onclick=null;">Click to fix permissions</button>Media Recorder API
For demonstration purposes, we’re going to create a simple React App in iframe that uses Media Recorder to record audio and video. The test page test.html will be hosted on the Netlify server to check the cross-domain ability to access the camera within iframe.
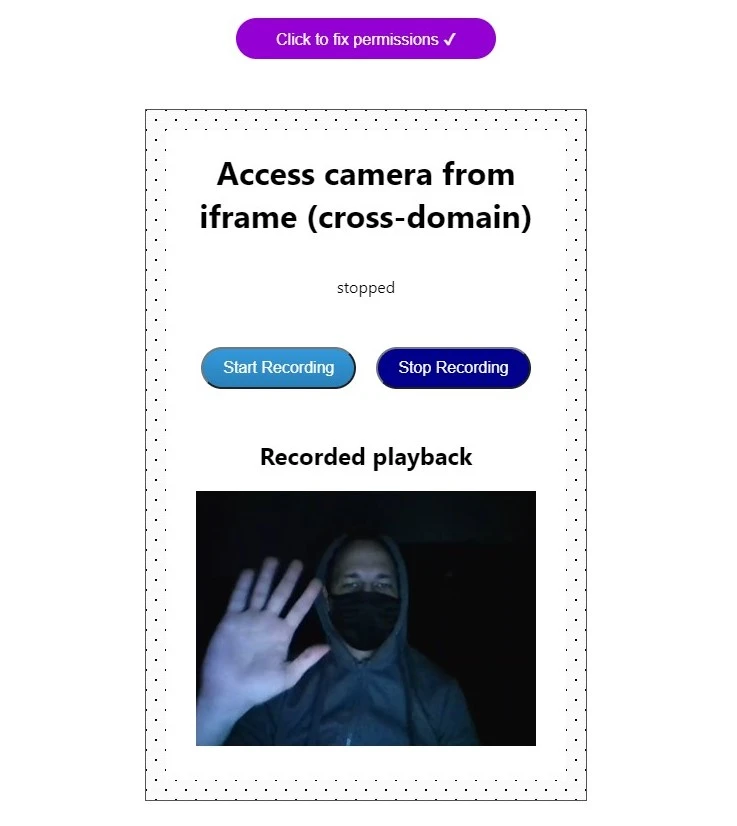
To showcase cross-origin camera access from iframe, our demo will show the recording status as well as 2 buttons for starting and stopping the recording. During recording, we will see a video preview. After stopping, the recorded playback will be played.
Video Recording with preview
Our React application has a button ‘Click to fix permissions’, which will add a proper attribute to iframe. This will solve the issue of accessing camera/microphone within iframe using a different domain. Below is the code used inside iframe. The react-media-recorder is ready to use the component that will help us record the video stream from a laptop camera.
// install dependency
npm install react-media-recorder
The main app is simple, it only includes one component.
// src/App.jsx
import React from 'react';
import './App.css';
import {RecordView} from './RecordView'
function App() {
  return (
    <div className="App">
      <RecordView />
    </div>
  );
}
export default App;
The most important part of the application is here:
// src/RecordView.jsx
import React, {useRef, useEffect} from 'react';
import { ReactMediaRecorder } from "react-media-recorder";
export const RecordView = () => {
    return (
        <div className={'videoContainer bg-pattern bg-light'}>
            <h1 className={'brightBox'}>Access camera from iframe (cross-domain)</h1>
            <ReactMediaRecorder
                video
                render={({ status, startRecording, stopRecording, mediaBlobUrl, previewStream, error }) => (
                    <div>
                        <p className={'brightBox'}>{status}</p>
                        { error && <p className={'brightBox error'}>Error: {error}</p> }
                        <div className={'buttons brightBox'}>
                            <button onClick={startRecording} className={(status === 'recording') ? 'btn active' : 'btn'}>Start Recording</button>
                            <button onClick={stopRecording} className={(status === 'stopped') ? 'btn active' : 'btn'}>Stop Recording</button>
                        </div>
                        { (status === 'stopped') && <><h2 className={'brightBox'}>Recorded playback</h2><div className={'outer'}><video src={mediaBlobUrl} controls autoPlay loop /></div></> }
                        { (status === 'recording') && <><h2 className={'brightBox'}>Live preview</h2><div className={'outer'}><VideoPreview stream={previewStream} /></div></> }
                    </div>
                )}
            />
        </div>
    );
}
export const VideoPreview = ({ stream }) => {
    const videoRef = useRef(null);
    useEffect(() => {
        if (videoRef.current && stream) {
            videoRef.current.srcObject = stream;
        }
    }, [stream]);
    if (!stream) {
        return null;
    }
    return <video ref={videoRef} width={500} height={500} autoPlay controls />;
};
Additional CSS styles:
.App {
  text-align: center;
}
.videoContainer {
  padding:20px;
  border:1px solid #555;
  margin:30px auto;
  max-width:400px;
}
.buttons {
  margin:20px;
}
.buttons button {
  margin:10px;
}
.btn {
  background: #3498db;
  background-image: -webkit-linear-gradient(top, #3498db, #2980b9);
  background-image: -moz-linear-gradient(top, #3498db, #2980b9);
  background-image: -ms-linear-gradient(top, #3498db, #2980b9);
  background-image: -o-linear-gradient(top, #3498db, #2980b9);
  background-image: linear-gradient(to bottom, #3498db, #2980b9);
  -webkit-border-radius: 28;
  -moz-border-radius: 28;
  border-radius: 28px;
  color: #ffffff;
  font-size: 1rem;
  padding: 10px 20px 10px 20px;
  text-decoration: none;
}
.btn:hover {
  background: #3cb0fd;
  background-image: -webkit-linear-gradient(top, #3cb0fd, #3498db);
  background-image: -moz-linear-gradient(top, #3cb0fd, #3498db);
  background-image: -ms-linear-gradient(top, #3cb0fd, #3498db);
  background-image: -o-linear-gradient(top, #3cb0fd, #3498db);
  background-image: linear-gradient(to bottom, #3cb0fd, #3498db);
  text-decoration: none;
}
.btn.active {
   background:darkblue;
   color:#fff;
 }
video {
  width: 100% !important;
  height: auto !important;
}
.bg-light {
  background-color: #fafafa;
}
.bg-pattern {
  background-image: radial-gradient(currentColor 1px, transparent 1px),radial-gradient(currentColor 1px, transparent 1px);
  background-size: calc(20 * 1px) calc(20 * 1px);
  background-position: 0 0,calc(10 * 1px) calc(10 * 1px);
}
.brightBox {
  background:#fff;
  padding:20px 10px;
  margin:0;
}
.outer {
  padding: 0 30px 30px 30px;
  margin: 0;
  background: #fff;
}
.error {
  color:red;
}

Accessing camera from iframe
To test cross-domain permissions to access camera and microphone, we need a test.html page that will include the iframe hosted on an external domain. The simplest solution will be to deploy our React app to Netlify. To do this, we can use, for example: https://example345.netlify.app iframe src. You can also host it on your server.
<!-- public/test.html -->
<html>
<head>
    <style>
        html, body {
            width:100%;
            height:100%;
            margin:0;
            padding:0;
        }
        iframe {
            height:100%;
            width:100%;
            border:0;
        }
        button {
            padding: 10px;
            font-size: 1rem;
            border: 0;
            background: darkviolet;
            margin: 20px auto;
            display: block;
            width: 260px;
            color: #fff;
            border-radius: 25px;
        }
    </style>
    <script>
        const handleClick = (e) => {
            const d = document.getElementById("iframe1");
            d.setAttribute("allow", "autoplay; camera; microphone");
            // reset MediaRecorder permissions by changing src url
            const iframeUrl = d.getAttribute('src');
            d.setAttribute("src", iframeUrl + '?v=2');
            e.target.appendChild(document.createTextNode(' ✔'));
        }
    </script>
</head>
<body>
<button onclick="handleClick(event); this.onclick=null;">Click to fix permissions</button>
<iframe src="https://example345.netlify.app" id="iframe1" ></iframe>
<!-- OR ADD ATTRIBUTE ALLOW INLINE -->
<!-- <iframe src="https://example345.netlify.app" id="iframe1" allow="autoplay; camera; microphone"></iframe> -->
</body>
</html>
Now, go to http://localhost:3001/test.html and test if the camera can record. If you see a red error, use the button: ‘Click to fix permissions’. Now the recording should successfully start!
That’s it for today’s tutorial. Make sure to follow us for other useful tips and guidelines, and don’t forget to sign up for our newsletter.
Do you need someone to implement this iframe solution for you? Check out our specialists for hire in the outsourcing section. Are you considering a global project and need custom web development? Check us!


![How to Fight AI Hallucinations About Your Brand [ready-to-use prompt inside]](https://www.createit.com/wp-content/uploads/2026/02/How-to-Fight-AI-Hallucinations-355x200.jpg)


