reCAPTCHA v3 – WordPress implementation

Challenge: add user-friendly captcha to a WordPress form
Solution: after ajax form submit – connect to the recaptcha siteverify service and get a SPAM score
Website visitors don’t like standard captcha solutions. It’s difficult to solve and not user-friendly. In this tutorial, we will use Google reCaptcha version 3, which is invisible for the user. In the backend, we will get a “SPAM score” for particular interaction. Then, we can decide what to do – save data in the database or display an error. The user doesn’t have to solve a difficult puzzle.
ReCAPTCHA3
The new recaptcha API, version 3, was released in 2018. The script is running adaptive risk analysis in the background to deliver a frictionless user experience. With version 3, we can also assign different “actions” tag to captchas. Having this, we can have a better overview of actions triggered on our website. It is recommended to include the api.js script globally to the website. This allows Google to gather more signals and score user behavior more accurately.
reCAPTCHA3 example
In this tutorial, we will show how to create a WordPress ajax form with recaptcha. The backend part includes SPAM score verification and saving user rating as a custom field (wp_postmeta table).
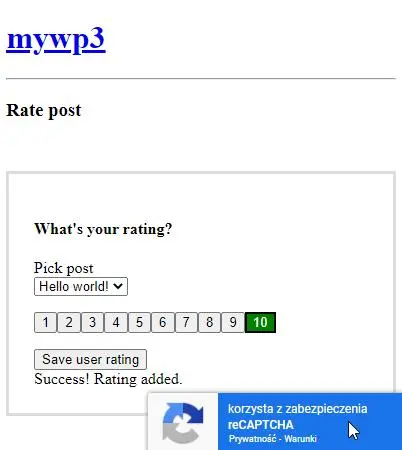
We are going to create an HTML form where the user can rate blog posts (from 1 to 10 points). After clicking ‘Save user rating’– the ajax function will trigger a backend function for saving data. The PHP function send_form() triggers https://www.google.com/recaptcha/api/siteverify , the success response includes a SPAM score (0.0 – 1.0 value). 1.0 is very likely a good interaction, 0.0 is very likely a bot.
Recaptcha async render
On frontend, we need to add a recaptcha api.js script. The async parameter will ensure that script does not block page rendering, and the performance of the website is not affected in a negative way.
/**
 * Add JS file to head
 */
function my_wp_head()
{
    echo '<script async src="https://www.google.com/recaptcha/api.js?render=' . CT_RECAPTCHA_PUBLIC . '"></script>';
}
add_action('wp_head', 'my_wp_head');
Ajax form
A simple Ajax form includes the hidden input “token”, which is filled in, after form submit. This token is used in the backend for SPAM verification. Using the get_posts() function, we display a list of all blog posts. As an alternative, you can also hardcode post_id by using hidden input.
<h3>Rate post</h3>
<form action="<?php echo admin_url( "admin-ajax.php" ); ?>" method="post" name="contact-me" class="js-my-form myForm">
    <div class="ct-loader"></div>
    <h4>What's your rating?</h4>
    <?php
    $posts = get_posts();
    if(!empty($posts)):
        echo '<label>Pick post</label><br>';
        echo '<select name="post_id">';
        echo '<option>--</option>';
        foreach($posts as $post){
            echo '<option value="'. $post->ID .'">'. $post->post_title .'</option>';
        }
        echo '</select>';
    endif;
    ?>
    <?php
    // as alternative - we can hardcode post_id using hidden input
    // <input type="hidden" name="post_id" value="7">
    ?>
    <input type="hidden" name="my_rating" class="js-rating" value="">
    <input type="hidden" name="token" class="js-token" value="">
    <input type="hidden" name="action" class="js-my-action" value="send_my_form">
    <p>
        <?php
        for ($i = 1; $i <= 10; $i++) {
            echo '<button class="js-user-rating btn btn-outline-secondary userButton" data-rating="'. $i .'" >'. $i .'</button>';
        }
        ?>
    </p>
    <button type="submit" class="btn btn-primary js-my-submit">Save user rating</button>
    <div id="my-form-alert" class="alert alert-success" style="display:none;">Success! Rating added.</div>
</form>
recaptcha Javascript
The Javascript part handles clicking on submit button, form submit action. Grecaptcha.ready is ensuring that api.js script is fully loaded (recaptcha API is available, we can proceed).
<script>
    (function($) {
        $(".js-user-rating").click(function(e){
            e.preventDefault();
            const $this = $(this);
            $(".js-user-rating").removeClass("active");
            $this.addClass("active");
            const myRating = $this.data("rating");
            $(".js-rating",".js-my-form").val(myRating);
        });
        $(".js-my-form").submit(function(e){
            e.preventDefault();
            const $form = $(this);
            $form.addClass("loading");
            const myaction = jQuery(".js-my-action", $form).val();
            try{
                grecaptcha.ready(function() {
                    grecaptcha.execute('<?php echo CT_RECAPTCHA_PUBLIC ?>', {action: myaction}).then(function(token) {
                        $(".js-token").val(token);
                        // and call ajax submit !
                        let mydata = $form.serialize();
                        jQuery.ajax({
                            type : "post",
                            dataType : "json",
                            url : "<?php echo admin_url( "admin-ajax.php" ); ?>",
                            data : mydata,
                            success: function(response) {
                                $form.removeClass("loading");
                                if(response.success) {
                                    jQuery("#my-form-alert").show();
                                }
                                else {
                                    jQuery("#my-form-alert").hide();
                                    alert(response.alert)
                                }
                            }
                        })
                    });
                });
            } catch(e){
                // console.log(e);
                // recaptcha library not yet loaded
                alert(e);
            }
        });
    })(jQuery);
</script>
Backend recaptcha verification
The WordPress backend function (wp_ajax) receives a token string from frontend and “action” name. We’re triggering the url: https://www.google.com/recaptcha/api/siteverify
Here is an example response:
"{
  "success": true,
  "challenge_ts": "2023-01-09T13:15:05Z",
  "hostname": "mywp3.local",
  "score": 0.9,
  "action": "send_my_form"
}"
Now we can use the “score” value and decide what to do. The value closer to 0.0 indicates suspicious behavior. The entire backend function for ajax verification:
/**
 * AJAX submit
 */
add_action('wp_ajax_send_my_form', __NAMESPACE__ . 'send_form'); // This is for authenticated users
add_action('wp_ajax_nopriv_send_my_form', __NAMESPACE__ . 'send_form'); // This is for unauthenticated users.

function send_form()
{
    $alertMsg = '';
    if (empty($_POST["post_id"])) {
        $alertMsg = "Post ID required";
    }
    if (!(is_numeric($_POST["my_rating"]))) {
        $alertMsg = "Rating is required";
    }
    if (empty($_POST["token"])) {
        $alertMsg = "Token is required";
    }
    if (empty($_POST["action"])) {
        $alertMsg = "Action is required";
    }
    if ($alertMsg) {
        echo json_encode(array('success' => false, 'alert' => $alertMsg));
        wp_die();
    }
    // 1.0 is very likely a good interaction, 0.0 is very likely a bot
    $g_recaptcha_allowable_score = 0.3;
    $secretKey = CT_RECAPTCHA_SECRET;
    $ip = $_SERVER['REMOTE_ADDR'];
    $user_agent = $_SERVER['HTTP_USER_AGENT'];
    // post request to server
    $url = 'https://www.google.com/recaptcha/api/siteverify';
    $data = array('secret' => $secretKey, 'response' => $_POST["token"]);
    if (isset($ip)) {
        $data['remoteip'] = $ip;
    }
    $options = array(
        'http' => array(
            'header' => "Content-type: application/x-www-form-urlencoded\r\n",
            'method' => 'POST',
            'content' => http_build_query($data)
        )
    );
    $context = stream_context_create($options);
    $response = file_get_contents($url, false, $context);
    $responseKeys = json_decode($response, true);
    //check if the test was done OK, if the action name is correct and if the score is above your chosen threshold (again, I've saved '$g_recaptcha_allowable_score' in config.php)
    if ($responseKeys["success"] && $responseKeys["action"] == $_POST["action"]) {
        if ($responseKeys["score"] >= $g_recaptcha_allowable_score) {
            /**
             * saving to database
             */
            /**
             * Update product with the score
             */
            $postId = intval($_POST["post_id"]);
            $myRating = intval($_POST["my_rating"]);
            if ($res = get_post_status($postId)) {
                // post exists
                // add not-unique post-meta
                add_post_meta($postId, 'my_rating', $myRating, false);
            }
            if ($res) {
                echo json_encode(array('success' => true, 'data' => $response));
            } else {
                echo json_encode(array('success' => false, 'alert' => 'Error 549'));
            }
        } elseif ($responseKeys["score"] < $g_recaptcha_allowable_score) {
            //failed spam test. Offer the visitor the option to try again or use an alternative method of contact.
            echo json_encode(array('success' => false, 'alert' => 'Error 553'));
        }
    } elseif ($responseKeys["error-codes"]) { //optional
        //handle errors. See notes below for possible error codes
        echo json_encode(array('success' => false, 'alert' => 'Error 554'));
    } else {
        //unkown screw up. Again, offer the visitor the option to try again or use an alternative method of contact.
        echo json_encode(array('success' => false, 'alert' => 'Error 556'));
    }
    die();
}
Register to recaptcha-v3
To start with reCAPTCHA, we need to register a new website using https://www.google.com/recaptcha/about/ . After adding your website domains in the configuration, you will get recaptcha keys. Add them to your wp-config.php file:
define( 'CT_RECAPTCHA_PUBLIC', 'XXX' );
define( 'CT_RECAPTCHA_SECRET', 'YYY' );
WordPress setup
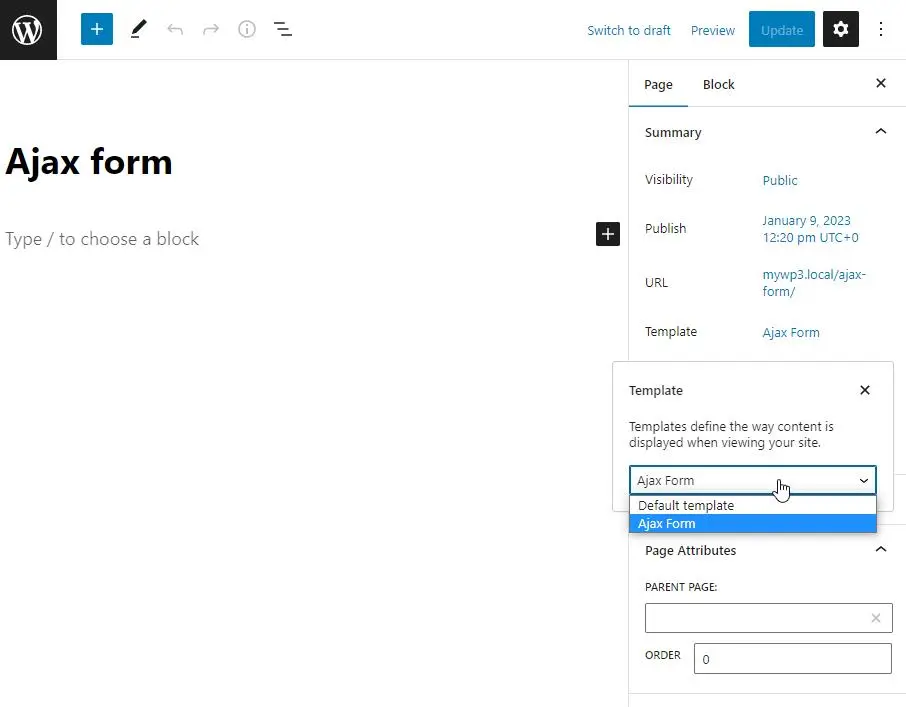
The last step is to display the ajax form. Add a new page, select a new PHP template (name: Ajax Form) for displaying the form.
Submit form with recaptcha-v3
That’s it. Your form should be working now. If SPAM score is higher than 0.3, the value will be saved in the database (wp_postmeta table). Otherwise, an error will be displayed. To adjust the threshold for accepting risk, go to functions.php and change:
$g_recaptcha_allowable_score = 0.3;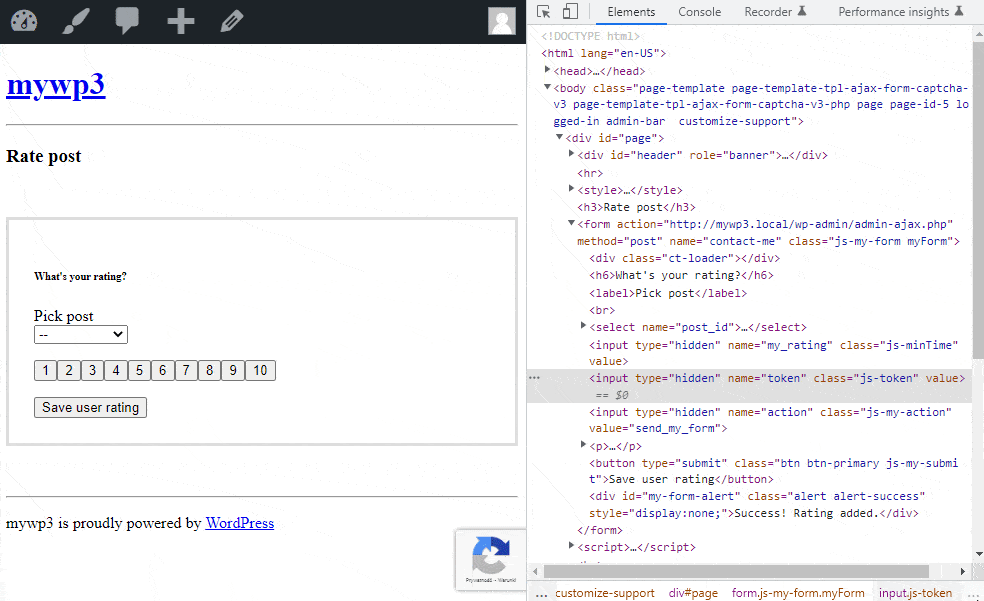
Results verification
How to check if custom-fields are saved in the database? Go to post Preferences and enable the ‘Custom fields’ option. All ratings will be displayed at the bottom of the page (key: my_rating).


Working example
The working source code for WordPress recaptcha (version 3) implementation is available in our github repository: https://github.com/createit-dev/188-recaptcha-v3-wordpress-implementation-b .
Hiding recaptcha badge
In the recaptcha terms of service, Google requires us to display information that a website uses recaptcha. There is a standard badge that is rendered automatically. You can also display a custom message yourself and then hide the normal badge using CSS:
<style>
.grecaptcha-badge {
    visibility: hidden;
}
</style>
Troubleshooting
* I’m getting captcha error: incorrect-captcha-sol
– Make sure that your site domain is added to the recaptcha configuration. If you’re working locally, add localhost to the list. Changes to the domains field may take up to 30 minutes to take effect.
That’s it for today’s tutorial. We are a web development company with experience, that can help you with any project.


![How to Fight AI Hallucinations About Your Brand [ready-to-use prompt inside]](https://www.createit.com/wp-content/uploads/2026/02/How-to-Fight-AI-Hallucinations-355x200.jpg)


