Add buttons in Chat in React

CHALLENGE: create a Chat message with clickable buttons
SOLUTION: use the SendBird SDK and getSendUserMessage
Nowadays, online presence is the key to a successful business. Handling Customer Support or answering frequently asked questions can be time consuming. A chat that can be embedded on a company website is a useful tool that can improve support answer time.
Having a standard chat, we can receive and send messages. What about adding custom data to a message that will render action buttons? That way we can suggest some options to choose from the available list. We will focus on the frontend part (the widget).
Building with SendBird
SendBird, co-headquartered in Seoul, Korea, and San Mateo, California, has now raised around $221 million. Founded in 2013, SendBird offers chat API, which can be used to create Chats. In this tutorial, we will create a chat widget with message buttons.
Chat widget
The fastest way to start the chat will be to use the UIKit for React provided by Sendbird. It renders chat components that can be customized. We’re going to write a custom view for renderChatItem, where action buttons with possible answers will be displayed. After a user clicks a button, the answer will be sent back to the chat. Also check how to optimize message rendering in SendBird chat.
After installing the dependency:
npm install sendbird-uikitWe can prepare the main app view. Make sure to change the APP_ID, USER_ID and CHANNEL_URL.
// App.js
import React from 'react';
import './App.css';
import { Channel, SendBirdProvider } from "sendbird-uikit";
import "sendbird-uikit/dist/index.css";
import {MyCustomChatMessage} from "./MyCustomChatMessage";
const APP_ID = "AAA";
const USER_ID = "BBB";
const CHANNEL_URL = "CCC";
const App = () => (
    <SendBirdProvider appId={APP_ID} userId={USER_ID}>
      <div style={{ height: '500px' }}>
        <Channel
            channelUrl={CHANNEL_URL}
            renderChatItem={({ message, onDeleteMessage, onUpdateMessage }) => (
                <MyCustomChatMessage
                    message={message}
                    onDeleteMessage={onDeleteMessage}
                    onUpdateMessage={onUpdateMessage}
                    channelUrl={CHANNEL_URL}
                />
            )}
        />
      </div>
    </SendBirdProvider>
);
export default App;
The custom message view will remember the button that was clicked. The state is stored in application memory, but it will be lost after browser reload. The user will see buttons in a message and the new message will be sent to the chat by clicking. Our function getParsedData() is parsing message.data to look for additional message information, such as buttons.
// MyCustomChatMessage.jsx
import React, {useState} from 'react';
import {RenderButtons} from "./RenderButtons";
export const MyCustomChatMessage = ({ message, onDeleteMessage, onUpdateMessage, channelUrl }) => {
const safelyParseJSON = (json) => {
// This function cannot be optimised, it's best to
// keep it small!
var parsed;
try {
parsed = JSON.parse(json)
} catch (e) {
// Oh well, but whatever...
return false;
}
return parsed // Could be undefined!
}
const getParsedData = () => {
let data = "";
if(message.messageType === 'file'){
return data;
}
if(message.data !== 'undefined') {
data = safelyParseJSON(message.data);
}
return data;
}
const [activeValue, setActiveValue] = useState( null );
let msg_div_class = 'is-bot-msg';
if(typeof(message.sender) !== 'undefined' && message.sender.nickname === 'Client'){
msg_div_class = 'is-client-msg';
}
if(activeValue != null){
msg_div_class += " is-action-taken";
}
return (
<div className={msg_div_class}>
<div className="msg-content">
{message.message}
<RenderButtons msgData={getParsedData()} message={message} channelUrl={channelUrl} activeValue={activeValue} setActiveValue={setActiveValue} />
</div>
</div>
);
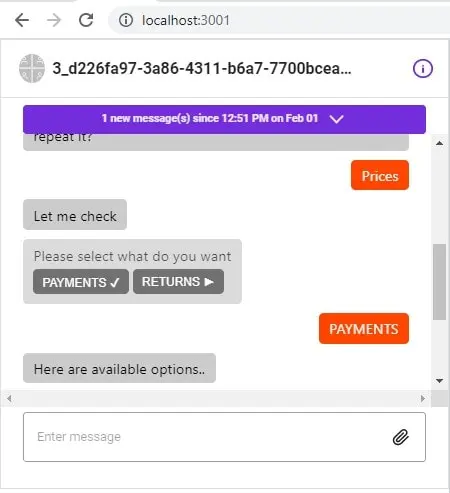
}Rendering buttons
RenderButtons.jsx is expecting messages to have message.data defined and feature the msgButtons key. Example:
“{\”msgButtons\”:[\”PAYMENTS\”, \”RETURNS\”, \”Other\”]}”;
// RenderButtons.jsx
import React, {useState, useEffect} from 'react';
import SendMessageWithSendBird from "./SendMessage";
export const RenderButtons = React.memo((props) => {
    const {msgData, message, channelUrl, activeValue, setActiveValue} = props;
    const keyName = 'msgButtons';
    const[buttonClicked, setButtonClicked] = useState(false);
    const [msgToSent, setMsgToSent] = useState({msg: "", activeValue: msgData.activeValue});
    const handleClick = (btn, index) => {
        setMsgToSent({msg: btn, activeValue: index});
    }
    useEffect(() => {
        if( typeof msgToSent.activeValue !== "undefined"){
            setActiveValue(msgToSent.activeValue);
        }
        return () => {
            setButtonClicked(true);
        };
        // eslint-disable-next-line
    }, [msgToSent]);
    let buttonsRaw = [];
    if(msgData[keyName] !== undefined){
        buttonsRaw = msgData[keyName];
    } else {
        return (
            <></>
        );
    }
    const component = !buttonClicked && msgToSent.msg ? (<SendMessageWithSendBird updateMsgData={{message: message, params: msgToSent.params3}} msg={msgToSent.msg} channelUrl={channelUrl} />) : (<></>);
    return (
        <>
            {buttonsRaw.length > 0 &&
                <span className="d-flex">
                        {buttonsRaw.map((btn, index ) => (
                            <button key={index}  onClick={() => handleClick(btn, index)} type="button">{btn} {(activeValue === index) ? '✔' : '►'}</button>
                        ))}
                    {component}
                    </span>
            }
        </>
    )
});
SendBird Send Message
We need SendMessageWithSendBird implementation to be able to send a message after a user clicks a button. Here is example source code:
// SendMessage.jsx
import React, { useEffect } from "react";
import {
withSendBird,
sendBirdSelectors,
} from "sendbird-uikit";
import "sendbird-uikit/dist/index.css";
const CustomComponent = (props) => {
const {
msg,
channelUrl,
extraData,
sendMessage,
sdk,
} = props;
const sendSelectTypeMessage = (msg, channelUrl, extraData = null) => {
const params = new sdk.UserMessageParams();
if(!msg){
return;
}
params.message = msg;
if(extraData){
params.data = extraData;
}
sendMessage(channelUrl, params)
.then(message => {
})
.catch(e => {
console.warn(e);
});
}
useEffect(() => {
sendSelectTypeMessage(msg, channelUrl, extraData);
});
return(
<></>
);
};
const SendMessageWithSendBird = withSendBird(CustomComponent, (state) => {
const sendMessage = sendBirdSelectors.getSendUserMessage(state);
const updateLastMessage = sendBirdSelectors.getUpdateUserMessage(state);
const sdk = sendBirdSelectors.getSdk(state);
return ({
sendMessage,
updateLastMessage,
sdk
});
});
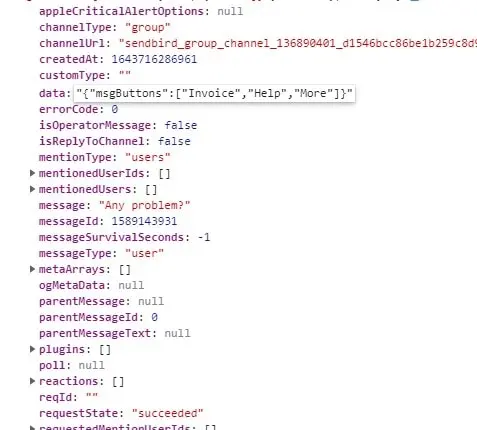
export default SendMessageWithSendBird;How to debug messages
A useful tip for debugging SendBird messages data is to use the UseEffect hook in the message component. On every view render, the developer console will show all parameters attached to the message.
// MyCustomChatMessage.jsx
import React, {useState, useEffect} from 'react';
export const MyCustomChatMessage = ({ message, onDeleteMessage, onUpdateMessage, channelUrl }) => {
    useEffect(() => {
        // debug
        if(message.messageId){
            console.log(message);
        }
    }, [message]);
    // REST OF THE CODE
    (...)

}
Styling chat
The last step is to add some basic styles, so our chat will not look so raw.
/**
index.css
 */
.msg-content {
  display:inline-block;
  background:transparent;
  border-radius:5px;
  padding:6px 12px;
  margin:5px 0;
}
.msg-content button{
  cursor:pointer;
  display:inline-block;
  border:0;
  border-radius:5px;
  background:#333;
  color:#fff;
  padding:5px 10px;
  margin:5px 5px 5px 0;
}
.is-bot-msg {
  text-align:left;
}
.is-bot-msg .msg-content {
  background:#ccc;
}
.is-client-msg {
  text-align:right;
}
.is-client-msg .msg-content {
  background:orangered;
  color:#fff;
}
.d-flex {
  display:flex;
}
.is-action-taken {
  opacity:0.7;
  pointer-events: none;
  cursor:not-allowed;
}
Create ChatBOT
We can use automation to optimize customer support. Having a BOT that can answer frequently asked questions and provide possible answers by rendering buttons can improve response time.
Implementing BOTs is possible with SendBird. The first step will be to use the Platform API and to authenticate. The Webhook which is configured in panel settings will receive Client messages. Then, we can process it and send answers using the Bot Interface. More info available in the following tutorial provided by SendBird: https://sendbird.com/developer/tutorials/chatbot-google-dialogflow
That’s it for today. Be sure to follow us for other tips and guidelines and don’t forget to sign up for our newsletter.


![How to Fight AI Hallucinations About Your Brand [ready-to-use prompt inside]](https://www.createit.com/wp-content/uploads/2026/02/How-to-Fight-AI-Hallucinations-355x200.jpg)


