Chat with datepicker

CHALLENGE: allow a chat member to pick a date using datepicker and send a response
SOLUTION: use the react-datepicker package and the SendMessageWithSendBird component
Nowadays, chatbots are getting more and more popular. Bots follow sets of rules and scenarios to quickly provide information to Customers, including discounts, shipping costs or refunds. Instead of hiring additional Customer Service members, ChatBots can handle most of the frequently asked questions.
Of course, bots are not perfect and Customers are confronted with many issues. For example, a question asked in plain language may not be properly processed and we can get a response: “Sorry, I don’t understand. Could you rephrase your question”.
Picking the date in the chat
Regarding User Experience, chats are getting better. They offer predefined options to pick from, or introduce Machine Learning to develop understanding of questions asked in the natural language.
What about asking a Chat Member about picking a date for scheduling package delivery or booking a meeting? How could we handle this? We can ask a user to send a preferred date via a Chat Message, but this can be sent in any format, like: 29 June 2022, 2022/06/29, 29-6-2022, 29.06.2022, June-29 etc. This is not the perfect solution for storing a date in a database.
In this tutorial we’re going to add a datepicker to chat and allow a chat member to pick a preferred date from the calendar view. The user will see months and days of the week. After choice confirmation, the date in the predefined format will be sent to the Chat.

Datepicker with SendBird
SendBird offers messaging-as-a-service. Founded in 2013, it provides the chat API and the backend for apps enabling real-time communication. You can build your own chat on top of SendBird API. This example is a real React application built with SendBird, and it includes Datepicker component implementation.
React-datepicker
React-datepicker NPM package seems like a good choice, with over 1 million downloads weekly, it is one of the most popular datepicker packages on the market. Another benefit of using it is the extended Demo page with many usage examples: https://www.npmjs.com/package/react-datepicker
After adding a package to package.json we can activate the datepicker with a couple of lines of code:
<DatePicker
    selected={startDate}
    onChange={(date) => setStartDate(date)}
    inline
/>
Channel renderCustomMessage
When customizing the SendBird chat, a clever solution is to use the renderCustomMessage method. By doing it, all original styling and functionality will stay the same, only a particular type of message render will be overwritten. In our situation, we’re going to keep all other type of messages without change. Only the datepicker will have custom rendering.
<Channel
    channelUrl={currentChannelUrl}
    renderCustomMessage={(message, channel) => {
      if (message.customType === 'datepicker' || message.message === 'datepicker') {
        return (
            displayDatePicker(setChoiceCompleted, setMsgToSent, message)
        )
      }
    }}
/>
It’s worth to mention that renderCustomMessage can’t have a React Component as the returned value, so we need to use a normal function as a wrapper for adding Datepicker:
export const displayDatePicker = (setChoiceCompleted, setMsgToSent, message) => {
    return () => (
        <RenderDatepicker setChoiceCompleted={setChoiceCompleted} setMsgToSent={setMsgToSent} message={message} />
    );
}
Javascript date formatting
We have multiple options for sending a date in a message. Date object provides different methods to display the full date. Here are examples:
const today = new Date();
today.toDateString(); // Tue Mar 01 2022
today.toISOString(); // 2022-03-01T13:20:46.743Z
today.toUTCString(); // Tue, 01 Mar 2022 13:20:46 GMT
today.toLocaleDateString(); // 1.03.2022
date-fns library
date-fns, the npm library for manipulating javascript dates, called itself ‘lodash for dates’. We will use it only for one purpose – to display the formatted date as button text, for example: I’m picking 12-01-2022.
Storing choice in localStorage
Once user picked the date – will be nice to remember his choice. We’re using browser localStorage to save the date object, the key value is the unique messageID. Once the “I’m picking date” button is clicked, CSS class is applied and the date can’t be picked anymore. Also, after browser refresh, we will see the saved date in the calendar view.
Example data stored in the browser (localStorage):
( message.messageID → pickedDate.toISOString() )
1653910041 → 2022-03-27T13:24:19.000Z
Trigger datepicker
This tutorial focuses on the frontend part – chat in React, but we need to somehow trigger the displaying of datepicker to the user. In our example, we can type the message: datepicker, and our function will be forced to render.
if (message.customType === 'datepicker' || message.message === 'datepicker') {
        return (
            displayDatePicker(setChoiceCompleted, setMsgToSent, message)
        )
}
We will also have backend part in the production application. The backend application will use webhooks to receive messages from the chat, and the API Platform to generate responses. For example: backend will prepare a message with message.customType, called datepicker, and this will be a signal for the React Chat to render a calendar with the option to pick a date.
SendBird UIKit – datepicker in the chat
Here is the full Demo. In our example, Datepicker will be rendered as an inline element. The chat member needs to complete 2 steps: first, select the preferred date, and second, click the button to confirm the choice. That will ensure that the user selected the date on purpose, and hasn’t clicked it by mistake.
We’re using the SendBird UIKit for React with one customization: renderCustomMessage will detect that the message custom type is ‘datepicker’ and render the calendar for picking a day. Another component called withSendBird is responsible for sending the final date as a chat message.
The first step is to install dependencies:
npm install react-datepicker
npm install date-fns
npm install sendbird-uikit
The Main app displays Channel List. Setting DEFAULT_CHANNEL_URL as active one.
// App.jsx
import React, {useState, useEffect, useCallback} from 'react';
import {
    SendBirdProvider,
    Channel,
    ChannelList
} from 'sendbird-uikit';
import "sendbird-uikit/dist/index.css";
import './App.css';
import {displayDatePicker} from "./RenderDatepicker";
import SendMessageWithSendBird from "./SendMessage";
/**
 * Configuration
 */
const APP_ID = "AAA";
const USER_ID = "BBB";
const DEFAULT_CHANNEL_URL = "CCC";
export default function App() {
    const channelSort = useCallback((channels) => { // useCallback to memoize the fn
        if (channels.length === 0) {
            return channels;
        }
        const channel = channels.find(c => c.url === DEFAULT_CHANNEL_URL);
        if (!channel) {
            return channels;
        }
        const otherChannels = channels.filter(c => c.url !== channel.url);
        otherChannels.sort(function (a, b) {
            if (a.name < b.name) {
                return -1;
            }
            if (a.name > b.name) {
                return 1;
            }
            return 0;
        });
        return [channel, ...otherChannels];
    }, []);
    const [msgToSent, setMsgToSent] = useState({
        msg: "",
        msgType: "",
        isSilent: false,
        extraData: "",
        readyToSend: false
    });
    const [choiceCompleted, setChoiceCompleted] = useState(false);
    const [currentChannelUrl, setCurrentChannelUrl] = useState("");
    useEffect(() => {
        return () => {
            /**
             * reset state
             */
            setMsgToSent({...msgToSent, readyToSend: false});
            setChoiceCompleted(false);
        };
        // eslint-disable-next-line
    }, [choiceCompleted]);
    useEffect(() => {
        return () => {
            setChoiceCompleted(true);
        };
        // eslint-disable-next-line
    }, [msgToSent]);
    const component = (!choiceCompleted && msgToSent.readyToSend) ? (
        <SendMessageWithSendBird extraData={msgToSent.extraData} msg={msgToSent.msg} isSilent={msgToSent.isSilent}
                                 customType={msgToSent.msgType} channelUrl={currentChannelUrl}/>) : (<></>);
    return (
        <div className="App">
            <SendBirdProvider appId={APP_ID} userId={USER_ID} theme={'light'}>
                <div style={{display: 'flex',  flexDirection: 'column', height: '100%'}}>
                    <ChannelList
                        sortChannelList={channelSort}
                        onChannelSelect={(channel) => {
                            if (channel && channel.url) {
                                setCurrentChannelUrl(channel.url);
                            }
                        }}
                    />
                    <Channel
                        channelUrl={currentChannelUrl}
                        renderCustomMessage={(message, channel) => {
                            if (message.customType === 'datepicker' || message.message === 'datepicker') {
                                return (
                                    displayDatePicker(setChoiceCompleted, setMsgToSent, message)
                                )
                            }
                        }}
                    />
                </div>
                {component}
            </SendBirdProvider>
        </div>
    );
}
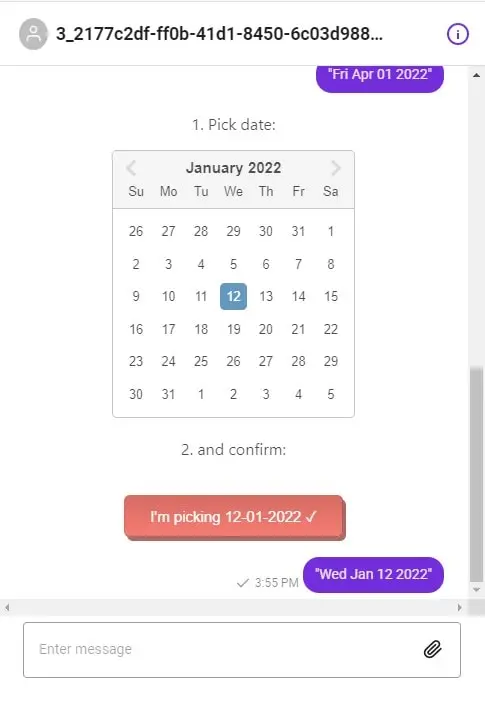
Our datepicker component renders 2 steps: a calendar for picking a date and a confirm button.
// src/RenderDatepicker.jsx
import React, {useState} from 'react';
import { format } from 'date-fns';
import DatePicker from 'react-datepicker';
import "react-datepicker/dist/react-datepicker.css";
export const RenderDatepicker = (props) => {
    const {setChoiceCompleted, setMsgToSent, message} = props;
    const localStorageDate = localStorage.getItem(message.messageId);
    const initialDate = localStorageDate ? new Date(localStorageDate) : new Date();
    const [startDate, setStartDate] = useState(initialDate);
    const handleConfirm = () => {
        setChoiceCompleted(false);
        let extraData = {
            choices: [startDate],
        };
        const fullDate  = startDate.toISOString();
        const formattedDate  = startDate.toDateString();
        localStorage.setItem(message.messageId, fullDate);
        const extraData2 = JSON.stringify(extraData);
        const msg = JSON.stringify(formattedDate);
        setMsgToSent({msg: msg,msgType: "date", isSilent: true, extraData: extraData2, readyToSend: true});
    }
    return (
        <div className={(localStorageDate) ? 'is-already-taken' : ''}>
            <p>1. Pick date:</p>
            <DatePicker
                selected={startDate}
                onChange={(date) => setStartDate(date)}
                inline
            />
            <p>2. and confirm:</p>
            <span>
                <button className={'myButton mb1'} onClick={() => handleConfirm()} >{"I'm picking " + format(startDate, "dd-MM-yyyy")} {(localStorageDate) ? "✓" : "⮞" }</button>
            </span>
        </div>
    );
};
export const displayDatePicker = (setChoiceCompleted, setMsgToSent, message) => {
    return () => (
        <RenderDatepicker setChoiceCompleted={setChoiceCompleted} setMsgToSent={setMsgToSent} message={message} />
    );
}
And finally styles for making app 100% window height, button styling and “disabling” the datepicker once the confirm button is clicked (is-already-taken CSS class):
.App {
  text-align: center;
}
html, body, #root, .App {
  height:100%;
}
.myButton{
  font-size:15px;
  width:auto;
  padding:10px 25px;
  border-width:1px;
  color:#fff;
  border-color:#d02718;
  font-weight:normal;
  border-radius: 6px;
  box-shadow: 3px 4px 0px 0px #8a2a21;
  background:linear-gradient(#c62d1f, #f24437);
  margin:20px 0;
}
.myButton:hover {
  background: linear-gradient(#f24437, #c62d1f);
}
.is-already-taken {
  opacity:0.7;
  pointer-events: none;
}
App configuration
Make sure to fill in the config data. APP_ID is the application identifier from the SendBird panel. USER_ID is the chat member ID number, and the DEFAULT_CHANNEL_URL is the full channel url we would like to display, for example: sendbird_group_channel_XXXXXX_YYYYYYYYYY
// App.jsx
/**
 * Configuration
 */
const APP_ID = "AAA";
const USER_ID = "BBB";
const DEFAULT_CHANNEL_URL = "CCC";
Datepicker options
The “React Date Picker” Plugin offers multiple configuration options: we can display time, customize the look of most of the elements, add localization for our language, add a custom CSS class, use date range to select days between 2 dates, filter dates or times, add a dropdown for months and many more. The available configuration options for reactdatepicker can be found in the official documentation: https://reactdatepicker.com/
Adding timepicker
At this point, the addition of a timepicker (the ability to pick the exact hour of the meeting) is easy to implement. We only need to add a couple of modifications to our code. First, the format of the formattedDate variable, which is used for sending the message, needs to be changed to include time. Second, the modification is to add options to datepicker to render a list of hours to pick from.
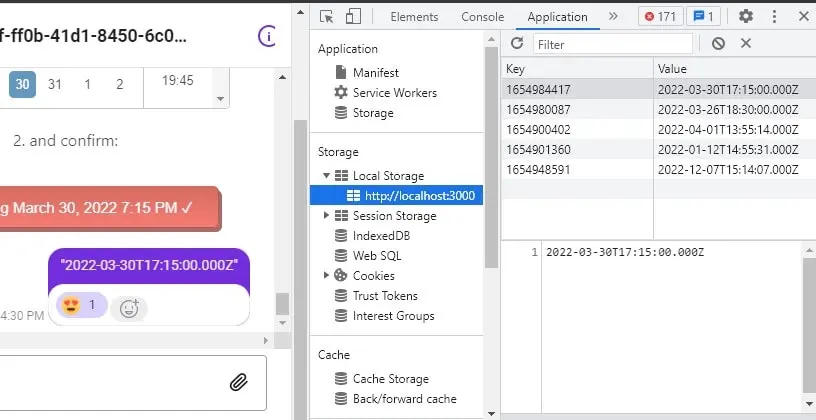
It’s worth to mention that the toISOString() method returns a string in a simplified extended ISO format (ISO 8601), which is always 24 or 27 characters long (YYYY-MM-DDTHH:mm:ss.sssZ or ±YYYYYY-MM-DDTHH:mm:ss.sssZ, respectively). The timezone is always zero UTC offset, as denoted by the suffix “Z”.
Example:
Picked date: March 30, 2022 7:15 PM
Message sent: 2022-03-30T17:15:00.000Z
And that’s a totally correct value, because in Poland we have the UTC+2h timezone ( from 2022-03-27 to 2022-10-30 ). To sum up, whatever timezone the user is using, we will get a normalized time that follows UTC time.
// src/RenderDatepicker.jsx
// adding timepicker to datepicker
// SendBird UIKit - datepicker in the chat
export const RenderDatepicker = (props) => {
    const handleConfirm = () => {
        (...)
        // send message using full format (with time)
        const formattedDate  = startDate.toISOString();
        (...)
    }
    return (
        <div className={(localStorageDate) ? 'is-already-taken' : ''}>
            <p>1. Pick date:</p>
            <DatePicker
                selected={startDate}
                onChange={(date) => setStartDate(date)}
                inline
                showTimeSelect
                timeFormat="HH:mm"
                timeIntervals={15}
                timeCaption="time"
                dateFormat="MMMM d, yyyy h:mm aa"
            />
            <p>2. and confirm:</p>
            <span>
                <button className={'myButton mb1'} onClick={() => handleConfirm()} >{"I'm picking " + format(startDate, "MMMM d, yyyy h:mm aa")} {(localStorageDate) ? "✓" : "⮞" }</button>
            </span>
        </div>
    );
};
That’s it for today’s tutorial. Make sure to follow us for other useful tips and guidelines, and don’t forget to subscribe to our newsletter.


![How to Fight AI Hallucinations About Your Brand [ready-to-use prompt inside]](https://www.createit.com/wp-content/uploads/2026/02/How-to-Fight-AI-Hallucinations-355x200.jpg)


